1. Introduction
Thank you for choosing the Aqualux Doseco Peristaltic pH Minus Dosing Pump. This manual provides essential information for the safe and efficient installation, operation, and maintenance of your dosing pump. Please read this manual thoroughly before use and retain it for future reference.
The Aqualux Doseco pump is designed to regulate the pH level in swimming pools up to 65 m³, ensuring optimal water quality for comfort and disinfection efficiency. It features a peristaltic dosing mechanism with a flow rate of 0.8 l/h.
2. Safety Information
Always observe the following safety precautions to prevent injury or damage to the equipment.
- Chemical Handling: Always wear appropriate personal protective equipment, including gloves and eye protection, when handling pH minus solutions. Refer to the chemical manufacturer's safety data sheet for specific handling instructions.
- Storage: Store the dosing pump and all chemicals out of reach of children and pets. Keep chemicals in their original, properly labeled containers.
- Electrical Installation: Electrical installation should only be performed by a qualified professional to prevent electric shock hazards. Ensure the power supply matches the pump's requirements and that proper grounding is in place.
- Water Quality: This pump is designed for use with pH minus liquid solutions only. Do not use with other chemicals unless explicitly stated by the manufacturer.
- Maintenance: Disconnect the pump from the power supply before performing any maintenance or cleaning.
3. Product Overview and Package Contents
The Aqualux Doseco pump is a peristaltic dosing system designed for precise pH regulation in swimming pools. Its simple design allows for easy adjustment and reliable operation.
3.1 Key Features
- Peristaltic Dosing Technology: Ensures accurate and consistent dosing of pH minus solution.
- Adjustable pH Setpoint: Easy adjustment of the target pH range (7.2 to 7.4) via a single button.
- Compact Design: Simple installation with a wall-mounting bracket.
- Optimized Water Balance: Helps maintain stable pH for clean, healthy water and enhanced swimmer comfort.
3.2 Package Contents
Verify that all components are present and undamaged upon unpacking.

Figure 1: Aqualux Doseco pH Minus Dosing Pump and included accessories. This image shows the blue dosing pump unit, clear tubing, power cable, pH probe, buffer solution, mounting bracket, and various connectors.
- 1 x Aqualux Doseco Peristaltic pH Minus Dosing Pump
- 1 x User Manual (this document)
- Mounting accessories (e.g., wall bracket, screws)
- pH Probe
- Tubing for chemical suction and injection
- Buffer solution for pH probe calibration
Note: Collars for the probe and injector connections to the pipework are not supplied and must be purchased separately.
4. Setup and Installation
Proper installation is crucial for the optimal performance and longevity of your dosing pump. If you are unsure about any step, consult a qualified professional.
4.1 Site Selection
- Install the pump in a dry, well-ventilated area, protected from direct sunlight and extreme temperatures.
- Ensure easy access for maintenance and chemical replenishment.
- Mount the pump above the chemical container to prevent siphoning.
4.2 Mechanical Installation
- Mounting the Pump: Use the provided mounting bracket and screws to securely fix the pump to a vertical surface near your pool's filtration system.
- Installing the pH Probe:
- The pH probe should be installed in the pool's circulation pipework, after the filter and heater, and before any chemical injection points (e.g., chlorine).
- Use a suitable probe collar (not supplied) to create a secure, watertight connection in the pipe.
- Ensure the probe tip is fully immersed in the water flow.
- Installing the Injector:
- The chemical injector should be installed in the pool's circulation pipework, after the pH probe and any other sensors, and before the water returns to the pool.
- Use a suitable injector collar (not supplied) to create a secure, watertight connection.
- Ensure the injector nozzle is positioned to allow for proper dispersion of the pH minus solution.
- Connecting the Tubing:
- Connect one end of the suction tubing to the pump's suction inlet and the other end to the bottom of your pH minus chemical container. Ensure the tubing reaches the bottom of the container.
- Connect one end of the injection tubing to the pump's injection outlet and the other end to the chemical injector installed in the pipework.
- Ensure all tubing connections are tight and secure to prevent leaks or air ingress.
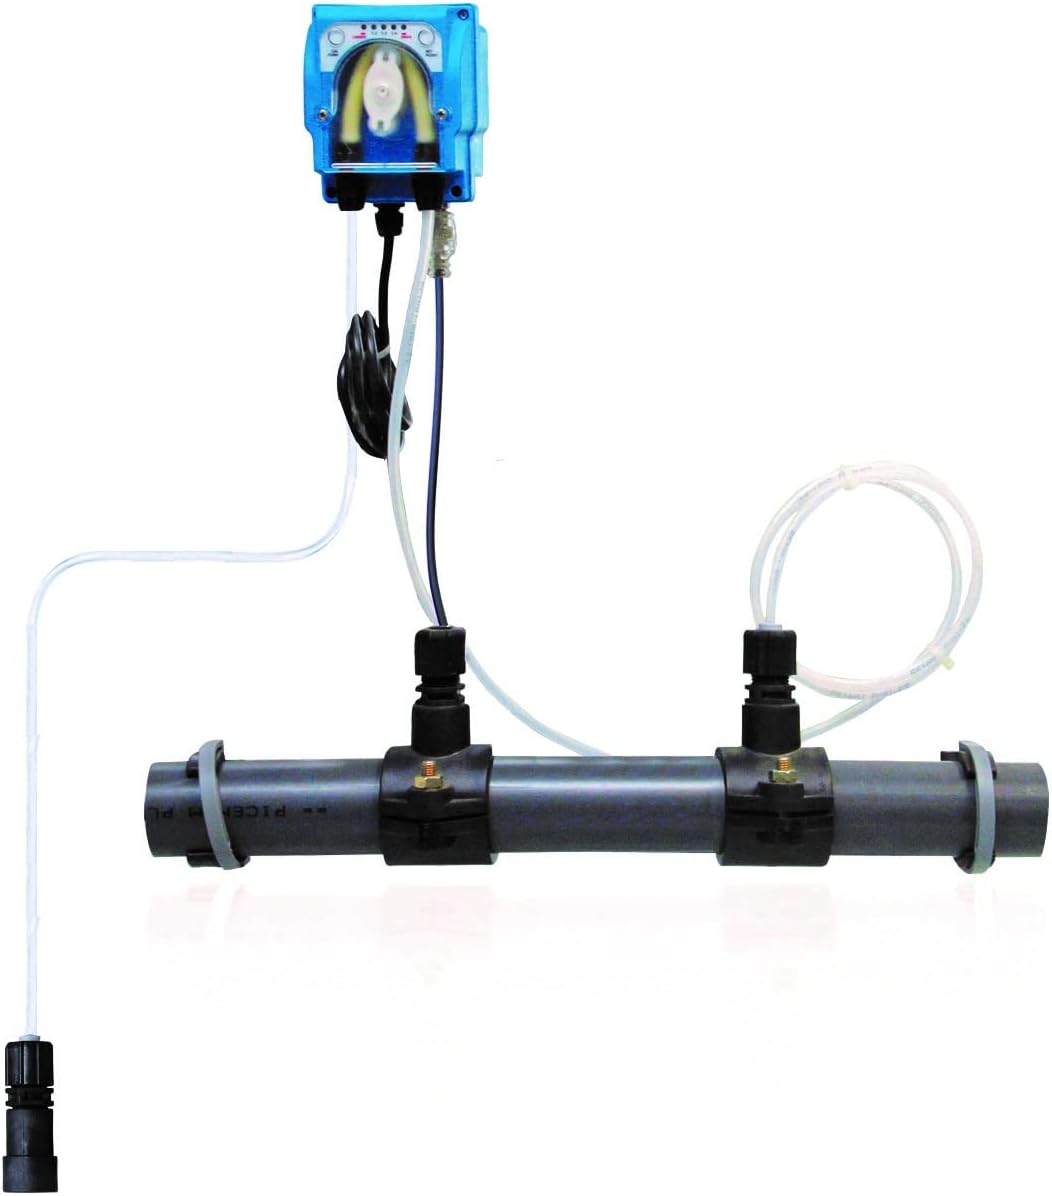
Figure 2: Example installation of the Aqualux Doseco pump with pH probe and injector connected to the pool's circulation pipework. This image illustrates the pump mounted above a pipe, with the pH probe and injector integrated into the pipe system, and tubing connecting them to the pump and a chemical container (not fully visible).
4.3 Electrical Connection
WARNING: Electrical installation must be performed by a qualified electrician.
- Connect the pump's power cable to a suitable, grounded electrical outlet.
- Ensure the power supply is protected by a Residual Current Device (RCD) or Ground Fault Circuit Interrupter (GFCI).
- Connect the pH probe cable to the designated input on the dosing pump.
5. Operation
5.1 Initial Start-up and Calibration
- Power On: Plug in the pump and switch on the power. The pump's indicator lights should illuminate.
- pH Probe Calibration:
- Remove the pH probe from the pipework (if already installed) and rinse it with distilled water.
- Immerse the probe in the provided pH buffer solution (e.g., pH 7.0 or pH 7.2).
- Follow the pump's specific calibration procedure (refer to the pump's display or indicator lights for instructions, typically involving pressing and holding a calibration button until stable).
- Once calibrated, rinse the probe again and reinstall it in the pipework.
5.2 Setting the pH Setpoint
The Aqualux Doseco pump allows for easy adjustment of the target pH level, typically within a range of 7.2 to 7.4.
- Locate the adjustment button or dial on the pump's control panel.
- Press or turn the control to select your desired pH setpoint (e.g., 7.2).
- The pump will automatically monitor the pool's pH and inject pH minus solution when the measured pH exceeds the setpoint.
5.3 Normal Operation
Once installed and calibrated, the pump operates automatically. It will activate when the pH level rises above the setpoint and deactivate once the target pH is reached.
- Regularly check the pH level of your pool water using a separate test kit to verify the pump's accuracy.
- Ensure there is always sufficient pH minus solution in the chemical container.
- Monitor the pump's indicator lights for any error messages or operational status.
6. Maintenance
Regular maintenance ensures the longevity and accurate performance of your Aqualux Doseco pump.
6.1 Routine Checks (Weekly/Bi-weekly)
- Chemical Level: Check the level of pH minus solution in the container and refill as needed.
- Tubing: Inspect all tubing for kinks, cracks, or blockages. Ensure connections are secure.
- pH Probe: Visually inspect the pH probe for any deposits or damage. Clean gently if necessary (see 6.2).
- Pump Operation: Observe the pump during its dosing cycle to ensure smooth operation and no unusual noises.
6.2 pH Probe Cleaning and Calibration (Monthly/Seasonally)
- Disconnect the pump from power.
- Remove the pH probe from the pipework.
- Gently clean the probe tip with a soft brush and a mild cleaning solution specifically designed for pH probes, or a dilute acid solution (e.g., vinegar) to remove calcium deposits. Rinse thoroughly with distilled water.
- Recalibrate the pH probe using fresh buffer solutions as described in Section 5.1.
- Reinstall the probe.
6.3 Peristaltic Tube Replacement (Annually or as needed)
The peristaltic tube is a wear-and-tear component. Its lifespan depends on usage and chemical concentration. Replace it if you notice reduced dosing efficiency or signs of wear.
- Disconnect the pump from power.
- Open the pump housing to access the peristaltic head.
- Carefully remove the old peristaltic tube and install a new, genuine Aqualux replacement tube.
- Close the pump housing and reconnect power.
7. Troubleshooting
This section provides solutions to common issues. For problems not listed here, contact Aqualux customer support.
| Problem | Possible Cause | Solution |
|---|---|---|
| Pump not dosing / pH not decreasing |
|
|
| pH reading is inaccurate |
|
|
| Pump running continuously |
|
|
8. Technical Specifications
| Parameter | Value |
|---|---|
| Model | Doseco |
| Brand | Aqualux |
| Pump Type | Peristaltic Dosing Pump |
| Flow Rate | 0.8 l/h |
| Max Pool Volume | Up to 65 m³ |
| pH Adjustment Range | 7.2 to 7.4 |
| Power Source | Electric Cable |
| Material | Plastic |
| Color | Blue |
| Item Weight | 1 Kilogram |
| Country of Origin | Italy |
| Specific Use | Pool Maintenance |
| Spare Parts Availability (EU) | 6 Years |
9. Warranty and Support
For warranty information, please refer to the terms and conditions provided at the point of purchase or contact Aqualux customer service. Keep your proof of purchase for any warranty claims.
For technical support, spare parts, or further assistance, please contact Aqualux directly or your authorized dealer. Contact details can typically be found on the manufacturer's website or on the product packaging.