1. Introduction and Overview
This manual provides essential information for the proper setup, operation, and maintenance of your Yamaha A-S1200 Integrated Amplifier. Please read these instructions thoroughly before using the unit to ensure optimal performance and longevity.
The Yamaha A-S1200 is an integrated amplifier designed to deliver high-fidelity audio. It features a robust construction and a design that incorporates elements from classic audio equipment, including level meters.

Figure 1: Front view of the Yamaha A-S1200 Integrated Amplifier, showcasing its controls and level meters.
2. Package Contents
Verify that all items listed below are included in the package:
- Yamaha A-S1200 Integrated Amplifier
- Remote Controller
- Power Cord
- User Manual (this document)

Figure 2: The included remote controller for the A-S1200 amplifier.
3. Key Features
The Yamaha A-S1200 Integrated Amplifier incorporates several design and engineering elements to enhance audio reproduction:
- High-Quality Components: Utilizes premium components for accurate sound reproduction.
- Toroidal Power Transformer: Provides stable and ample power for dynamic audio performance.
- Analog Level Meters: Visually indicates audio signal levels, adding a classic aesthetic.
- Floating Balanced Power Amplifier: Designed to minimize noise and improve channel separation.
- Mechanical Ground Concept: Maximizes rigidity to reduce unwanted vibrations and enhance bass response.
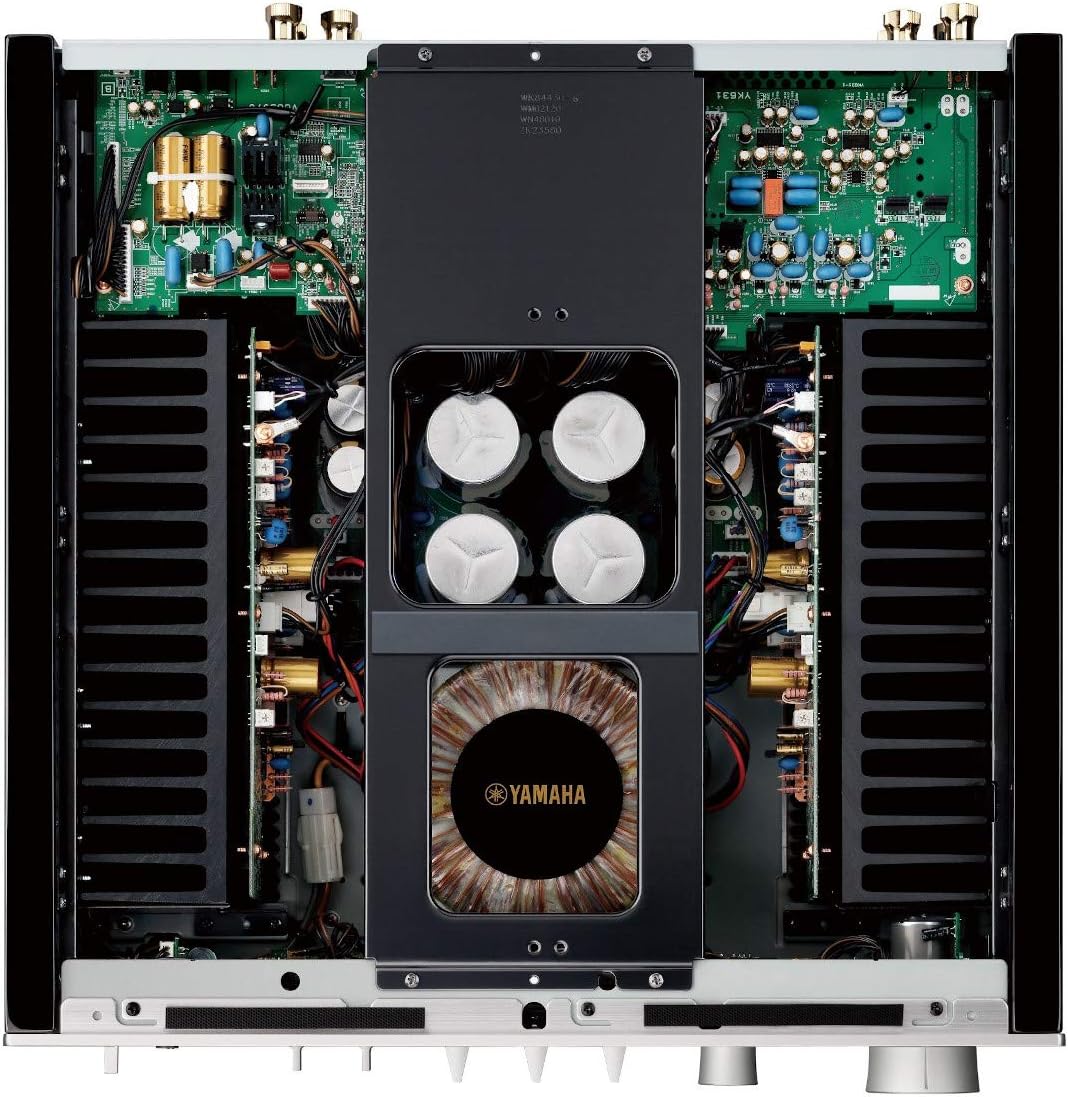
Figure 3: Internal view highlighting the toroidal power transformer and large capacitors, contributing to the amplifier's performance.
4. Setup
Follow these steps to set up your Yamaha A-S1200 Integrated Amplifier:
4.1 Placement
- Place the amplifier on a stable, level surface.
- Ensure adequate ventilation around the unit to prevent overheating. Avoid placing it in an enclosed cabinet without proper airflow.
- Keep the unit away from direct sunlight, heat sources, and moisture.
4.2 Connecting Speakers
Connect your speakers to the speaker terminals on the rear panel. Ensure correct polarity (positive to positive, negative to negative) for each speaker. The A-S1200 supports two sets of speakers (A and B).
- Loosen the terminal knob.
- Insert the speaker cable (bare wire or banana plug).
- Tighten the terminal knob securely.
4.3 Connecting Audio Sources
Connect your audio source components (e.g., CD player, tuner, phono turntable) to the corresponding input jacks on the rear panel using RCA cables. For a turntable, connect to the PHONO input and ensure the ground wire is connected to the GND terminal.
4.4 Power Connection
After all audio connections are made, connect the supplied power cord to the AC IN terminal on the amplifier and then to a wall outlet.

Figure 4: Rear panel connections, including speaker terminals, various audio inputs (CD, Tuner, Line 1, Line 2, Phono), and power input.
5. Operating Instructions
This section outlines the basic operation of your amplifier.
5.1 Power On/Off
- Press the POWER switch on the front panel to turn the unit on or off.
- Alternatively, use the AMP button on the remote control.
5.2 Input Selection
Rotate the INPUT selector knob on the front panel or use the corresponding input buttons (CD, Tuner, Phono, Line 1, Line 2, Main Direct) on the remote control to select your desired audio source.
5.3 Volume Control
Adjust the listening volume using the large VOLUME knob on the front panel or the VOLUME +/- buttons on the remote control.
5.4 Tone Controls
Use the BASS and TREBLE knobs to adjust the low and high frequency response. The BALANCE knob adjusts the left/right channel balance.
5.5 Speaker Selection
Use the SPEAKERS switch to select speaker set A, B, or A+B, or turn speakers off for headphone listening.
5.6 Headphone Output
Connect headphones to the PHONES jack on the front panel for private listening. When headphones are connected, speaker output is automatically muted.
6. Maintenance
Proper care will ensure the longevity and performance of your amplifier.
- Cleaning: Wipe the unit with a soft, dry cloth. For stubborn dirt, lightly dampen the cloth with water. Avoid using abrasive cleaners, solvents, or chemical cloths, as these may damage the finish.
- Ventilation: Ensure that the ventilation openings on the top and sides of the unit are not blocked.
- Power Cord: Periodically check the power cord for any damage. If damaged, contact qualified service personnel for replacement.
- Storage: If storing the unit for an extended period, disconnect the power cord and store it in a clean, dry environment.
7. Troubleshooting
If you experience issues with your amplifier, refer to the following common problems and solutions:
- No Power:
- Check if the power cord is securely connected to both the amplifier and the wall outlet.
- Ensure the power outlet is functional.
- Verify the POWER switch on the front panel is pressed in.
- No Sound:
- Confirm that the correct input source is selected.
- Check speaker connections for proper polarity and secure fit.
- Ensure the SPEAKERS switch is set to A, B, or A+B, and not OFF.
- Increase the VOLUME level.
- If headphones are connected, disconnect them to enable speaker output.
- Distorted Sound:
- Check all cable connections for secure fit and proper routing.
- Ensure speaker impedance matches the amplifier's specifications.
- Reduce the volume level if distortion occurs at high volumes.
- Remote Control Not Working:
- Replace the batteries in the remote control.
- Ensure there are no obstructions between the remote control and the amplifier's remote sensor.
If the problem persists after checking these points, please contact Yamaha customer support.
8. Specifications
| Specification | Value |
|---|---|
| Model Number | A-S1200 |
| Manufacturer | Yamaha |
| Product Dimensions | 23.5 x 23 x 10 inches |
| Item Weight | 59.5 pounds |
| Power Source Type | Corded Electric |
| Date First Available | March 16, 2020 |
9. Warranty and Support
For warranty information and customer support, please refer to the warranty card included with your product or visit the official Yamaha website. You can also find additional support resources and frequently asked questions there.
Yamaha Official Website: www.yamaha.com


