Introduction
This manual provides detailed instructions for the proper installation, operation, and maintenance of your BOSS Audio Systems Elite BE1200.1D Class D Monoblock Car Amplifier. Please read this manual thoroughly before attempting installation or operation to ensure optimal performance and safety.

Image 1: The BOSS Audio Systems Elite BE1200.1D Class D Monoblock Car Amplifier with its remote bass control unit.
Package Contents
Upon opening the package, verify that all items are present and in good condition:
- BOSS Audio Systems Elite BE1200.1D Amplifier
- Remote Subwoofer Control
- Power Harness
- Mounting Screws
- User's Manual (this document)

Image 2: Overview of the BOSS Audio Systems Elite BE1200.1D amplifier and its included accessories.
Setup and Installation
Professional installation of this product is strongly encouraged to ensure proper and safe functionality. Incorrect installation can lead to damage to the amplifier, vehicle, or personal injury.
Key Features for Installation:
- Class D Topology: This amplifier utilizes Class D technology, which significantly reduces power loss and increases efficiency. This results in a smaller, lighter unit with reduced heat generation.
- 1 Ohm Stable: The amplifier is designed to continuously power loads down to 1 Ohm, making it suitable for demanding subwoofer applications.
- RCA & Speaker Level Inputs: Provides flexibility for connecting to various head units.
- High-Input Turn On: Allows the amplifier to turn on automatically when a signal is detected from the vehicle's audio system.

Image 3: A visual representation of the amplifier's features and connection points, including RCA and speaker level inputs.
Wiring Connections:
- Power Connection: Connect the power harness to the amplifier and to the vehicle's battery. Ensure proper fusing is used near the battery.
- Ground Connection: Securely connect the ground wire from the amplifier to a clean, unpainted metal surface on the vehicle chassis.
- Remote Turn-On: Connect the remote turn-on wire to the head unit's remote output or use the high-input turn-on feature.
- Audio Input: Connect RCA cables from your head unit to the amplifier's RCA inputs, or use speaker-level inputs if RCA outputs are not available.
- Speaker Output: Connect your subwoofer(s) to the amplifier's speaker output terminals. Ensure correct polarity and impedance matching (1 Ohm stable).
- Remote Subwoofer Control: Connect the remote bass control unit to the designated port on the amplifier for convenient bass level adjustment.
Operating the Amplifier
The BE1200.1D amplifier offers several adjustable controls to fine-tune your audio experience.
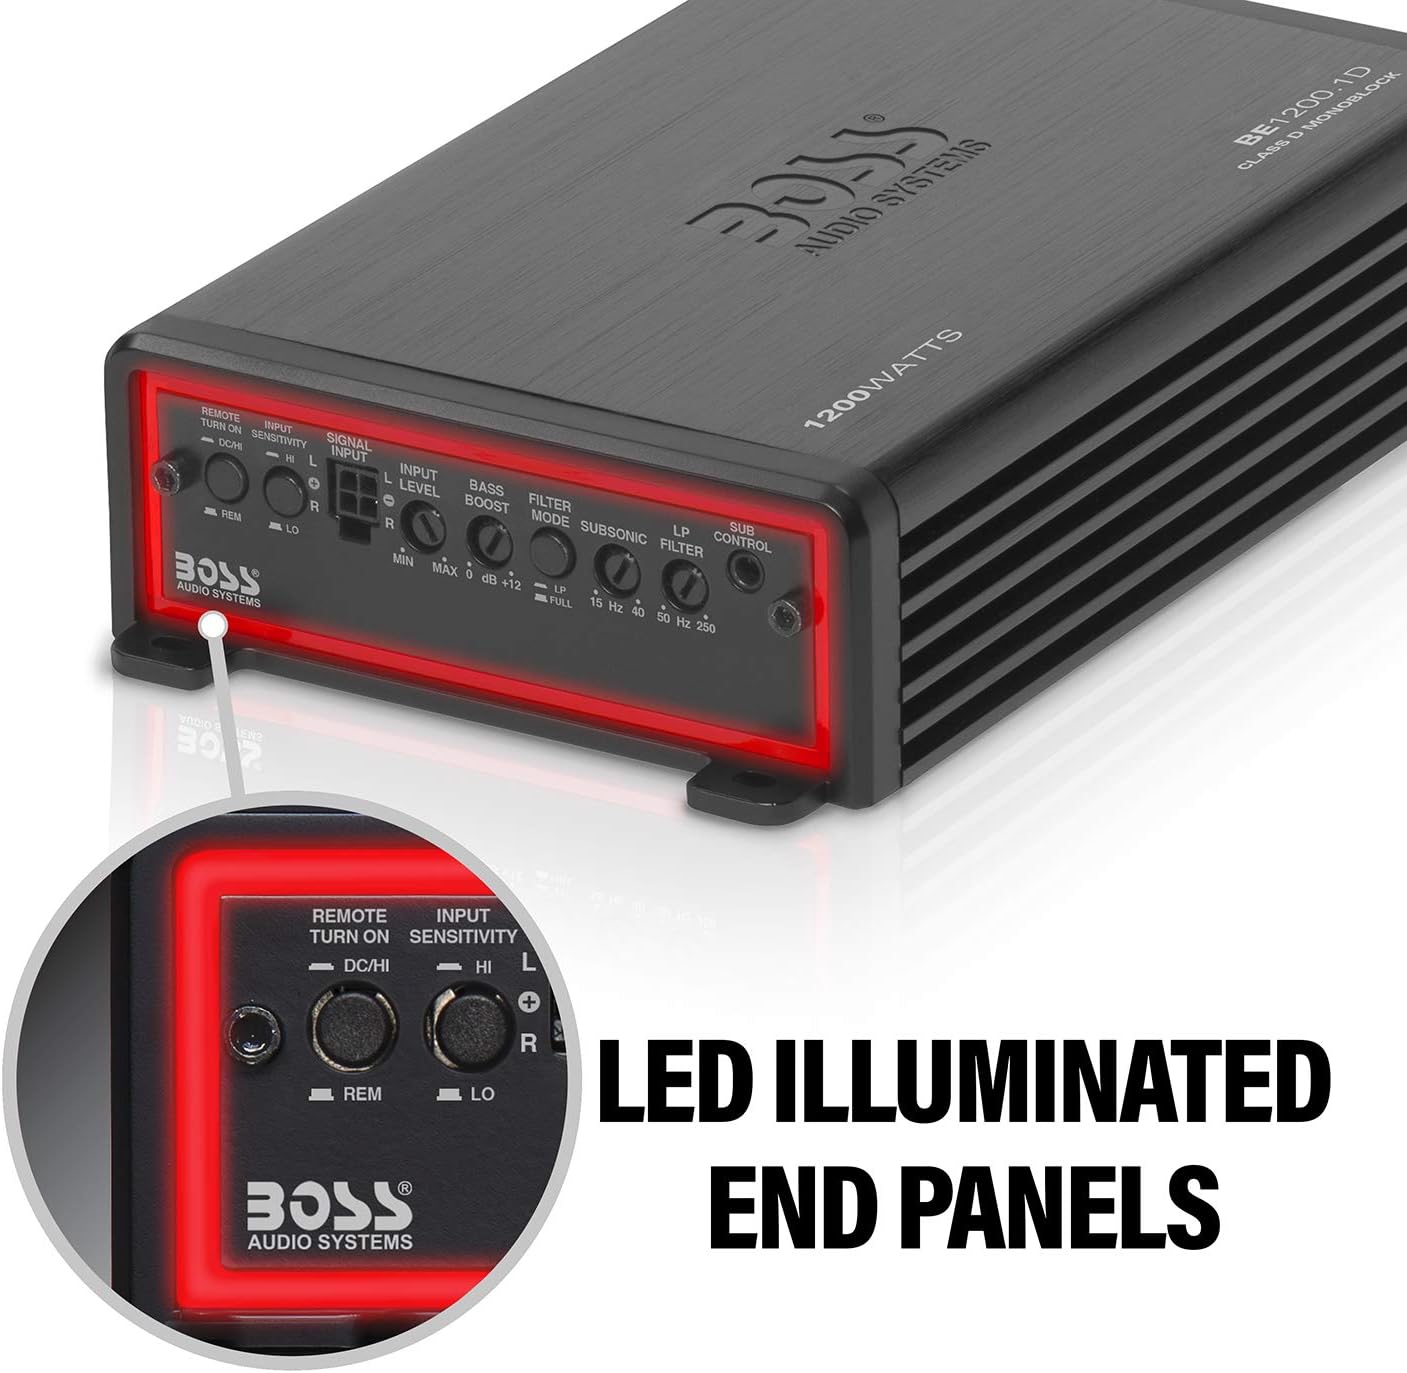
Image 4: Detailed view of the amplifier's control panel, featuring various adjustment knobs and switches.
Control Functions:
- Input Level (Gain Control): Adjusts the input sensitivity to match the output of your head unit. Start with the gain at minimum and slowly increase until desired volume is achieved without distortion.
- Bass Boost: Allows adjustment of low bass frequencies within a specified range (0 to +12 dB). Use sparingly to avoid distortion.
- Filter Mode (Low Pass Crossover): This variable control sets the upper frequency limit for the amplifier's output, typically used for subwoofers (e.g., 40 Hz to 250 Hz). Frequencies above the set point are filtered out.
- Subsonic Filter: A variable filter (15 Hz to 40 Hz) that removes extremely low frequencies below the audible range. This prevents your subwoofer from attempting to reproduce frequencies it cannot handle, protecting it from damage and improving sound quality.
- Remote Subwoofer Control: Use the included wired remote to conveniently adjust the subwoofer output level from the driver's seat.
Power Output:
- 1200 Watts Max x 1 @ 1-Ohm
- 600 Watts Max x 1 @ 2-Ohms
- 300 Watts Max x 1 @ 4-Ohms
Maintenance
To ensure the longevity and optimal performance of your amplifier, follow these maintenance guidelines:
- Cleaning: Regularly wipe the amplifier's exterior with a soft, dry cloth. Avoid using harsh chemicals or abrasive cleaners.
- Ventilation: Ensure the amplifier is installed in a location with adequate airflow to prevent overheating. Do not block cooling fins or vents.
- Connections: Periodically check all power, ground, and speaker connections to ensure they are secure and free from corrosion. Loose connections can lead to performance issues or damage.
- Environmental Factors: Protect the amplifier from moisture, extreme temperatures, and direct sunlight.
Troubleshooting
If you experience issues with your amplifier, refer to the following common problems and solutions before contacting support.
| Problem | Possible Cause | Solution |
|---|---|---|
| No Power / Amplifier Not Turning On | Blown fuse, loose power/ground connection, faulty remote turn-on, amplifier in protection mode. | Check fuses (both amplifier and vehicle), verify all power and ground connections are secure, ensure remote turn-on wire has 12V, check for short circuits in speaker wiring. |
| No Sound Output | No input signal, incorrect gain setting, speaker wires disconnected, amplifier in protection mode. | Verify RCA or speaker-level input connections, adjust gain control, check speaker wiring for shorts or disconnections, ensure head unit is functioning. |
| Distorted Sound | Gain set too high, improper crossover settings, damaged speakers, poor ground connection. | Reduce gain, adjust Low Pass Filter and Subsonic Filter settings, inspect speakers for damage, ensure ground connection is solid. |
| Amplifier Overheats / Cuts Out | Inadequate ventilation, impedance too low, prolonged high-volume operation, internal fault. | Ensure proper airflow around the amplifier, verify speaker impedance is within acceptable limits (1 Ohm minimum), reduce volume, allow amplifier to cool. If problem persists, professional inspection may be required. |
Specifications
| Feature | Detail |
|---|---|
| Model Number | BE1200.1D |
| Brand | BOSS Audio Systems |
| Amplifier Class | Class D |
| Number of Channels | 1 (Monoblock) |
| Max Power Output (1 Ohm) | 1200 Watts x 1 |
| Max Power Output (2 Ohms) | 600 Watts x 1 |
| Max Power Output (4 Ohms) | 300 Watts x 1 |
| Minimum Stable Impedance | 1 Ohm |
| Voltage | 12 Volts (DC) |
| Supply Current | 100 Amps |
| Product Dimensions (L x W x H) | 7.8 x 4.6 x 1.7 inches (197.4 x 116.0 x 43.5 mm) |
| Item Weight | 3.17 pounds |
| Mounting Type | Surface Mount |
| Special Features | Class D, MOSFET Power Supply, Variable Low Pass Crossover, Variable Subsonic Filter, Variable Bass Boost, High/Low Level Inputs, Variable Gain Control |
| UPC | 791489125826 |

Image 5: Dimensional drawing of the amplifier, indicating its length, width, and height.
Warranty Information
BOSS Audio Systems provides a 6-year Platinum Online Dealer Warranty for this product, provided the purchase is made through Amazon.Com. Please refer to the official BOSS Audio Systems website or your purchase documentation for full warranty terms and conditions.
Registering your product online after purchase is recommended to activate and ensure your warranty coverage.
Support
For further assistance, technical support, or warranty claims, please contact BOSS Audio Systems customer service. Refer to the contact information provided on the official BOSS Audio Systems website or your product packaging.
Online resources and FAQs may also be available on the BOSS Audio Systems Store.