1. Introduction and Product Overview
The Kmise DIY Ukulele Kit provides all necessary components for assembling a 21-inch Soprano ukulele. This kit is designed for beginners and children, offering an educational and engaging experience in musical instrument construction. It allows users to build and customize their own playable ukulele.
2. Package Contents
Please verify that all the following components are included in your kit:
- 1 x Ukulele body
- 1 x Ukulele neck
- 1 x Fingerboard
- 1 x Nut
- 1 x Saddle
- 1 x Bridge
- 1 x Set of Dowel pins
- 1 x Set of Screws
- 1 x Bridge dot
- 1 x Screwdriver
- 1 x Rubber band
- 1 x Ruler
- 1 x Coarse sandpaper
- 1 x Fine sandpaper
- 1 x Clamp
- 1 x Instruction manual (this document)
- 1 x Set of tuning pegs
- 1 x Set of strings

3. Assembly Instructions
Follow these steps carefully to assemble your ukulele. It is recommended to watch the assembly video for visual guidance.
3.1 Preparation
Before assembly, wear a dust mask and sand the body, neck, bridge bottom, and fingerboard bottom with 320# sandpaper until smooth. Draw a center line on the body, neck, fingerboard, bridge, and nut to aid in alignment.
3.2 Neck to Body Connection
Apply glue to the neck joint and the corresponding area on the ukulele body. Insert the wooden dowel pins for alignment and secure the neck to the body. Use the provided rubber band or clamps to hold the joint firmly while the glue dries.
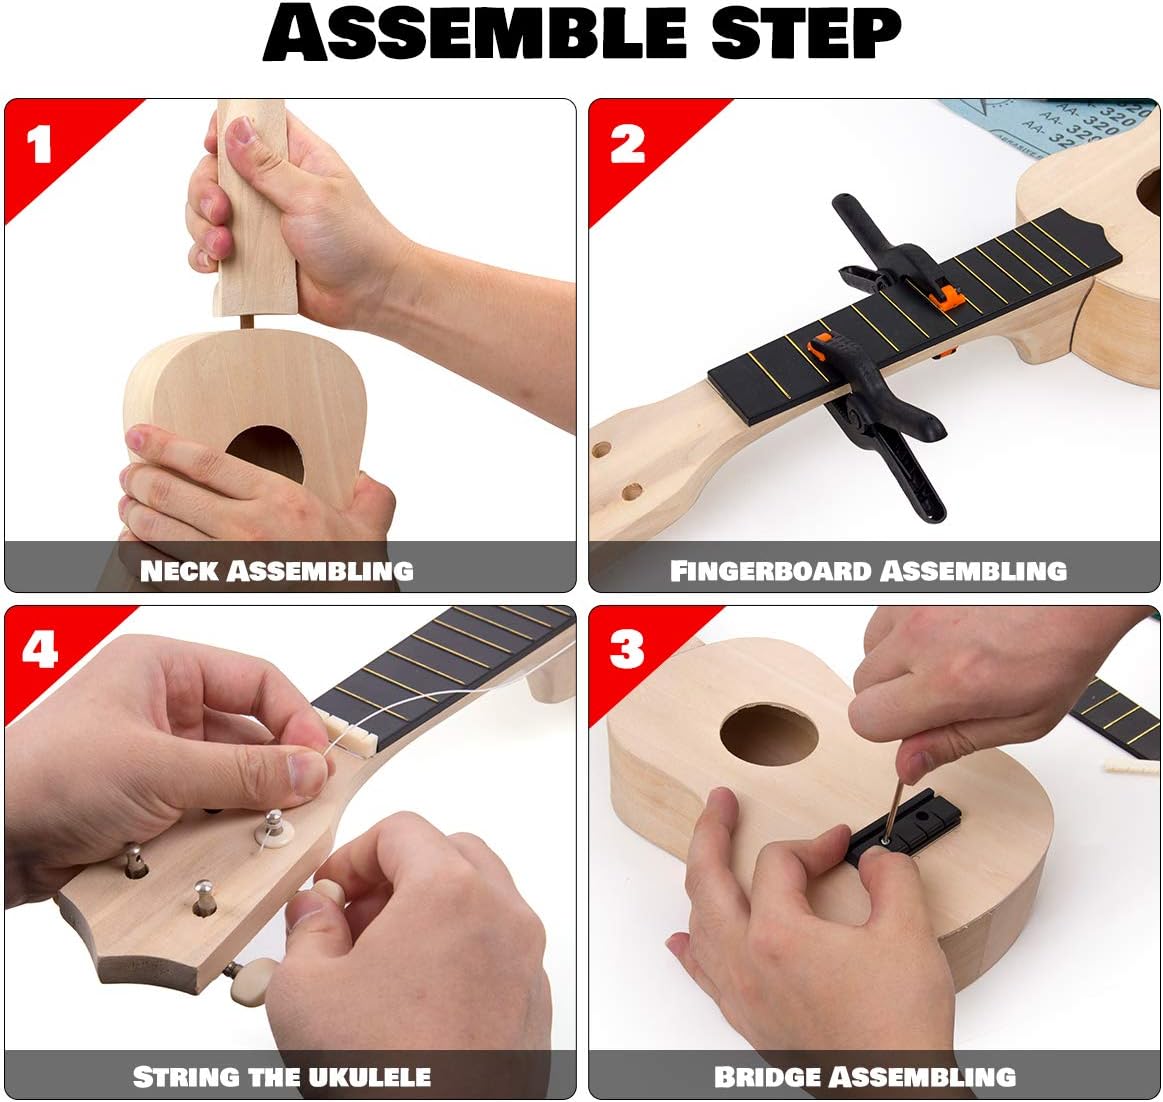
3.3 Fingerboard Attachment
Apply glue to the back of the fingerboard. Carefully align the fingerboard with the neck and body, ensuring the 12th fret aligns correctly with the body joint. Press firmly and use clamps to secure it while the glue sets.
3.4 Bridge Installation
Position the bridge on the ukulele body. Use the ruler to ensure correct placement, typically 80mm (3.14 inches) from the soundhole's edge. Mark the screw holes, pre-drill if necessary, and then secure the bridge using the provided screws. Insert the saddle into the bridge slot.
3.5 Nut Installation
Apply a small amount of glue to the nut and carefully place it into the slot at the top of the neck, ensuring it is centered and flush.
3.6 Tuning Pegs Installation
Insert the tuning pegs into the pre-drilled holes on the headstock. Ensure the gears are facing downwards (towards the back of the headstock) and secure them with the small screws provided.
4. Stringing Instructions
Proper stringing is essential for sound quality. Follow these steps to string your ukulele:
4.1 String Identification
The ukulele strings vary in thickness. The 1st string is the thinnest, the 4th string is the second thinnest, the 3rd string is the thickest, and the 2nd string is slightly thinner than the 3rd string. This order is crucial for correct tuning and playability.
4.2 Attaching to Bridge
Tie a knot at the end of each string and thread it through the corresponding hole in the bridge, securing it firmly.
4.3 Attaching to Tuning Pegs
Thread each string through its respective tuning peg hole on the headstock. Wind the string around the peg, keeping steady tension, and turn the peg to tighten. Ensure the strings are correctly placed over the nut.
4.4 Initial Tuning
After stringing, tune the ukulele to the correct pitch. New nylon strings will stretch and require frequent tuning over the first few days or weeks until they stabilize. Use a tuner for accuracy.
5. Finishing and Customization
The natural wood finish of the ukulele body and neck provides a blank canvas for personalization. You can paint, stain, or decorate your ukulele before or after assembly. If applying a finish, it is recommended to do so before attaching the fingerboard and bridge for easier application and a cleaner result.


6. Specifications
| Feature | Detail |
|---|---|
| Brand | Kmise |
| Model Number | DIY Ukulele Kit |
| Size | 21'' Soprano (travel/mini) |
| Body Material | Basswood |
| Top Material | Basswood |
| Back Material | Basswood |
| String Material | Nylon |
| Number of Strings | 4 |
| Finish Type | Polished (natural wood) |
| Item Weight | 1.2 pounds |
| Operation Mode | Manual |
7. Maintenance
To ensure the longevity and optimal performance of your ukulele, keep it clean and free from dust. Store it in a stable environment, avoiding extreme temperature changes or humidity, which can affect the wood and tuning stability. Regularly check the strings for wear and replace them as needed. Gently wipe the body and neck with a soft, dry cloth.
8. Troubleshooting
- Strings not holding tune: New nylon strings naturally stretch. Tune frequently over the first few days of use. Ensure strings are properly secured at both the bridge and tuning pegs.
- Buzzing sounds: Check if strings are properly seated in the nut and saddle. Ensure all components are securely glued and screwed.
- Difficulty with assembly: Refer to the provided visual instructions and videos for detailed guidance. Ensure all parts are correctly aligned before applying glue or tightening screws.
9. Warranty and Support
Kmise is committed to customer satisfaction. If you encounter any problems with your product, please contact Kmise customer support for assistance. The product includes a customer protection plan to ensure the best shopping experience.
10. Final Product View


