1. Introduction
Thank you for choosing the INFURIDER YF 1500 Infrared Thermometer. This device is designed for safe, non-contact temperature measurement in various industrial and daily settings. It provides accurate and rapid temperature readings from a distance, enhancing safety when measuring hot or hazardous surfaces. Please read this manual thoroughly before use to ensure proper operation and to maximize the device's performance and longevity.
2. Safety Information
2.1 General Safety Warnings
- Do not point the laser directly at eyes or indirectly off reflective surfaces. This product uses a Class II laser with optical power <0.5 mW and wavelength 8-14um.
- This infrared thermometer is designed for industrial and general non-contact temperature measurements. It is NOT intended for measuring human or animal body temperature.
- Do not use the device in environments with explosive gas, vapor, or dust.
- Avoid exposing the device to extreme temperatures, humidity, or direct sunlight for prolonged periods.
- Keep the device away from strong electromagnetic fields.
- Do not attempt to disassemble or modify the device. Repairs should only be performed by qualified personnel.
2.2 Important Note: Not for Human or Animal Measurement
The INFURIDER YF 1500 is calibrated for industrial applications and has a wider margin of error than medical thermometers. Using it to measure body temperature can lead to inaccurate readings and potentially incorrect health assessments. Always use a medical-grade thermometer for human or animal temperature measurement.

This image illustrates the correct and incorrect use of the infrared thermometer. It should not be used for measuring human body temperature, but is suitable for objects like food in an oven.
3. Product Overview
The INFURIDER YF 1500 is a high-precision infrared thermometer equipped with dual lasers for accurate targeting and a wide temperature range suitable for various industrial tasks.
3.1 Device Components
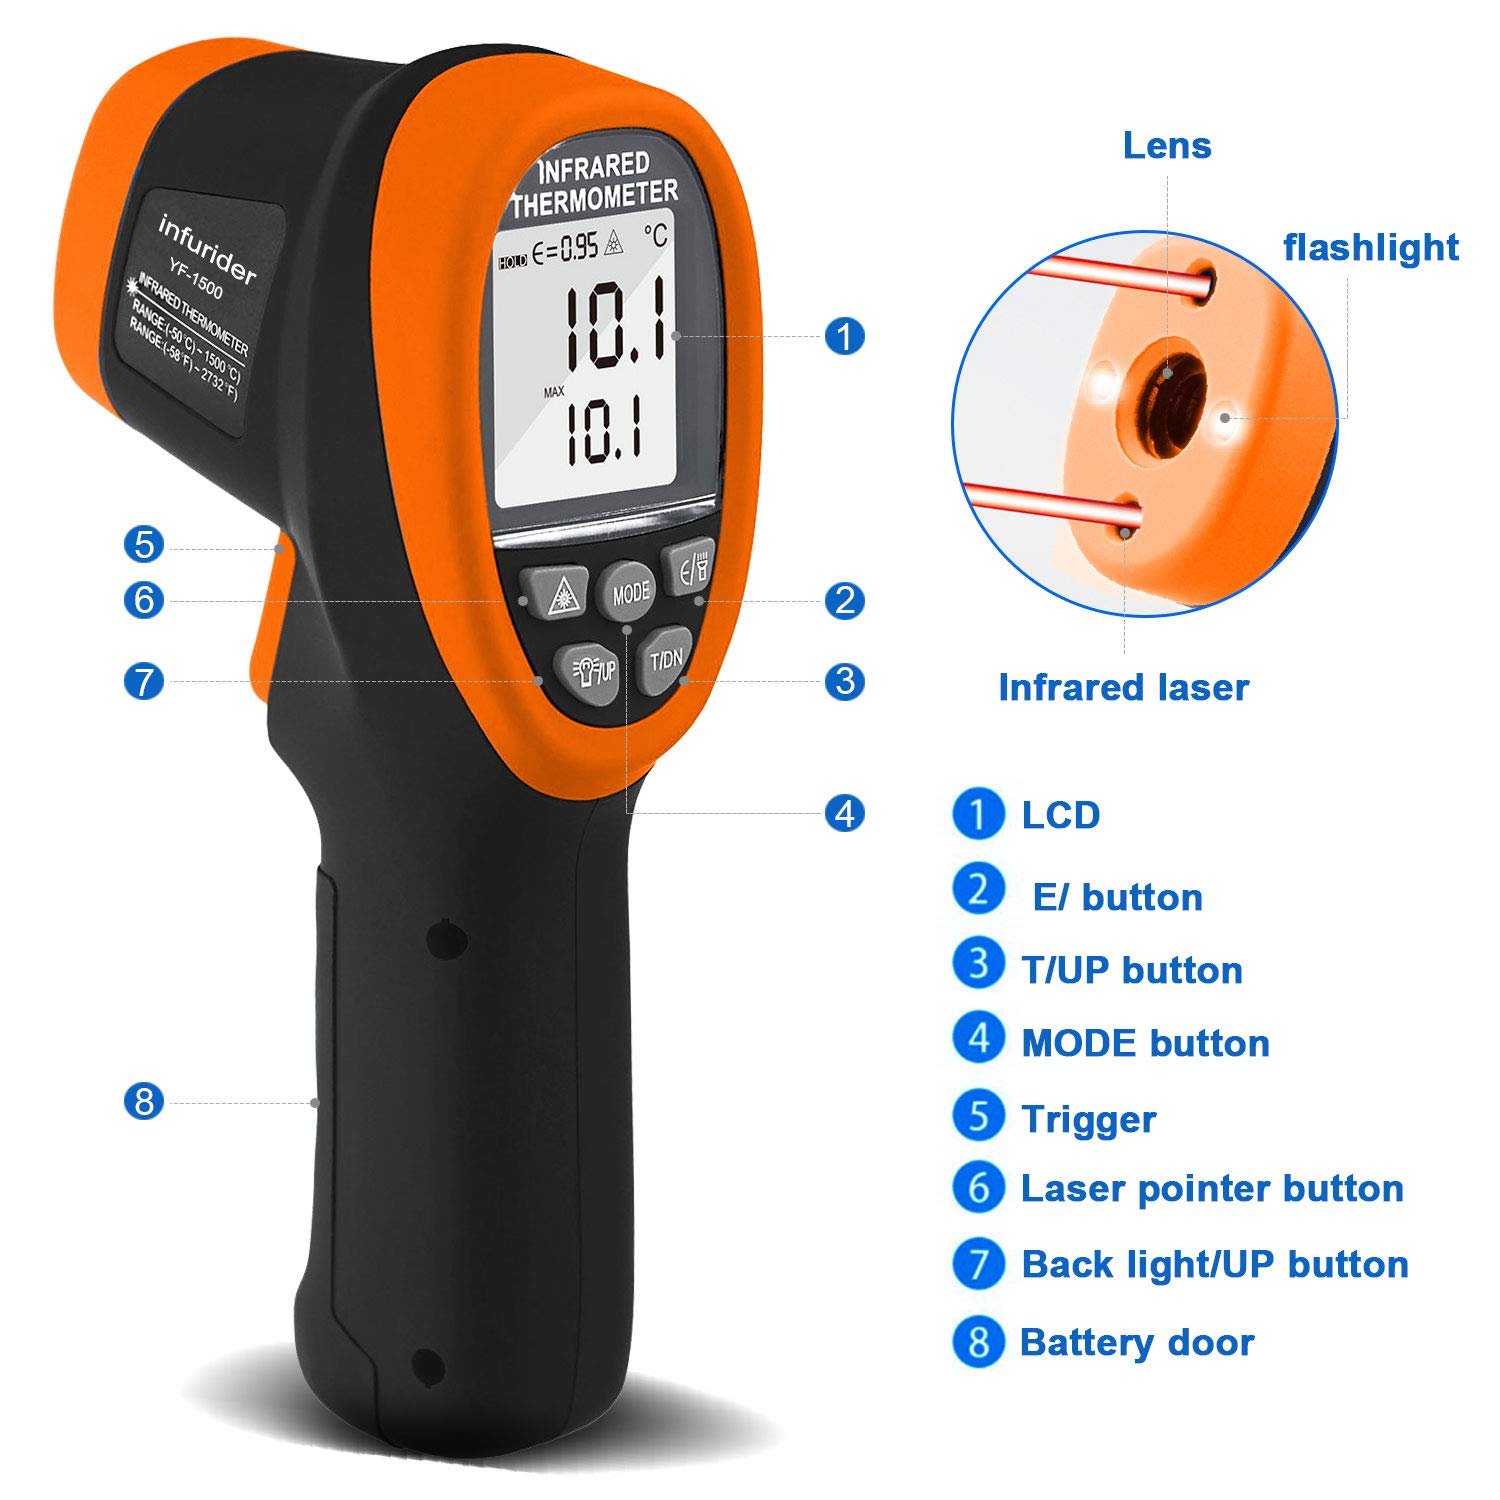
This diagram labels the key components of the INFURIDER YF 1500 Infrared Thermometer for easy identification.
- LCD Display: Shows temperature readings, mode indicators, and settings.
- E/ Button: Used to adjust emissivity settings.
- T/UP Button: Toggles between Celsius/Fahrenheit and navigates up in menus.
- MODE Button: Cycles through measurement modes (MAX, MIN, AVG, DIF, REC, HAL, LAL).
- Trigger: Activates the laser and initiates temperature measurement.
- Laser Pointer Button: Toggles the dual laser pointers on/off.
- Backlight/UP Button: Toggles the LCD backlight on/off and navigates up in menus.
- Battery Door: Access point for battery installation.
- Lens: Infrared sensor lens.
- Flashlight: Provides illumination for dark areas.
- Infrared Laser: Dual lasers for precise targeting.
4. Setup
4.1 Package Contents
Before using the thermometer, please ensure all items are present:
- INFURIDER YF 1500 Infrared Thermometer
- 9V Battery
- User Guide (this manual)
- Small Screwdriver (for battery compartment)
- Carrying Case

The thermometer comes with essential accessories including a 9V battery, screwdriver, and carrying case.
4.2 Battery Installation
- Locate the battery door (8) on the handle of the thermometer.
- Use the provided small screwdriver to open the battery compartment.
- Insert the 9V battery, ensuring correct polarity (+/-).
- Close the battery compartment securely.
5. Operation
5.1 Basic Temperature Measurement
- Point the thermometer at the target surface.
- Press and hold the Trigger (5) to activate the device and begin scanning. The dual laser pointers will indicate the measurement area.
- The temperature reading will appear on the LCD display (1) within 0.25 seconds.
- Release the Trigger (5) to hold the reading on the display. The device will automatically shut down after approximately 10 seconds of inactivity to conserve battery.
5.2 Distance to Spot Ratio (D:S)
The YF 1500 has a D:S ratio of 30:1. This means that at a distance of 30 units from the target, the measurement spot diameter will be 1 unit. For example, at 30 inches, the spot size is 1 inch. A higher D:S ratio allows for accurate measurement of smaller targets from a greater distance, which is crucial for safety when dealing with high temperatures.

This image illustrates the 30:1 Distance to Spot Ratio, showing how the measurement area expands with distance. It also highlights key features like auto shut-down, data hold, and temperature alarm.
5.3 Emissivity Adjustment
Emissivity (ε) is a measure of an object's ability to emit infrared energy. Different materials have different emissivity values. For accurate readings, adjust the emissivity setting (0.1-1.0) to match the material being measured. The default setting is typically 0.95, suitable for many organic materials and painted surfaces.
- Press the 'E/' button (2) to enter emissivity adjustment mode.
- Use the 'T/UP' (3) and 'Backlight/UP' (7) buttons to increase or decrease the emissivity value.
- Press the 'E/' button (2) again or the Trigger (5) to confirm and exit.

This image demonstrates the adjustable emissivity feature, allowing for accurate temperature readings across various materials.
5.4 Unit Switching (℃/℉)
To switch between Celsius (℃) and Fahrenheit (℉):
- While the device is on, press the 'T/UP' button (3) to toggle the temperature unit.
5.5 Advanced Measurement Modes
Press the 'MODE' button (4) to cycle through the following functions:
- MAX: Displays the maximum temperature recorded during a continuous scan.
- MIN: Displays the minimum temperature recorded during a continuous scan.
- AVG: Displays the average temperature recorded during a continuous scan.
- DIF (Difference): Displays the difference between the MAX and MIN temperatures.
- REC (Record): Allows you to recall the last 10 readings.
- HAL (High Alarm): Set a high-temperature alarm threshold. If the measured temperature exceeds this value, an alarm will sound.
- LAL (Low Alarm): Set a low-temperature alarm threshold. If the measured temperature falls below this value, an alarm will sound.

This image demonstrates the temperature alarm feature and the ability to switch between MIN, MAX, AVG, and DIF temperature readings.
5.6 Laser Pointer and Backlight
- Laser Pointer: Press the Laser Pointer button (6) to turn the dual laser pointers on or off. The lasers help pinpoint the exact measurement area.
- Backlight: Press the Backlight/UP button (7) to turn the LCD backlight on or off, improving visibility in dark conditions.
- Flashlight: The integrated flashlight provides additional illumination for the target area.

This image highlights the dual laser pointers for precise targeting and the backlight/flashlight features for use in low-light conditions.
6. Key Features
- Wide Temperature Range: Measures from -58℉ to 2732℉ (-50℃ to 1500℃).
- High Accuracy: Provides readings with an accuracy of +/- 2%.
- High D:S Ratio: 30:1 distance to spot ratio for accurate measurements from a safe distance.
- Dual Laser Targeting: Two laser pointers ensure precise aiming at the measurement spot.
- Fast Response Time: Delivers temperature readings in just 0.25 seconds.
- Adjustable Emissivity: Customizable from 0.1 to 1.0 to suit various surface materials.
- Multiple Measurement Modes: Includes MAX, MIN, AVG, DIF, and data record functions.
- High/Low Temperature Alarm: User-definable alarm thresholds for critical temperature monitoring.
- User-Friendly Display: Large LCD with backlight for clear visibility in all lighting conditions.
- Convenience Features: Auto shut-down, low battery indication, ℃/℉ switchable, data hold, and built-in flashlight.
7. Maintenance
7.1 Cleaning
- Lens Cleaning: The infrared lens is the most delicate part. Clean it with a soft, damp cloth or cotton swab. Do not use abrasive materials or solvents.
- Housing Cleaning: Clean the device housing with a damp cloth and mild soap. Do not immerse the device in water.
7.2 Storage
- Store the thermometer in its protective carrying case when not in use.
- Keep the device in a cool, dry place, away from direct sunlight and extreme temperatures.
- Remove the battery if the device will not be used for an extended period to prevent leakage.
8. Troubleshooting
| Problem | Possible Cause | Solution |
|---|---|---|
| Device does not turn on. | Low or dead battery. Incorrect battery installation. | Replace the 9V battery. Ensure correct polarity. |
| Inaccurate readings. | Incorrect emissivity setting. Lens is dirty. Distance to spot ratio exceeded. | Adjust emissivity for the target material. Clean the infrared lens. Ensure measurement is within the 30:1 D:S ratio. |
| Laser pointers not visible. | Laser function is off. | Press the Laser Pointer button (6) to activate. |
| Display is dim or blank. | Low battery. Backlight is off. | Replace the 9V battery. Press the Backlight/UP button (7) to turn on the backlight. |
| Alarm not sounding. | Alarm thresholds not set or set incorrectly. | Enter HAL/LAL mode via the MODE button and set appropriate temperature thresholds. |
9. Specifications
| Parameter | Value |
|---|---|
| Model | YF 1500 |
| Temperature Range | -58℉~2732℉ (-50℃~1500℃) |
| Accuracy | +/- 2% or 2℃ (4℉) |
| Distance to Spot Ratio (D:S) | 30:1 |
| Response Time | 0.25 seconds |
| Emissivity | Adjustable 0.1-1.0 |
| Spectral Response | 8-14um |
| Laser Type | Class II, <0.5 mW |
| Power Source | 9V Battery |
| Display | LCD with Backlight |
| Auto Shut-off | Approx. 10 seconds |
| Included Components | Thermometer, 9V Battery, User Guide, Screwdriver |
| Item Weight | 500 g |
| Material | Metal (Outer material) |
10. Warranty & Support
INFURIDER provides lifetime technical support for its products. For any questions, issues, or technical assistance regarding your YF 1500 Infrared Thermometer, please contact INFURIDER customer service. Refer to the product packaging or the official INFURIDER website for the most current contact information.
Please retain your purchase receipt as proof of purchase for warranty claims.