ELECALL EIRT550
ELECALL Digital Infrared Thermometer
User Instruction Manual
Model: EIRT550
1. Introduction
Thank you for purchasing the ELECALL Digital Infrared Thermometer. This non-contact infrared thermometer is designed for industrial, automotive, BBQ, and kitchen use, providing quick and accurate temperature readings from -58℉ to 1022℉ (-50℃ to 550℃). It is not intended for human body temperature measurement.
This manual provides important information on the safe and proper use of your thermometer. Please read it thoroughly before operation and keep it for future reference.
2. Product Features
- Non-contact infrared temperature measurement.
- Wide temperature range: -58℉~1022℉ (-50℃~550℃).
- Built-in 12-point laser for precise targeting.
- Color screen display with backlight.
- Adjustable emissivity for various surfaces.
- Temperature exceeded alarm function.
- Data hold and MAX/MIN temperature display.
- Automatic power-off function to save battery life.
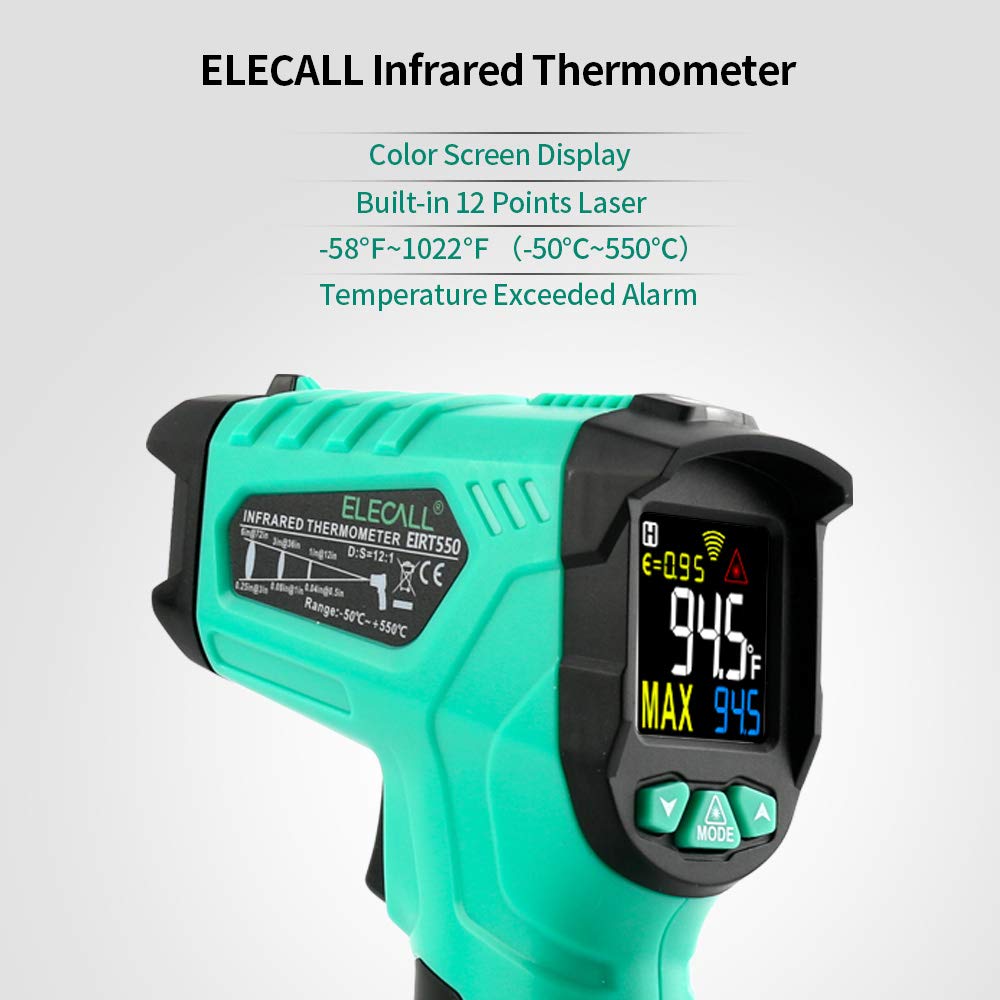
Image: ELECALL Infrared Thermometer highlighting its features including color screen display, 12-point laser, temperature range, and alarm.
3. Components and Display Overview

Image: The ELECALL Infrared Thermometer shown with two AAA batteries, illustrating the product's main components.

Image: Detailed view of the thermometer's display screen, showing indicators for low temperature alarm, high temperature alarm, alarm indication, measuring indication, low battery, laser indication, Centigrade/Fahrenheit degrees, surface temperature, data hold, emissivity, and button functions (Set down, Set up, Laser/Mode).
Display Indicators:
- Low temperature alarming: Indicates temperature is below set low limit.
- High temperature alarming: Indicates temperature is above set high limit.
- Alarm indication: General alarm icon.
- Measuring indication: Shows when a measurement is in progress.
- Low battery indication: Alerts when batteries need replacement.
- Laser indication: Shows if the laser pointer is active.
- Centigrade degree (°C): Temperature unit.
- Fahrenheit degree (°F): Temperature unit.
- Surface temperature: The main temperature reading.
- Data hold: Indicates the last reading is held on screen.
- Emissivity (ε): Current emissivity setting.
Buttons:
- Set down (▼): Decreases values or navigates down in menus.
- Set up (▲): Increases values or navigates up in menus.
- Laser / Mode (MODE): Toggles laser on/off; short press to cycle through modes (e.g., MAX, MIN, AVG, DIF, HAL, LAL, EMS).
4. Setup
4.1 Battery Installation
The thermometer requires 2 AAA batteries (included). To install or replace batteries:
- Locate the battery compartment cover on the handle.
- Slide the cover open.
- Insert two AAA batteries, ensuring correct polarity (+/-).
- Close the battery compartment cover securely.
Note: Remove batteries if the device is not used for an extended period to prevent leakage.
5. Operating Instructions
5.1 Taking a Measurement
- Point the thermometer at the target surface.
- Press and hold the trigger to begin measurement. The laser pointer will activate (if enabled) to help aim.
- The temperature reading will appear on the display.
- Release the trigger to hold the reading on the display (Data Hold).

Image: The thermometer displaying temperature readings for both high (fire) and low (ice) temperature scenarios, demonstrating its wide measurement range.
5.2 Adjusting Emissivity (EMS)
Emissivity (ε) is crucial for accurate temperature readings. Different materials emit infrared energy differently. The thermometer has adjustable emissivity from 0.10 to 1.00.
- With the thermometer on, press the "MODE" button until "EMS" appears on the display.
- Use the "▲" and "▼" buttons to adjust the emissivity value.
- Press "MODE" again to confirm and exit.
Common Emissivity Values:
| Material | Emissivity (ε) |
|---|---|
| Steel (oxidized) | 0.70 - 0.90 |
| Aluminum (oxidized) | 0.20 - 0.40 |
| Plastic | 0.95 |
| Water | 0.93 |
| Wood | 0.90 |

Image: Illustrates how emissivity can be adjusted for different materials like steel, aluminum, and plastic, showing their typical emissivity values.
5.3 Mode Functions (MAX/MIN/AVG/DIF/HAL/LAL)
Press the "MODE" button repeatedly to cycle through different measurement modes:
- MAX: Displays the maximum temperature measured during a scan.
- MIN: Displays the minimum temperature measured during a scan.
- AVG: Displays the average temperature measured during a scan.
- DIF: Displays the difference between the maximum and minimum temperatures measured.
- HAL (High Alarm): Set a high temperature alarm limit. If the measured temperature exceeds this limit, an alarm will sound.
- LAL (Low Alarm): Set a low temperature alarm limit. If the measured temperature falls below this limit, an alarm will sound.
To set HAL/LAL values, select the mode, then use "▲" and "▼" buttons to adjust the temperature limit.
5.4 Distance to Spot Ratio (D:S)
The thermometer has a D:S ratio of 12:1. This means that at a distance of 12 inches, the measurement spot diameter is 1 inch. To ensure accurate readings, make sure the target is larger than the spot size.
Example: At 12 inches distance, the measurement area is a 1-inch circle. At 24 inches, it's a 2-inch circle.

Image: Illustrates the wide range of applications for the thermometer, including cooking, automotive maintenance, and electrical engineering.
6. Maintenance and Care
6.1 Cleaning the Lens
The most critical part of the thermometer is the lens. A dirty lens can lead to inaccurate readings.
- Gently blow off loose particles using clean compressed air.
- Carefully wipe the surface with a cotton swab or soft cloth dampened with water or medical alcohol.
- Allow the lens to dry completely before use.
6.2 Cleaning the Housing
The thermometer housing can be cleaned with a damp cloth or sponge using mild soap and water. Do not immerse the unit in water.
6.3 Storage
Store the thermometer in a cool, dry place when not in use. Remove batteries if storing for extended periods.
7. Troubleshooting
| Problem | Possible Cause | Solution |
|---|---|---|
| No display / Unit won't turn on | Dead or incorrectly installed batteries. | Replace batteries; check polarity. |
| Inaccurate readings | Dirty lens; incorrect emissivity setting; target too small; outside operating temperature range. | Clean lens; adjust emissivity; ensure target is larger than spot size; allow unit to acclimate to ambient temperature. |
| "Hi" or "Lo" displayed | Temperature is outside the measurement range. | Ensure the target temperature is within -58℉~1022℉ (-50℃~550℃). |
8. Specifications
| Feature | Detail |
|---|---|
| Temperature Range | -58℉~1022℉ (-50℃~550℃) |
| Accuracy | ±1.5% or ±1.5℃ (whichever is greater) |
| Distance Spot Ratio (D:S) | 12:1 |
| Emissivity | 0.10 ~ 1.00 (Adjustable) |
| Response Time | 500 ms |
| Spectral Response | 8-14 μm |
| Laser Power | <1mW (Class II) |
| Power Supply | 2 x 1.5V AAA Batteries |
| Automatic Power-off | Yes (after 7 seconds of inactivity) |
| Operating Temperature | 32℉~122℉ (0℃~50℃) |
| Storage Temperature | -4℉~140℉ (-20℃~60℃) |
| Dimensions | 7.68 x 4.92 x 2.05 inches |
| Weight | 7.83 ounces (with batteries) |
9. Important Safety Information
- CAUTION: Do not point the laser directly at eyes or indirectly off reflective surfaces.
- This device is not intended for medical use or human body temperature measurement.
- Do not use the thermometer near explosive gas, vapor, or dust.
- Avoid exposing the thermometer to extreme temperatures, humidity, or direct sunlight.
- Keep out of reach of children.
10. Warranty and Support
ELECALL products are manufactured to high-quality standards. For warranty information or technical support, please refer to the contact details provided with your purchase or visit the official ELECALL website.
Please retain your proof of purchase for warranty claims.
Ask a question about this manual
Ask about setup, troubleshooting, compatibility, parts, safety, or missing instructions. Manuals+ will review the question and use this page’s manual context to help answer it.