Soundstream ST2.500D
Soundstream Stealth Double Shot ST2.500D Amplifier User Manual
Model: ST2.500D
1. Introduction
Thank you for choosing the Soundstream Stealth Double Shot ST2.500D Micro Class D 2-Channel Amplifier. This compact yet powerful amplifier is designed to deliver high-quality audio performance in a remarkably small footprint, making it ideal for installations where space is limited. This manual provides essential information for the proper installation, operation, and maintenance of your amplifier to ensure optimal performance and longevity.

Figure 1: Soundstream ST2.500D Micro Class D 2-Channel Amplifier. This image shows the compact design of the amplifier, highlighting its small size and sleek appearance.
2. Safety Information
Please read all instructions carefully before installing and operating your amplifier. Failure to do so may result in personal injury or damage to the product or property.
- Electrical Safety: Always disconnect the vehicle's battery negative terminal before making any electrical connections. Ensure all wiring is properly insulated and fused to prevent short circuits and fire hazards.
- Mounting: Mount the amplifier securely in a dry, well-ventilated location away from direct sunlight, heat sources, and moisture. Ensure adequate airflow around the amplifier for proper cooling.
- Heat: Amplifiers generate heat during operation. Avoid covering the amplifier or installing it in enclosed spaces without ventilation.
- Volume Levels: Prolonged exposure to high volume levels can cause hearing damage. Adjust volume to a comfortable level.
- Professional Installation: If you are unsure about any aspect of installation, consult a qualified car audio professional.
3. Package Contents
Verify that all items are present in the package before proceeding with installation:
- Soundstream ST2.500D Amplifier
- Power/Speaker Wire Harness
- High-Level Input Harness (if applicable)
- RCA Input Harness
- Mounting Hardware (screws)
- User Manual (this document)

Figure 2: Included wiring harnesses for the Soundstream ST2.500D amplifier. This image displays the various wiring harnesses provided, including those for power, speakers, and signal input, which are essential for connecting the amplifier to your vehicle's audio system.
4. Setup and Installation
4.1 Mounting the Amplifier
Due to its micro size, the ST2.500D offers flexible mounting options. Choose a location that is dry, free from excessive vibration, and allows for adequate ventilation. Secure the amplifier using the provided mounting screws.
4.2 Wiring Connections
Refer to the diagrams below and follow these steps for proper wiring:
- Power Connection (B+): Connect the +12V terminal of the amplifier to the positive terminal of the vehicle's battery using a suitable gauge power wire. An inline fuse (30A recommended, as seen on the unit) should be installed within 18 inches of the battery.
- Ground Connection (GND): Connect the GND terminal of the amplifier to a clean, unpainted metal surface of the vehicle's chassis. Ensure a solid, low-resistance connection.
- Remote Turn-On (REM): Connect the REM terminal to the remote turn-on output of your head unit. This wire signals the amplifier to turn on when the head unit is powered.
- Speaker Outputs: Connect your speakers to the amplifier's speaker output terminals. Ensure correct polarity (+ to + and - to -) for each speaker. The ST2.500D supports 2-channel stereo output or can be bridged for a single channel. Refer to the diagram on the amplifier for bridging instructions.
- Signal Input (HI/LO INPUT): Connect the audio signal from your head unit to the amplifier's input. Use the RCA input harness for low-level (RCA) signals or the high-level input harness for speaker-level signals.

Figure 3: Rear view of the Soundstream ST2.500D showing speaker and power connections. This image provides a clear view of the amplifier's rear panel, detailing the speaker output terminals, power input, ground connection, remote turn-on, and the fuse slot (30A).
5. Operating Instructions
Once installed, adjust the amplifier settings for optimal sound performance.
5.1 Gain Adjustment
The GAIN control (labeled 12V ~ 0.25V) matches the amplifier's input sensitivity to the output voltage of your head unit. Start with the gain control at its minimum (fully counter-clockwise) and slowly increase it until you achieve a clear, undistorted sound at your desired maximum volume level from the head unit. Avoid setting the gain too high, as this can lead to distortion and potential speaker damage.
5.2 Crossover Settings (X-OVER)
The ST2.500D features a built-in crossover network to filter frequencies. Use the switch to select between:
- HPF (High Pass Filter): Allows frequencies above the set point (50Hz ~ 500Hz) to pass through. Useful for full-range speakers to prevent low-frequency distortion.
- LPF (Low Pass Filter): Allows frequencies below the set point (50Hz ~ 500Hz) to pass through. Typically used for subwoofers.
- FLAT: Disables the crossover, allowing all frequencies to pass through.
Adjust the frequency knob (50Hz ~ 500Hz) to fine-tune the crossover point according to your speaker type and listening preferences.
5.3 Indicator Lights
- PW (Power): A green LED indicates the amplifier is powered on and operating normally.
- PT (Protection): A red LED indicates the amplifier has entered protection mode due to an issue (e.g., short circuit, overheating, low voltage). Turn off the system and troubleshoot the cause.
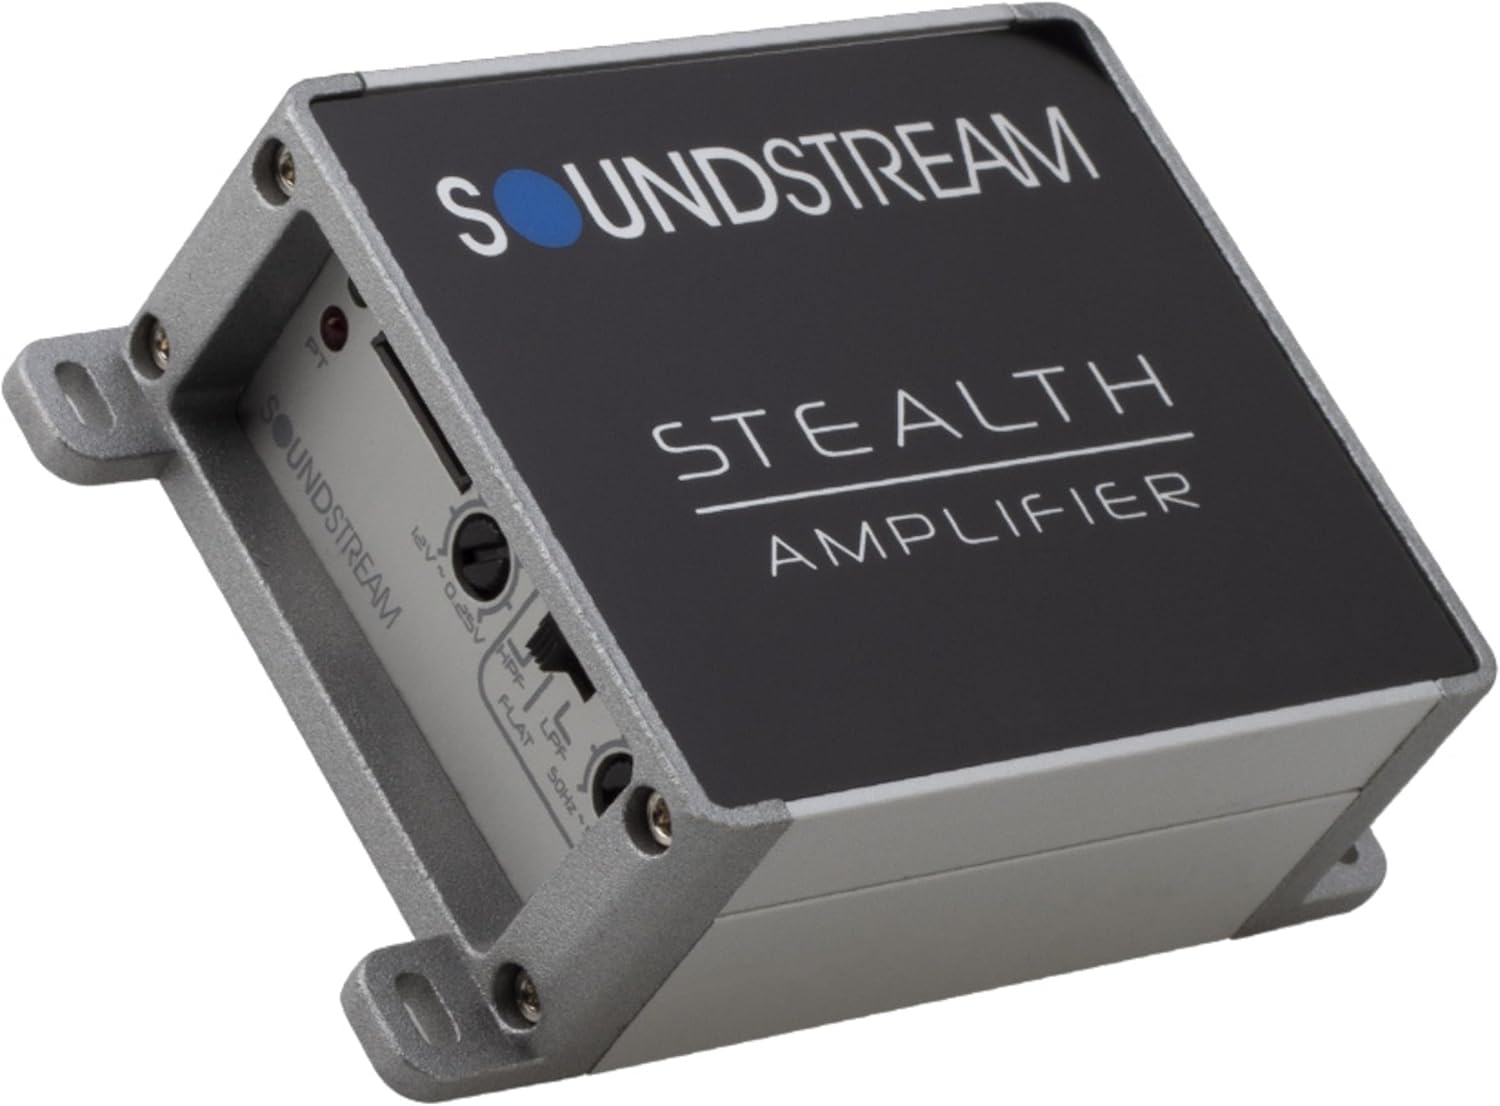
Figure 4: Top view of the Soundstream ST2.500D showing gain and crossover controls. This image highlights the amplifier's control panel, including the gain adjustment knob, the crossover mode switch (HPF/LPF/FLAT), and the frequency adjustment knob, along with the power (PW) and protection (PT) indicator lights.
6. Maintenance
Regular maintenance helps ensure the longevity and performance of your amplifier.
- Cleaning: Periodically wipe the amplifier's exterior with a soft, dry cloth. Do not use harsh chemicals or abrasive cleaners.
- Connections: Occasionally check all wiring connections to ensure they are secure and free from corrosion. Loose connections can lead to poor performance or damage.
- Ventilation: Ensure that the amplifier's cooling fins are free from dust and debris to maintain proper heat dissipation.
7. Troubleshooting
If you experience issues with your amplifier, refer to the table below for common problems and their solutions.
| Problem | Possible Cause | Solution |
|---|---|---|
| No Power (PW light off) | Blown fuse, loose power/ground wire, no remote signal. | Check inline fuse and amplifier fuse. Verify all power, ground, and remote connections are secure. Test remote wire for +12V. |
| Protection Mode (PT light on) | Short circuit in speaker wiring, overheating, low/high voltage. | Check speaker wires for shorts to chassis or between wires. Ensure proper ventilation. Verify vehicle's charging system voltage. Allow amplifier to cool down. |
| No Sound Output | No input signal, incorrect gain setting, speaker wires disconnected. | Check RCA/high-level input connections. Adjust gain. Verify speaker wire connections at amplifier and speakers. Ensure head unit is on and playing audio. |
| Distorted Sound | Gain set too high, poor ground connection, damaged speakers. | Reduce gain setting. Improve ground connection. Inspect speakers for damage. |
| Engine Noise/Whine | Poor grounding, RCA cables too close to power wires, faulty head unit. | Ensure amplifier and head unit have solid, common grounds. Route RCA cables away from power wires. Consider a ground loop isolator if necessary. |
8. Specifications
Key technical specifications for the Soundstream ST2.500D amplifier:
| Feature | Specification |
|---|---|
| Model Number | ST2.500D |
| Brand | Soundstream |
| Number of Channels | 2 |
| Output Power | 500 Watts Max (RMS at 4 Ohms: 2 x 45W) |
| Amplifier Class | Class D |
| Voltage | 12 Volts (DC) |
| Item Dimensions (L x W x H) | 3.75 x 3 x 1.5 inches |
| Item Weight | 1.39 pounds |
| Mounting Type | Surface Mount |
| Operating Temperature | 40 Degrees Celsius (Max) |
| UPC | 709483059580 |
9. Warranty Information
Soundstream products are designed and manufactured to the highest quality standards. This product is covered by a limited warranty against defects in materials and workmanship. The duration and terms of the warranty may vary by region and retailer. Please retain your proof of purchase for warranty claims. For specific warranty details, refer to the warranty card included with your product or contact Soundstream customer support.
10. Customer Support
For technical assistance, troubleshooting, or general inquiries regarding your Soundstream ST2.500D amplifier, please visit the official Soundstream website or contact their customer support department. You may find FAQs, additional resources, and contact information on their website.
Soundstream Official Website: www.soundstream.com
Ask a question about this manual
Ask about setup, troubleshooting, compatibility, parts, safety, or missing instructions. Manuals+ will review the question and use this page’s manual context to help answer it.