1. Introduction
The QYT KT-8900R is a compact and versatile tri-band mobile transceiver designed for amateur radio enthusiasts. It offers dual watch and dual standby capabilities, making it an excellent choice for new and experienced ham radio users alike. This manual provides comprehensive instructions for the setup, operation, and maintenance of your KT-8900R radio.
This device is FCC Part Certified and complies with Part 15B and Part 97 regulations.
2. What's in the Box
Upon opening the package, please verify that all items listed below are present and in good condition:
- QYT KT-8900R Mobile Radio Unit
- Microphone with DTMF Keypad
- Car Power Cable
- Fuse
- Mounting Bracket
- Screw Sets for Mounting
- User Manual (this document)
- Programming Cable (USB)

Figure 2.1: All components included in the QYT KT-8900R package, including the radio unit, microphone, power cable, mounting bracket, and programming cable.
3. Product Overview
Familiarize yourself with the main components and dimensions of the KT-8900R mobile transceiver.

Figure 3.1: Front view of the KT-8900R radio unit, showing the display, control knobs, and function buttons.

Figure 3.2: Detailed view of the KT-8900R front panel, highlighting the display and button layout.

Figure 3.3: The microphone unit with its numeric keypad and function buttons, designed for comfortable handling.
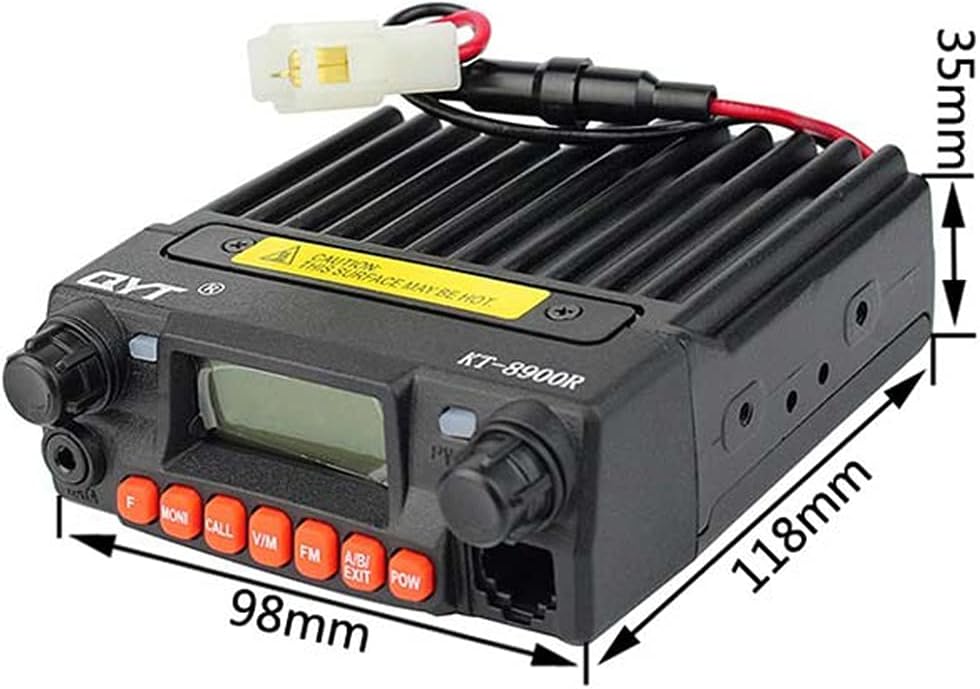
Figure 3.4: Dimensions of the KT-8900R radio unit: 98mm (width) x 118mm (depth) x 35mm (height).

Figure 3.5: Rear view of the KT-8900R, showing the cooling fan, antenna connector, and power input.
4. Setup and Installation
Follow these steps for proper installation of your KT-8900R mobile transceiver.
4.1 Mounting the Radio
- Select a stable and secure location in your vehicle or operating area that allows for good ventilation and easy access to controls.
- Use the provided mounting bracket as a template to mark drilling locations.
- Drill pilot holes and secure the mounting bracket using the supplied screws.
- Attach the radio unit to the mounting bracket. Ensure it is firmly secured.
4.2 Power Connection
The KT-8900R operates on 13.8 Volts DC. Use the provided car power cable for connection.
- Connect the red wire of the power cable to the positive (+) terminal of your vehicle's 12V power source (e.g., battery or fuse box).
- Connect the black wire to the negative (-) terminal or a suitable ground point.
- Ensure the inline fuse is properly installed in the positive line to protect the radio from power surges.
- Plug the power connector into the rear of the KT-8900R unit.
4.3 Microphone Connection
Connect the microphone cable to the dedicated port on the front of the radio unit. Ensure the connector clicks into place securely.

Figure 4.1: The KT-8900R radio unit with the microphone properly connected to the front panel.
4.4 Antenna Connection
Connect a suitable tri-band antenna (not included) to the SO-239 connector on the rear of the radio unit. Ensure the connection is tight and secure for optimal performance.
5. Operating Instructions
This section details the basic and advanced operational features of your KT-8900R.
5.1 Powering On/Off
Press the POW button on the front panel to turn the radio on or off.
5.2 Frequency Bands and Selection
The KT-8900R supports tri-band operation:
- VHF: 136-174 MHz (2 meters)
- 1.25m: 240-260 MHz
- UHF: 400-480 MHz (70 centimeters)
Use the V/M button to switch between VFO (Variable Frequency Oscillator) mode for direct frequency input and Memory mode for recalling stored channels. Use the rotary knob or microphone keypad to adjust frequencies or select channels.
5.3 Dual Watch and Dual Standby
The radio features Dual Watch and Dual Standby functions, allowing you to monitor two different frequencies simultaneously. Refer to the detailed instructions in the full user manual for configuration of these features.
5.4 Tone Functions (CTCSS/DCS/2Tone/5Tone) and DTMF
The KT-8900R supports various tone signaling methods for selective calling and repeater access:
- CTCSS (Continuous Tone-Coded Squelch System): Sub-audible tones for squelch control.
- DCS (Digital Coded Squelch): Digital codes for squelch control.
- 2Tone/5Tone: Specific tone sequences for selective calling.
- DTMF (Dual-Tone Multi-Frequency): Used for remote control, autopatch, and other functions via the microphone keypad.
Access these functions through the radio's menu system. Consult the full manual for specific menu navigation and setting procedures.
5.5 Programming via PC (CHIRP Software)
For advanced programming and channel management, the KT-8900R can be connected to a computer using the provided USB programming cable. QYT provides software downloads on their official website. The radio is also compatible with CHIRP software, which simplifies programming. Ensure you use the correct COM port settings when connecting.
6. Maintenance
Proper care and maintenance will ensure the longevity and optimal performance of your KT-8900R.
6.1 Cleaning
- Wipe the radio's exterior with a soft, damp cloth. Do not use harsh chemicals or abrasive cleaners.
- Ensure no moisture enters the radio's internal components.
6.2 Environmental Considerations
- Avoid exposing the radio to extreme temperatures, direct sunlight for prolonged periods, or excessive dust.
- While the radio has some water resistance, it is not waterproof. Protect it from heavy rain or immersion.
- Ensure adequate ventilation around the unit, especially during prolonged transmission, as the surface may become hot.
7. Troubleshooting
If you encounter issues with your KT-8900R, refer to the following common problems and solutions:
| Problem | Possible Cause | Solution |
|---|---|---|
| Radio does not power on. | No power connection; Blown fuse; Incorrect voltage. | Check power cable connection; Inspect and replace fuse if necessary; Ensure 13.8V DC power supply. |
| No audio from speaker. | Volume too low; Squelch set too high; Speaker damaged. | Increase volume; Adjust squelch level; Test with external speaker if available. |
| Cannot transmit or low power output. | Antenna not connected or faulty; Incorrect frequency/offset; Power supply issues. | Check antenna connection; Verify frequency and repeater settings; Ensure stable 13.8V power supply. |
| Programming via PC fails. | Incorrect programming cable; Driver issues; Wrong COM port; Software incompatibility. | Ensure correct QYT programming cable is used; Install/update USB drivers; Select correct COM port in software (e.g., CHIRP); Use compatible software version. |
If the problem persists after attempting these solutions, please contact QYT customer support or a qualified technician.
8. Specifications
Key technical specifications for the QYT KT-8900R mobile transceiver:
| Feature | Specification |
|---|---|
| Model Number | KT-8900R |
| Brand | QYT |
| Frequency Range | VHF: 136-174 MHz, 1.25m: 240-260 MHz, UHF: 400-480 MHz, FM: 76-108.900 MHz (Receive Only) |
| RF Output Power | VHF: 25W, UHF: 20W |
| Number of Channels | 200 |
| Voltage | 13.8 Volts (DC) |
| Product Dimensions (L x W x H) | 4.65 x 3.86 x 1.38 inches (118 x 98 x 35 mm) |
| Item Weight | 14.4 ounces (0.9 lb) |
| Special Features | Tri-Band, Dual Watch, Dual Standby, CTCSS/DCS/5Tone/2Tone, DTMF, PC Programmable |
| Water Resistance Level | Water Resistant (not waterproof) |
| Talking Range Maximum | 20 Kilometer (dependent on terrain and conditions) |
9. Warranty and Support
QYT products are manufactured to high quality standards. For warranty information, please refer to the warranty card included with your product or visit the official QYT website. For technical support, software downloads, or further assistance, please visit the QYT official website or contact their customer service department.
Official QYT Website: Visit the QYT Store on Amazon (for general information and store access)


