1. Introduction
Thank you for choosing the Nedis TVSM7060BK TV Floor Stand. This manual provides essential information for the safe and correct assembly, operation, and maintenance of your new TV mount. Please read these instructions carefully before installation and keep them for future reference.
Safety Instructions
- Ensure all components are present and undamaged before assembly. Do not use if any parts are missing or faulty.
- This TV stand is designed for televisions between 50 and 65 inches, with a maximum weight capacity of 35 kg. Do not exceed these limits.
- The VESA mounting interface compatibility ranges from 200x200 mm to 400x400 mm. Verify your TV's VESA pattern before installation.
- Assembly requires at least two people to ensure safety and proper handling of the television.
- Place the TV stand on a stable, level surface to prevent tipping.
- Keep children and pets away from the assembly area.
- Do not overtighten screws, as this may cause damage.
- Regularly check all connections to ensure they remain secure.
2. Package Contents
Please verify that all parts listed below are included in your package. If any parts are missing or damaged, contact your retailer.

Image: Overview of the Nedis TVSM7060BK TV Floor Stand components. This image displays the main stand structure, including the central pole, VESA mounting brackets, and the tripod base with wooden legs, before assembly.
- Central Support Pole (1x)
- Tripod Base Assembly (1x)
- VESA Mounting Brackets (2x)
- Cable Management Clip (1x)
- Hardware Kit (screws, washers, spacers for TV attachment, assembly tools)
- Instruction Manual (this document)
3. Setup and Assembly
Follow these steps carefully to assemble your Nedis TVSM7060BK TV Floor Stand. It is recommended to have a second person assist during the TV mounting process.
Step 1: Assemble the Tripod Base
- Unpack the tripod base and extend the legs. Ensure they are securely locked into position.
- Attach the central support pole to the tripod base. Align the holes and secure with the provided screws and Allen key.

Image: Side view of the fully assembled Nedis TVSM7060BK TV Floor Stand without a television attached. This shows the central pole connected to the tripod base and the VESA brackets in place.
Step 2: Attach VESA Mounting Brackets to the Central Pole
- Slide the two VESA mounting brackets onto the central support pole. Position them according to your TV's VESA pattern and desired height.
- Secure the brackets in place using the locking mechanisms or screws provided. Ensure they are level and firmly tightened.

Image: Close-up view of how the VESA mounting bracket attaches to the central support pole. This highlights the secure connection point and adjustment mechanism.
Step 3: Attach VESA Brackets to Your TV
- Carefully place your TV face down on a soft, clean surface.
- Identify the VESA mounting holes on the back of your TV.
- Attach the VESA mounting arms (from the stand) to the back of your TV using the appropriate screws, washers, and spacers from the hardware kit. Ensure the screws are tightened securely but do not overtighten.
Step 4: Mount the TV onto the Stand
- With the help of a second person, carefully lift the TV and align the VESA mounting arms attached to the TV with the brackets on the central pole.
- Hook the TV onto the stand's brackets. Ensure the TV is securely seated.
- Engage any safety locks or screws on the stand's brackets to prevent the TV from accidentally dislodging.
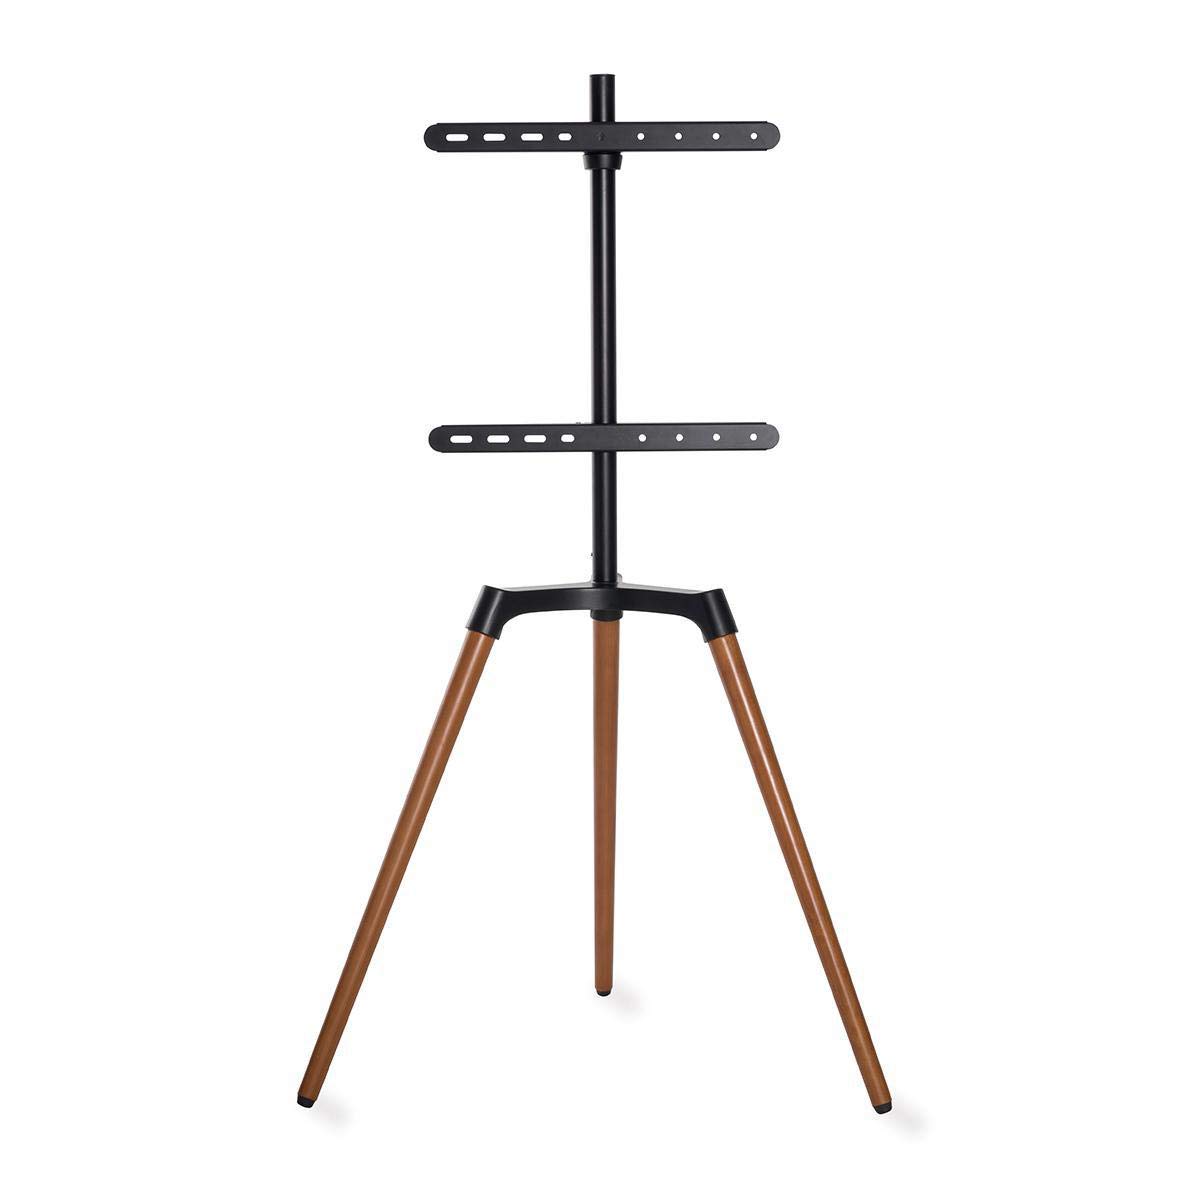
Image: The Nedis TVSM7060BK TV Floor Stand with a transparent outline of a television, illustrating how a TV would appear once mounted. This provides a visual guide for the final setup.
4. Operating Instructions
Adjusting TV Position
- Swivel Function: The TV stand allows for swivel adjustment. Gently rotate the TV to achieve the desired viewing angle. Do not force the rotation beyond its natural limits (approximately ±70 degrees).
- Height Adjustment: To adjust the TV height, you will need to loosen the screws securing the VESA mounting brackets to the central pole. With assistance, carefully raise or lower the TV to the desired position, then re-tighten the screws firmly.
Cable Management
The Nedis TVSM7060BK features improved cable management to keep your setup tidy and safe.
- Gather all TV and accessory cables.
- Route the cables along the central support pole.
- Use the provided cable management clip to secure the cables neatly to the pole, preventing tangles and reducing trip hazards.

Image: Detailed view of the cable management clip attached to the central pole of the TV stand. This shows how cables can be neatly routed and secured for a clean setup.
5. Maintenance
- Cleaning: Wipe the stand with a soft, dry cloth. For stubborn marks, a slightly damp cloth can be used, followed by immediate drying. Avoid abrasive cleaners or solvents.
- Regular Checks: Periodically check all screws and connections to ensure they remain tight and secure. Re-tighten if necessary.
- Damage: If any part of the stand becomes damaged, discontinue use immediately and contact customer support for assistance.
6. Troubleshooting
- TV is not level: Ensure the VESA mounting brackets are level on the central pole and securely tightened. Adjust if necessary.
- Stand feels unstable: Verify that the tripod legs are fully extended and locked, and the stand is placed on a flat, stable surface. Check all assembly screws for tightness. Ensure the TV weight does not exceed 35 kg.
- Difficulty swiveling the TV: Check for any obstructions behind the TV or around the stand. Ensure cables are not snagging. Do not force the swivel.
- Missing parts: Refer to the "Package Contents" section. If parts are missing, contact your retailer for replacements.
7. Specifications
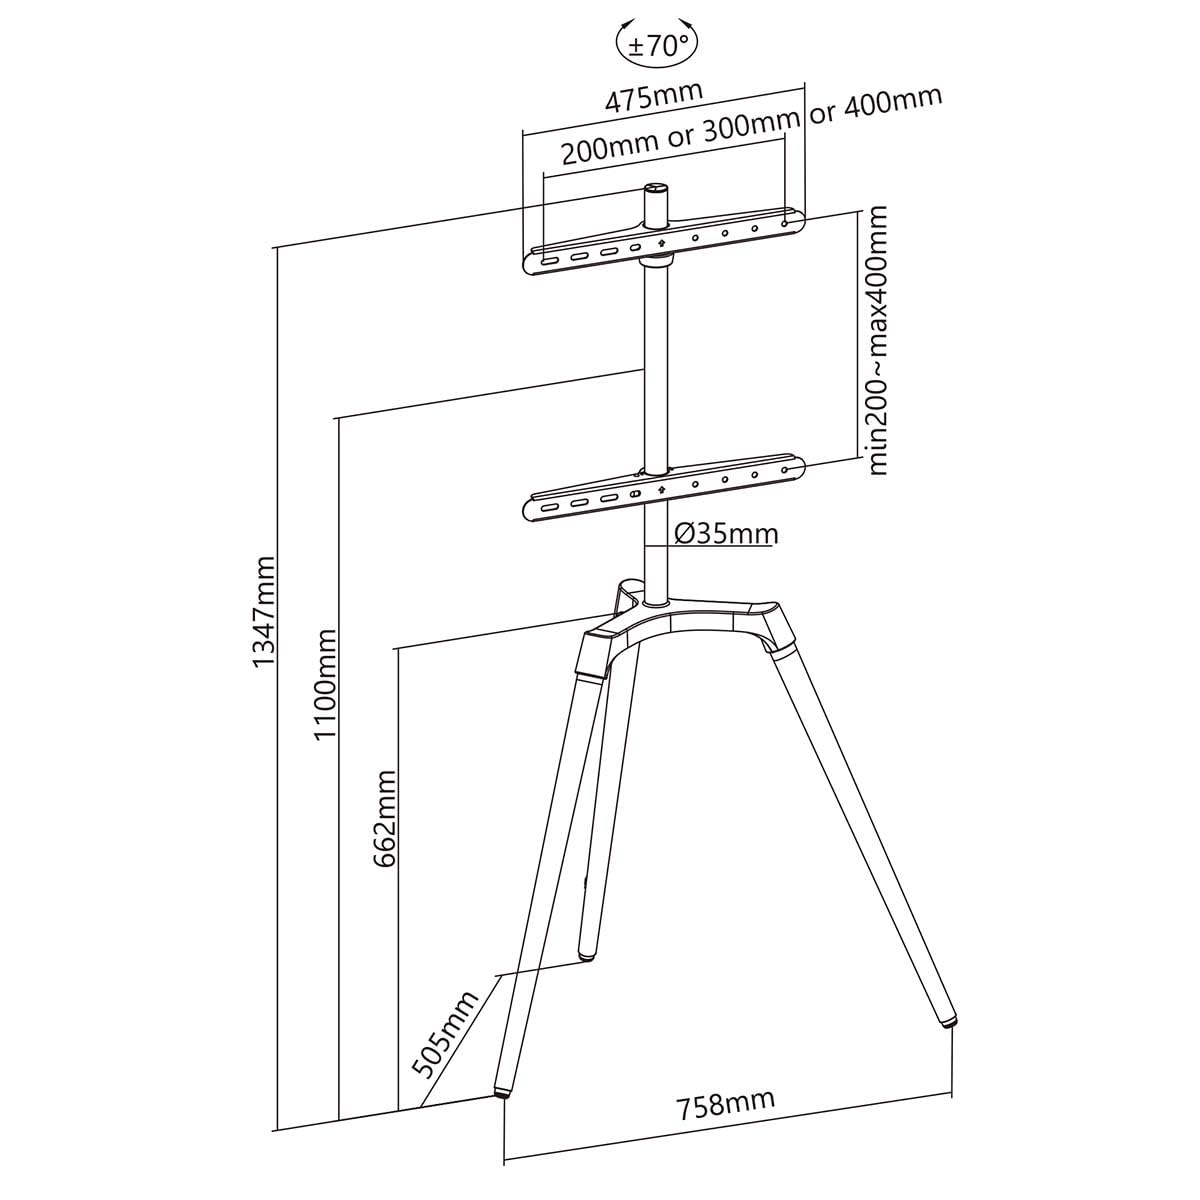
Image: Technical diagram showing the key dimensions of the Nedis TVSM7060BK TV Floor Stand, including height, width, and VESA mounting ranges. This helps in planning placement and compatibility.
| Model: | TVSM7060BK |
| Brand: | NEDIS |
| Material: | Aluminium, Steel |
| Color: | Black, Brown (wooden legs) |
| Screen Size Compatibility: | 127 cm (50") - 165.1 cm (65") |
| Maximum Weight Capacity: | 35 kg |
| VESA Compatibility (Min): | 200 x 200 mm |
| VESA Compatibility (Max): | 400 x 400 mm |
| Swivel Angle: | ±70° |
| Number of Displays Supported: | 1 |
8. Warranty and Support
For warranty information or technical support, please refer to the documentation provided with your purchase or visit the official Nedis website. Keep your proof of purchase for warranty claims.
Nedis Website: www.nedis.com


