1. Introduction
This manual provides essential information for the safe and efficient operation of your Studiomaster CLUBXS8 8-Input Audio Mixer. Please read it thoroughly before use and retain it for future reference.
The Studiomaster CLUBXS8 is a compact and portable 8-input audio mixer featuring 4 microphone channels, 2 stereo channels, 16 DSP effects, Bluetooth connectivity, and a USB/SD media player for playback and recording. It also includes 3-band EQ on each channel and built-in channel compression.
2. Package Contents
Upon unboxing, please verify that all components are present and in good condition. The package should contain:
- Studiomaster CLUBXS8 8-Input Audio Mixer
- Power Adapter (100V - 240V ~)
- Instruction Manual

Figure 1: Front view of the Studiomaster CLUBXS8 mixer.
3. Setup
3.1 Power Connection
- Ensure the mixer's power switch is in the OFF position.
- Connect the provided power adapter to the "AC INPUT/FUSE" port on the rear panel of the mixer.
- Plug the power adapter into a suitable electrical outlet (100V - 240V ~).
- Turn the mixer's power switch to the ON position. The power indicator should illuminate.

Figure 2: Rear panel with power input and fuse. Air vents must not be obstructed.
3.2 Input Connections
The CLUBXS8 offers various input options:
- Microphone Inputs (Channels 1-4): Use XLR cables for microphones. These channels feature a Mic Gain Range of 6dB to 50dB.
- Line Inputs (Channels 1-4): Use 1/4" TRS or TS cables for line-level instruments or devices. These channels have a Line Gain Range of 10dB to 34dB.
- Stereo Inputs (Channels 5/6 and 7/8): Use 1/4" TS cables for stereo line-level sources.
- CD/Tape Input (RCA): Connect external playback devices using RCA cables.
3.3 Output Connections
Connect your monitoring or recording equipment to the following outputs:
- Main Out (XLR): Connect to your main PA system or powered speakers.
- Control Room Out (1/4" TS): For connecting to studio monitors.
- Phones (1/4" TRS): For headphone monitoring.
- Record Out (RCA): For connecting to a recording device.
4. Operating Instructions
4.1 Channel Controls
Each input channel (1-4 for mic/line, 5/6 and 7/8 for stereo line) features:
- GAIN Knob: Adjusts the input sensitivity for the connected device.
- EQ (High, Mid, Low): 3-band equalizer for tone shaping. High at 12kHz, Mid at 2.5kHz, Low at 45Hz.
- LO CUT Button: Engages an 80Hz low-cut filter to remove unwanted low-frequency rumble.
- AUX Knob: Controls the send level to the auxiliary output.
- FX Knob: Controls the send level to the internal DSP effects processor.
- PAN/BAL Knob: Adjusts the stereo positioning (pan for mono channels, balance for stereo channels).
- MUTE Button: Mutes the channel output.
- PFL Button: Pre-Fader Listen for monitoring the channel signal through headphones without affecting the main mix.
- Channel Fader: Adjusts the channel's volume level in the main mix.
4.2 DSP Effects
The mixer includes 16 DSP effects. Use the dedicated controls in the master section:
- PROGRAM Knob: Selects one of the 16 available DSP effects.
- PARAMETER Knob: Adjusts a specific parameter of the selected effect (e.g., decay time for reverb).
- FX TO MAIN Fader: Controls the overall level of the effects sent to the main mix.
- FX MUTE Button: Mutes the effects output.
- Footswitch Socket: Allows for external control of DSP On/Off.
4.3 USB/SD Media Player
The integrated media player supports MP3 audio playback and recording to a USB drive or SD card (128kbps mono).
- Insert a USB drive or SD card into the respective slot.
- Use the navigation buttons (PREV, NEXT, VOL+, VOL-, MODE, P/P) to control playback and recording functions.
- The display screen will show track information and status.
4.4 Bluetooth Connectivity
To connect a Bluetooth device:
- Press the MODE button on the media player section until "Bluetooth" is displayed.
- On your mobile device, enable Bluetooth and search for available devices.
- Select "MIX-MP3 BT" (or similar name) from the list to pair.
- Once connected, you can play audio from your device through the mixer.
4.5 Headphone Monitoring
Connect headphones to the 1/4" TRS "PHONES" jack. Use the "PHONES" knob to adjust the headphone volume. The PFL buttons on individual channels allow you to monitor specific channels pre-fader.
4.6 Phantom Power
The mixer provides +48V phantom power for condenser microphones. Activate it using the "PHANTOM +48V" switch in the master section. Ensure condenser microphones are connected before activating phantom power to prevent damage.
5. Maintenance
- Keep the mixer clean by wiping it with a soft, dry cloth. Avoid liquid cleaners.
- Ensure air vents are not obstructed to prevent overheating.
- Store the mixer in a cool, dry place away from direct sunlight and extreme temperatures.
- Regularly check all cable connections for wear and tear.
6. Troubleshooting
- No Power: Check the power cable connection and ensure the power switch is ON. Verify the power outlet is functional.
- No Sound Output: Check all input and output connections. Ensure channel faders and the main mix fader are up. Verify that channels are not muted and PFL is not engaged on all channels.
- Distorted Sound: Reduce input GAIN levels and check for clipping indicators. Ensure output levels are not exceeding the limits of connected devices.
- No Effect: Check the FX send knobs on channels and the FX TO MAIN fader. Ensure the FX MUTE button is not active.
- Bluetooth Connection Issues: Ensure the mixer's media player is in Bluetooth mode. Check that your device is discoverable and within range. Try restarting both devices.
7. Specifications
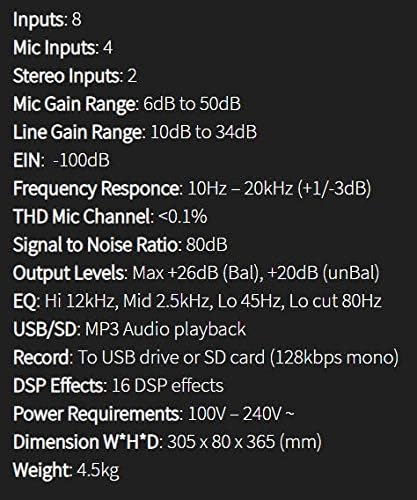
Figure 3: Detailed specifications of the Studiomaster CLUBXS8.
| Feature | Specification |
|---|---|
| Inputs | 8 (4 Mic, 2 Stereo) |
| Mic Inputs | 4 |
| Stereo Inputs | 2 |
| Mic Gain Range | 6dB to 50dB |
| Line Gain Range | 10dB to 34dB |
| EIN | -100dB |
| Frequency Response | 10Hz - 20kHz (+1/-3dB) |
| THD Mic Channel | <0.1% |
| Signal to Noise Ratio | 80dB |
| Output Levels | Max +26dB (Bal), +20dB (unBal) |
| EQ (Hi, Mid, Lo) | Hi 12kHz, Mid 2.5kHz, Lo 45Hz |
| Lo Cut | 80Hz |
| USB/SD | MP3 Audio playback |
| Record | To USB drive or SD card (128kbps mono) |
| DSP Effects | 16 DSP effects |
| Power Requirements | 100V - 240V ~ |
| Dimensions (W*H*D) | 12 x 14.37 x 3.14 inch (305 x 80 x 365 mm) |
| Weight | 10 lbs (4.5 kg) |
8. Warranty and Support
For warranty information and technical support, please refer to the Studiomaster official website or contact your local dealer. Keep your proof of purchase for warranty claims.