1. Introduction
The AgraTronix 8180 Soil Compaction Tester is designed to assess soil conditions by measuring compaction levels. Understanding soil compactness is crucial for plant growth, as it influences root development, water infiltration, and nutrient uptake. This device provides accurate data to help optimize tilling procedures, irrigation systems, and the application of fertilizers and herbicides.
2. Key Features
- Accurate Soil Compaction Testing: Designed to precisely measure soil compaction, helping determine optimal soil states for plant development.
- Easy-to-Read Dial: Features a stainless-steel, liquid-filled dial for accurate readings and reduced shock damage during transport or operation.
- Portable Design: Equipped with double-molded rubber handles and a lightweight body for ease of use and portability. Includes a hanger hole for convenient storage.
- Durable Construction: Made from high-grade stainless steel, including a 24-inch probe with an adjustable shock collar for reliable, long-lasting performance.
- 3-Way Rating System: Provides soil penetration data using a color-coded dial (Red, Yellow, Green) to indicate soil quality, aiding in efficient agricultural practices.
- Interchangeable Tips: Includes two tester tips (Small: 1/2 in. diameter, Large: 3/4 in. diameter) for varied testing needs.
3. Product Components
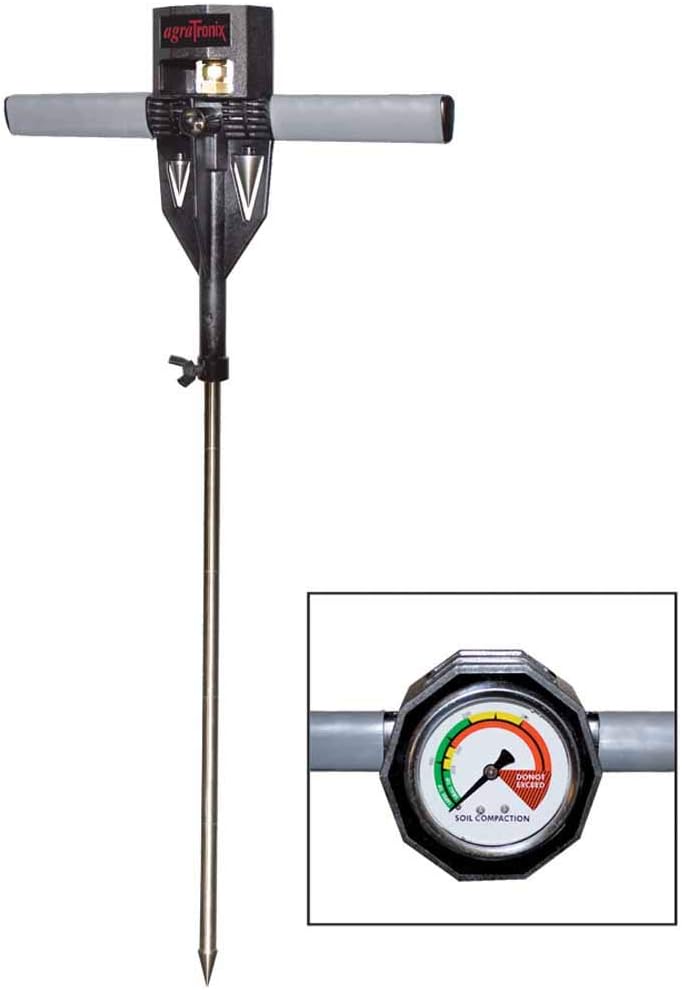
Figure 1: Overview of the AgraTronix 8180 Soil Compaction Tester, showing the main unit, probe, and handles.
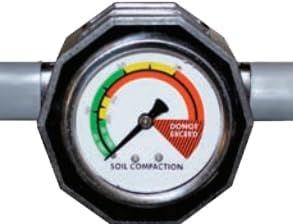
Figure 2: Detailed view of the water-filled stainless steel dial, featuring color-coded zones (Green, Yellow, Red) to indicate compaction levels.
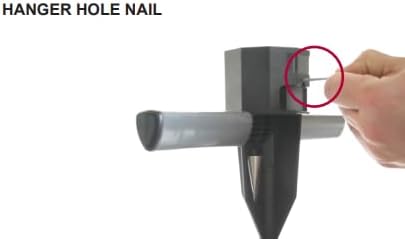
Figure 3: Illustration of the hanger hole, allowing for convenient storage of the device.

Figure 4: The soil compaction tester inserted into the ground, demonstrating its use with interchangeable tips.
The AgraTronix 8180 consists of a main body with double-molded rubber handles, a 24-inch stainless steel probe, and a water-filled stainless steel dial. It comes with two interchangeable tips: a small 1/2-inch diameter tip and a large 3/4-inch diameter tip.
4. Setup
- Unpack: Carefully remove all components from the packaging.
- Select Tip: Choose the appropriate tester tip (1/2-inch or 3/4-inch diameter) based on your testing requirements. The smaller tip is generally used for finer soils or when more precise readings are needed, while the larger tip is suitable for coarser soils.
- Attach Tip: Securely attach the selected tip to the end of the 24-inch stainless steel probe. Ensure it is firmly in place to prevent detachment during use.
- Inspect Device: Before first use, inspect the probe, handles, and dial for any signs of damage. The dial is liquid-filled; ensure there are no leaks or cracks.
5. Operating Instructions
- Choose Testing Location: Select the area of soil you wish to test. For accurate results, test multiple spots within the area.
- Insert Probe: Hold the device by its rubber handles. Slowly and steadily push the stainless steel probe vertically into the soil. Apply consistent downward pressure.
- Observe Reading: As the probe penetrates the soil, the needle on the water-filled dial will move, indicating the level of compaction in PSI (pounds per square inch).
- Record Data: Note the reading on the dial. The dial is color-coded to provide a quick visual assessment of soil quality:
- Green Zone: Indicates good soil quality with low compaction.
- Yellow Zone: Suggests moderate compaction, which may require attention.
- Red Zone: Signifies high compaction, indicating poor growing conditions and a need for intervention.
- Remove Probe: Gently pull the device straight up from the soil. Avoid twisting or bending the probe.
- Clean Probe: After each use, clean any soil residue from the probe and tip to maintain accuracy and prevent corrosion.
6. Maintenance
- Cleaning: After each use, wipe the probe and tip clean with a damp cloth to remove soil and debris. Ensure the device is dry before storage.
- Storage: Store the soil compaction tester in a dry, cool place away from direct sunlight and extreme temperatures. Use the hanger hole for convenient storage.
- Inspection: Periodically check the probe for any bends or damage. Inspect the dial for clarity and ensure the liquid filling is intact.
- Tip Care: Ensure the interchangeable tips are clean and free from wear. Replace if damaged to maintain accurate readings.
7. Troubleshooting
- Inaccurate Readings: Ensure the probe and tip are clean. Verify that the probe is inserted vertically and with consistent pressure. Check if the tip is securely attached.
- Difficulty Penetrating Soil: If the soil is excessively hard or dry, moisten the area slightly before testing. Ensure the correct tip size is being used for the soil type.
- Needle Not Moving: Check for any obstructions on the probe or damage to the internal mechanism. If the dial is damaged or leaking, the unit may require professional service or replacement.
8. Specifications
- Model: AgraTronix 8180
- Probe Length: 24 inches
- Maximum PSI Range: 0 to 300 PSI
- Handles: Double-molded rubber grips
- Dial: Water-filled stainless steel, color-coded (Red, Yellow, Green)
- Tester Tips: Small (1/2 in. diameter), Large (3/4 in. diameter)
- Construction Material: High-grade stainless steel
- Item Weight: 6 pounds
- Manufacturer: AgraTronix
9. Warranty and Support
For warranty information, technical support, or service inquiries, please refer to the documentation included with your purchase or contact AgraTronix customer service directly. Keep your proof of purchase for any warranty claims.