Mikro-mir 48-007
American Helicopter XH-26 Jet Plastic Model Kit Instruction Manual
Model: AMP 48-007 | Brand: Mikro-mir
Product Overview
This manual provides detailed instructions for assembling the AMP 48-007 American Helicopter XH-26 Jet Plastic Model Kit. The XH-26 Jet, also known as XA-8, was an experimental light pilot helicopter developed by the American Helicopter Company for the US Army and Air Force in 1951. This kit allows enthusiasts to recreate this unique aircraft in 1/48 scale.
- Manufacturer: AMP (Ukraine)
- Scale: 1/48
- Material: High-quality plastic
- Condition: New in Box, unpainted and unassembled

Figure 1: Front view of the kit box art, depicting the assembled XH-26 Jet in flight.
Kit Contents
Before beginning assembly, please verify that all components are present and undamaged. The kit includes:
- One frame with plastic details (grey sprue)
- One frame made of transparent plastic (clear sprue for canopy and windows)
- Decal sheet (stickers for markings)
- Photo-etched parts (for fine details)
- Masking sheet (for painting clear parts)
- Detailed instruction manual (in English and Russian)
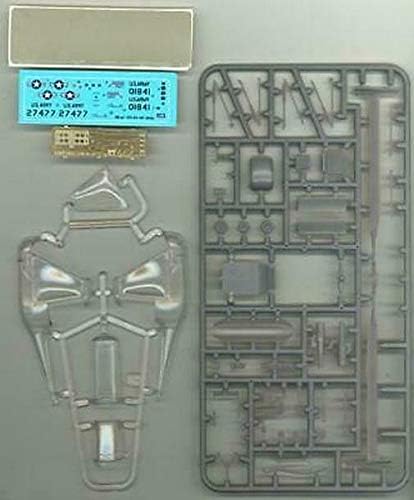
Figure 2: Overview of the kit contents, showing the grey plastic sprue, clear plastic sprue, decal sheet, photo-etched parts, and masking sheet.
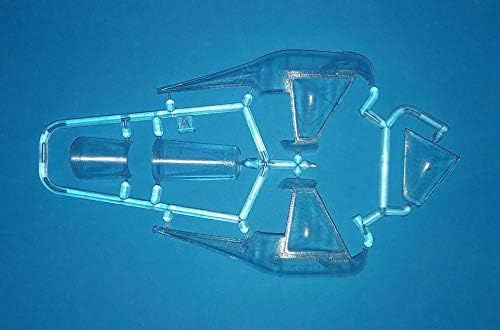
Figure 3: Detailed view of the plastic sprues, highlighting the various molded parts for the helicopter body, rotor, and other components.
Assembly Instructions
Assembly requires modeling tools such as plastic cement, hobby knife, sprue cutters, and tweezers (not included). Follow the numbered steps in the included instruction booklet for best results. This section provides a general overview of the assembly process.
- Preparation: Carefully remove parts from the sprues using sprue cutters. Clean any flash or mold lines with a hobby knife or sanding stick. Identify parts according to the provided diagrams.
- Cockpit Assembly: Assemble the interior cockpit components, including the seat, control stick, and instrument panel. Paint these parts before assembly if desired.
- Fuselage Assembly: Join the fuselage halves, ensuring proper alignment. Secure with plastic cement. Attach the clear canopy and windows using clear-part friendly adhesive.
- Rotor and Landing Gear: Assemble the main rotor mast and blades. Attach the landing skids to the underside of the fuselage.
- Detailing: Attach smaller components such as antennas, lights, and photo-etched parts. Refer to the detailed diagrams for placement.
- Painting and Decals: Apply primer and paint according to the suggested color scheme. Once paint is dry, apply decals using decal setting solution for a seamless finish.
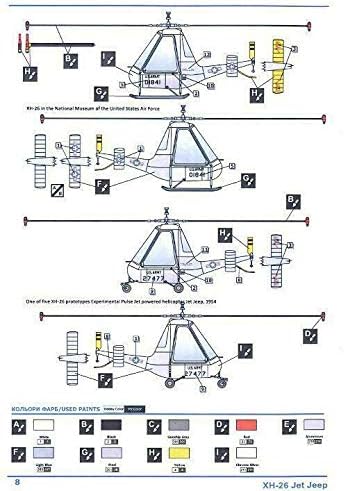
Figure 4: Diagram illustrating the layout of parts on the sprues and initial assembly sequences, including fuselage and cockpit components.
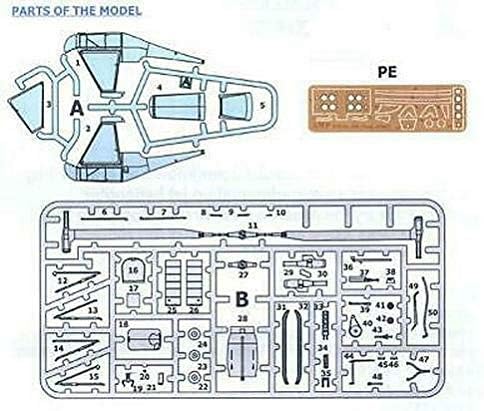
Figure 5: Further assembly diagrams, detailing the attachment of the main rotor, landing gear, and other external components.

Figure 6: An artistic rendering of the completed XH-26 Jet Helicopter model, showcasing the final appearance after assembly and painting.
Operating Instructions
As this is a static display model kit, there are no operational instructions. The assembled model is intended for display purposes only and does not feature moving parts or electronic functions.
Maintenance
Proper care will ensure the longevity and appearance of your assembled model.
- Cleaning: Dust the model regularly with a soft, dry brush or a can of compressed air. Avoid using water or chemical cleaners, as these may damage paint or decals.
- Display Environment: Display the model in a cool, dry place away from direct sunlight, extreme temperatures, and high humidity. Prolonged exposure to sunlight can cause paint fading and plastic degradation.
- Handling: Handle the model carefully, grasping it by sturdy sections like the fuselage. Avoid touching delicate parts such as rotor blades or antennas to prevent breakage.
Troubleshooting
Here are solutions to common issues encountered during model kit assembly:
Specifications
Warranty and Support
Information regarding specific warranty terms for this model kit is not provided. For support concerning missing or defective parts, please contact the retailer or manufacturer directly with your purchase details. Ensure to retain your proof of purchase.
Ask a question about this manual
Ask about setup, troubleshooting, compatibility, parts, safety, or missing instructions. Manuals+ will review the question and use this page’s manual context to help answer it.