1. Introduction
This manual provides essential information for the safe and effective installation, operation, and maintenance of your Walfront AS-10A-220V Automatic Outdoor Photocell Light Switch Sensor. This device is designed to automatically control outdoor lighting based on ambient light levels, offering convenience and energy efficiency. Please read this manual thoroughly before use and retain it for future reference.
2. Safety Information
WARNING: Electrical shock hazard. Improper installation or use can result in serious injury or death. Always follow these safety guidelines:
- Installation must be performed by a qualified electrician in accordance with all local and national electrical codes.
- Disconnect power at the circuit breaker or fuse box before installing or servicing the unit.
- Ensure the voltage supply matches the product's specified operating voltage (220V AC).
- Do not exceed the maximum load capacity of 2200W (10A).
- This device is designed for outdoor use and is rainproof, but ensure all connections are properly sealed and protected from direct water ingress.
- Do not attempt to disassemble or modify the unit. There are no user-serviceable parts inside.
3. Product Overview
The Walfront AS-10A-220V photocell light switch is an automatic control device designed for outdoor lighting applications. It features a photosensitive sensor that detects ambient light, turning connected lights on at dusk and off at dawn.
Key Features:
- Automatic Control: Automatically detects ambient light to control connected lighting.
- Sensitive and Reliable Performance: High sensitivity ensures accurate light detection and reliable operation.
- Precise Detection: Offers a 10-meter detection range for effective light sensing.
- Outdoor Application: Rainproof design suitable for controlling outdoor street lights and other exterior luminaires.
- High Power Capacity: Supports a load power of up to 2200W (10A).
- Anti-Interference Delay Circuit: Equipped with a delay circuit to prevent false switching due to momentary light changes.
Components:
The unit consists of a compact plastic housing, a photosensitive sensor, and three color-coded wires for electrical connection, along with a metal mounting bracket.

Figure 3.1: Front view of the Walfront AS-10A-220V photocell light switch with its wiring.

Figure 3.2: Close-up view highlighting the rainproof design, automatic photosensitive operation, high sensitivity, and the anti-interference delay circuit of the photocell switch.
4. Specifications
| Specification | Value |
|---|---|
| Manufacturer | Walfront |
| Item Model Number | AS-10A-220V |
| Material | Plastic |
| Operating Mode | ON-OFF |
| Current Rating | 10 A |
| Operating Voltage | 220 Volts AC |
| Load Power | 2200 W |
| Detection Range | 10 meters |
| Delayed Shutdown Time | 0.1 s |
| Contact Type | Normally Open |
| Connector Type | Plug-in |
| Terminal Type | Screw |
| Switch Type | Photoelectric Switch |
| Country of Origin | China |
5. Setup and Installation
Proper installation is crucial for the optimal performance and safety of the photocell switch. Ensure power is disconnected before proceeding.
Wiring Diagram:
The photocell switch typically has three color-coded wires for connection:
- Red Wire: Connects to the LOAD (output to the light fixture).
- Black Wire: Connects to the LINE (incoming live/hot wire from power supply).
- White Wire: Connects to NEUTRAL (common neutral wire).
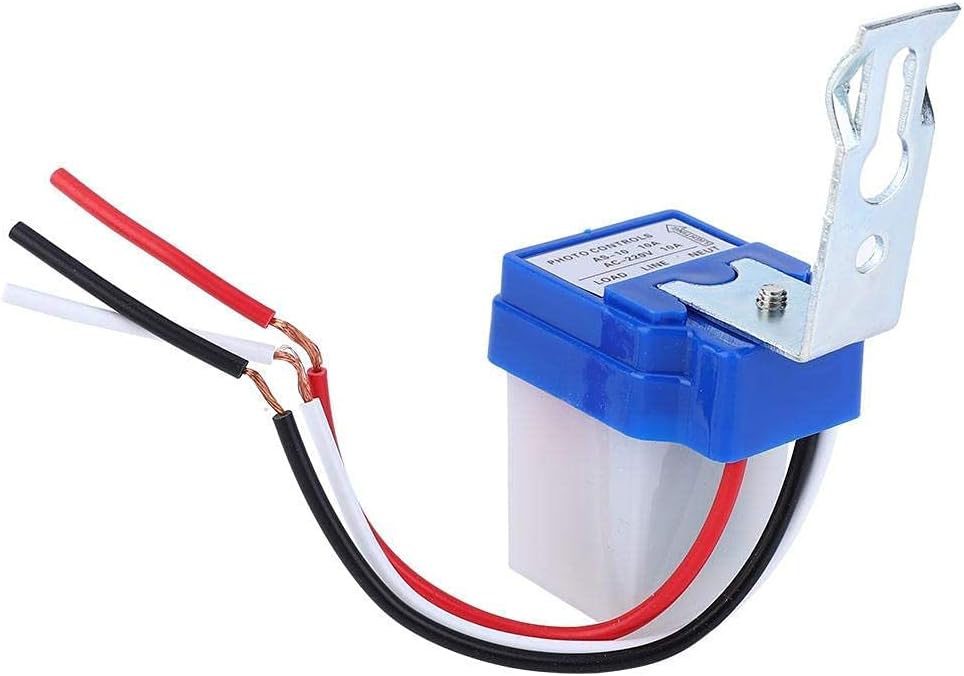
Figure 5.1: Detailed view of the wiring connections on the photocell switch, showing the red, black, and white wires.
Installation Steps:
- Disconnect Power: Turn off the power supply to the circuit at the main breaker or fuse box. Verify with a voltage tester.
- Mount the Switch: Choose a suitable outdoor location for mounting. The sensor should be exposed to natural light and not obstructed by eaves, trees, or other objects that could cast shadows or reflect artificial light onto it. Mount the switch using the provided metal bracket and appropriate screws. Ensure the sensor window faces the sky or the direction of natural light.
- Wire Connections:
- Connect the black wire from the photocell switch to the incoming live/hot wire from your power supply.
- Connect the white wire from the photocell switch to the neutral wire of your power supply and the neutral wire of your light fixture.
- Connect the red wire from the photocell switch to the live/hot wire of your light fixture.
- Secure Wiring: Route and secure all wiring to prevent damage and ensure compliance with local codes.
- Restore Power: Once all connections are secure and verified, restore power to the circuit.

Figure 5.2: Example of a photocell switch installed in an outdoor environment, controlling a street light.
6. Operating Instructions
The Walfront AS-10A-220V photocell light switch operates automatically based on ambient light conditions. There are no manual controls or adjustments required after installation.
- Automatic On: When the ambient light level drops below a certain threshold (typically at dusk), the photocell sensor will detect the change and automatically turn on the connected light fixture.
- Automatic Off: When the ambient light level rises above a certain threshold (typically at dawn), the photocell sensor will detect the change and automatically turn off the connected light fixture.
- Delay Function: The integrated 0.1-second delay circuit helps prevent false switching due to momentary light fluctuations (e.g., car headlights, lightning flashes).
For optimal performance, ensure the sensor is not exposed to direct artificial light sources at night, as this could cause it to turn off prematurely.
7. Maintenance
The Walfront AS-10A-220V photocell light switch requires minimal maintenance. Regular checks can help ensure its longevity and proper function.
- Cleaning: Periodically inspect the sensor window for dirt, dust, or debris. Gently clean the sensor surface with a soft, damp cloth to ensure accurate light detection. Do not use abrasive cleaners or solvents.
- Obstruction Check: Ensure that no new obstructions (e.g., growing foliage, new structures) are blocking the sensor's exposure to natural light.
- Wiring Inspection: Annually, or if issues arise, visually inspect the wiring connections for any signs of wear, corrosion, or damage. Ensure all connections remain secure. Always disconnect power before inspection.
- Environmental Factors: While rainproof, extreme weather conditions can affect any outdoor electrical device. Ensure the unit is not subjected to prolonged submersion or direct high-pressure water jets.
8. Troubleshooting
If you experience issues with your photocell light switch, refer to the following troubleshooting guide:
| Problem | Possible Cause | Solution |
|---|---|---|
| Light stays on during the day. | Sensor is obstructed or dirty. | Clean the sensor window. Remove any obstructions. |
| Sensor is not receiving enough natural light. | Relocate the sensor to an area with better exposure to natural light. | |
| Light does not turn on at night. | No power to the switch or light fixture. | Check circuit breaker/fuse. Verify wiring connections (ensure power is off first). |
| Sensor is exposed to artificial light at night. | Ensure no streetlights, porch lights, or other artificial light sources are shining directly onto the sensor. Relocate if necessary. | |
| Faulty light bulb or fixture. | Test the light fixture with a known working power source or bulb. | |
| Light flickers or cycles on/off rapidly. | Intermittent light source or reflection near sensor. | Identify and eliminate the intermittent light source. Ensure the sensor is not reflecting light from nearby surfaces. |
| Loose wiring connection. | Disconnect power and check all wiring connections for tightness. | |
| Switch does not respond. | Unit failure. | If all other troubleshooting steps fail, the unit may be faulty and require replacement. |
If you are unable to resolve the issue after following these steps, consult a qualified electrician.
9. Warranty and Support
Walfront products are designed for reliability and performance. While specific warranty details are not provided in this manual, most products come with a standard manufacturer's warranty against defects in materials and workmanship.
For technical support, warranty claims, or further assistance, please refer to the retailer where you purchased the product or visit the official Walfront website for contact information.


