Pawhut D06-072
Pawhut Modular 2-Level Pet Playpen Cage Instruction Manual
Model: D06-072 | Brand: Pawhut
Introduction
This manual provides detailed instructions for the assembly, operation, and maintenance of your Pawhut Modular 2-Level Pet Playpen Cage (Model D06-072). Please read these instructions carefully before assembly and retain for future reference.
Safety Warnings
- Ensure all connectors are securely fastened to prevent collapse.
- Keep small children away from the assembly area.
- Regularly inspect the playpen for any loose or damaged parts.
- This product is designed for small animals. Do not use for animals that may chew through metal or plastic components.
- Place the playpen on a flat, stable surface.
- The wire mesh may not be suitable for very small animals that could slip through the gaps.
Package Contents
Verify that all components listed below are present in your package before beginning assembly.

Figure 1: Package Contents Overview
This image displays the various parts included in the box, such as wire panels, connectors, cable ties, and a wooden mallet.
- 35 x Wire Panels (approx. 35 x 35 cm each)
- 1 x Door Panel (approx. 35 x 35 cm)
- 72 x Plastic Multi-angle Connectors
- Multiple Cable Ties
- 1 x Wooden Mallet
Setup and Assembly Instructions
Follow these steps to assemble your modular pet playpen. The design allows for various configurations.
- Plan Your Layout: Before connecting panels, decide on your desired configuration. The modular design allows for single-level, multi-level, or custom shapes.
- Connect Panels: Insert the corners of the wire panels into the slots of the plastic multi-angle connectors. Ensure each panel corner is fully seated and clicks into place. Use the provided wooden mallet to gently tap the panels into the connectors for a secure fit.
- Build the Base: Start by forming the base of your playpen. Connect panels to create the desired footprint.
- Add Walls and Levels: Continue adding panels vertically to form the walls. For multi-level configurations, use panels as platforms and ramps. Ensure ramps are securely attached and stable for your pet.
- Install Door Panel: Integrate the door panel into your chosen configuration. Ensure it opens and closes smoothly and the latch functions correctly.
- Secure with Cable Ties: For added stability, use the provided cable ties to reinforce connections between panels, especially at corners and where panels meet. This helps prevent panels from separating under pressure.
- Attach Anti-slip Mats: Place the anti-slip mats on the bottom connectors to prevent the playpen from sliding on smooth surfaces.

Figure 2: Assembly Diagram
This diagram shows how wire panels connect to the multi-angle plastic connectors to form the structure.

Figure 3: Secure Connection Detail
A detailed view of a panel connection, highlighting the use of a cable tie for enhanced stability.
Operating Instructions
Intended Use
The Pawhut Modular Pet Playpen is designed to provide a safe and spacious enclosure for small domestic animals such as rabbits, guinea pigs, ferrets, and hedgehogs. It can be used indoors or outdoors.
Customization and Configuration
One of the key features of this playpen is its modularity. You can reconfigure the panels to create different shapes and sizes to suit your space and your pet's needs. Examples include:
- Rectangular or Square Enclosures: Standard shapes for general use.
- L-shaped or U-shaped Layouts: To fit into room corners or against walls.
- Multi-level Habitats: Create elevated platforms and ramps for climbing and exploration.
- Dividers: Use panels to create separate sections within a larger enclosure.

Figure 4: Example Playpen Setup
This image shows a typical configuration of the playpen in an indoor setting, housing two rabbits.
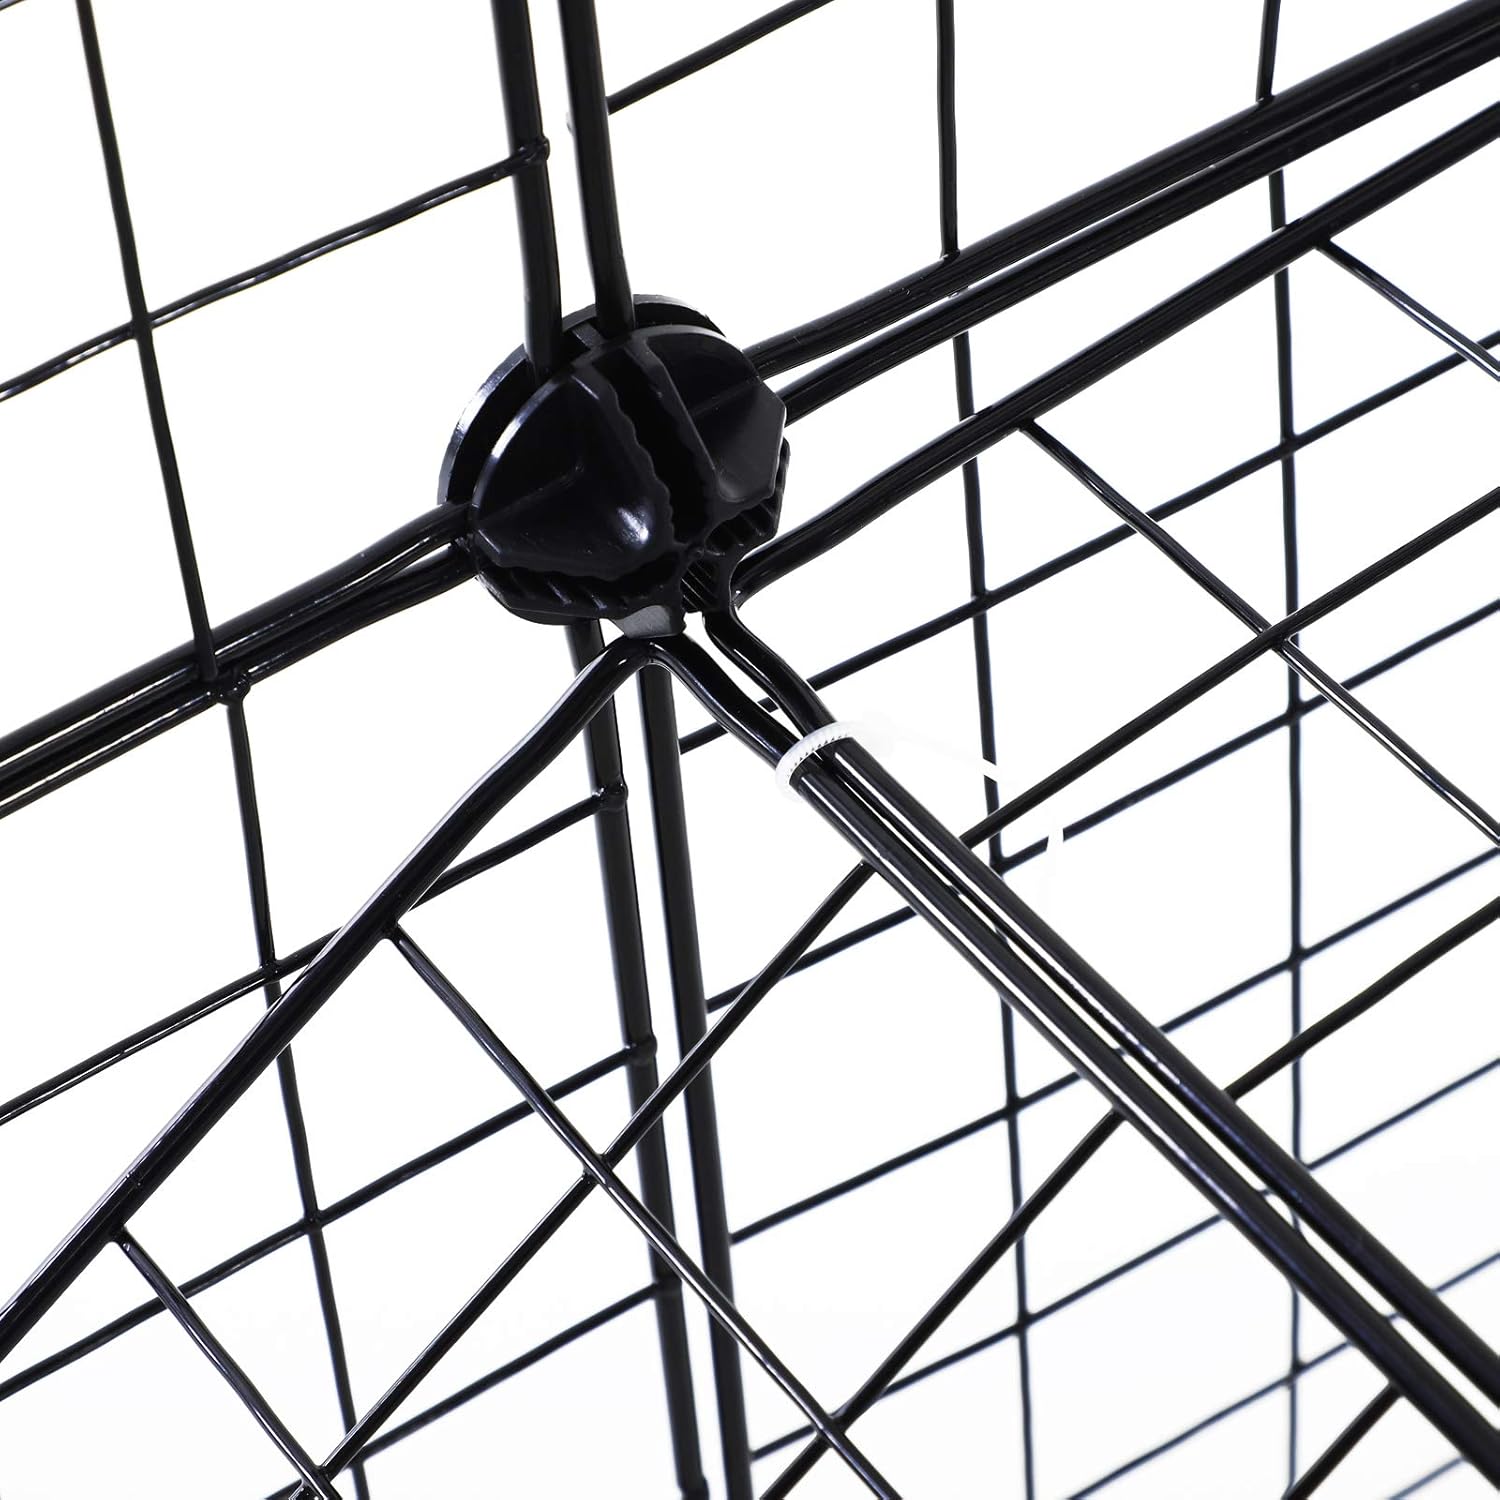
Figure 5: Customizable Configurations
Various layout options are depicted, demonstrating the versatility of the modular panels to create different shapes and sizes.
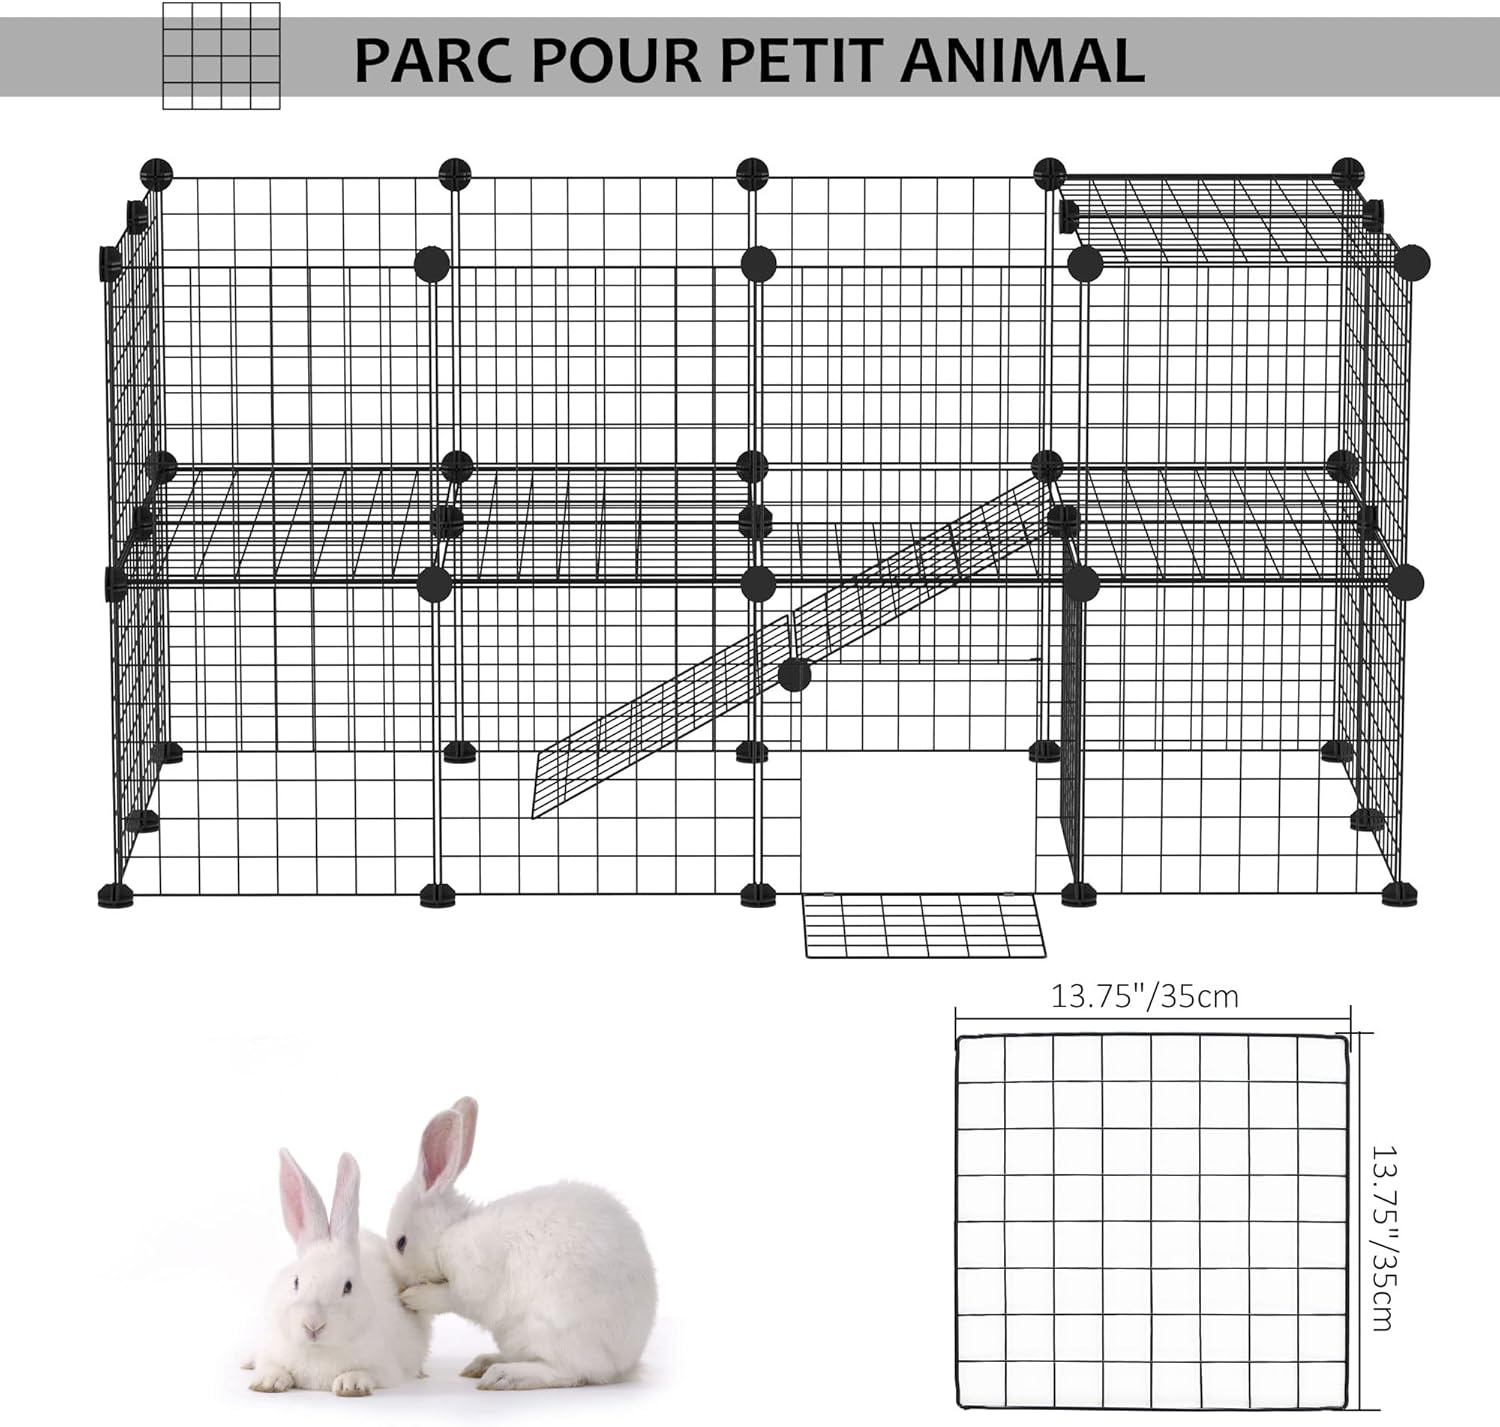
Figure 6: Configuration Examples with Panel Counts
This image illustrates several possible playpen designs and the number of panels required for each, ranging from 22 to 36 pieces.
Maintenance
- Cleaning: Regularly wipe down wire panels and plastic connectors with a damp cloth and mild, pet-safe cleaner. Rinse thoroughly and dry before reassembling or allowing pets back in.
- Inspection: Periodically check all connections to ensure they are secure. Tighten cable ties if necessary, or replace any damaged connectors or panels.
- Storage: If disassembling for storage, clean all components and store them in a dry place away from direct sunlight to prolong their lifespan.
Troubleshooting
| Problem | Possible Cause | Solution |
|---|---|---|
| Playpen feels unstable or wobbly. | Connectors not fully seated; insufficient cable ties; uneven surface. | Ensure all panel corners are fully inserted into connectors using the mallet. Add more cable ties at critical junctions. Place the playpen on a flat, level surface. |
| Panels detach easily. | Connectors are loose or damaged; cable ties are broken or missing. | Re-secure connections with the mallet. Replace any damaged connectors. Use additional cable ties to reinforce all panel joints. |
| Pet attempts to escape through gaps. | Gaps between panels; mesh size too large for pet. | Ensure all panels are tightly connected. Use cable ties to close any small gaps. If the mesh size (4x4 cm) is too large for your specific pet, this playpen may not be suitable. |
Specifications
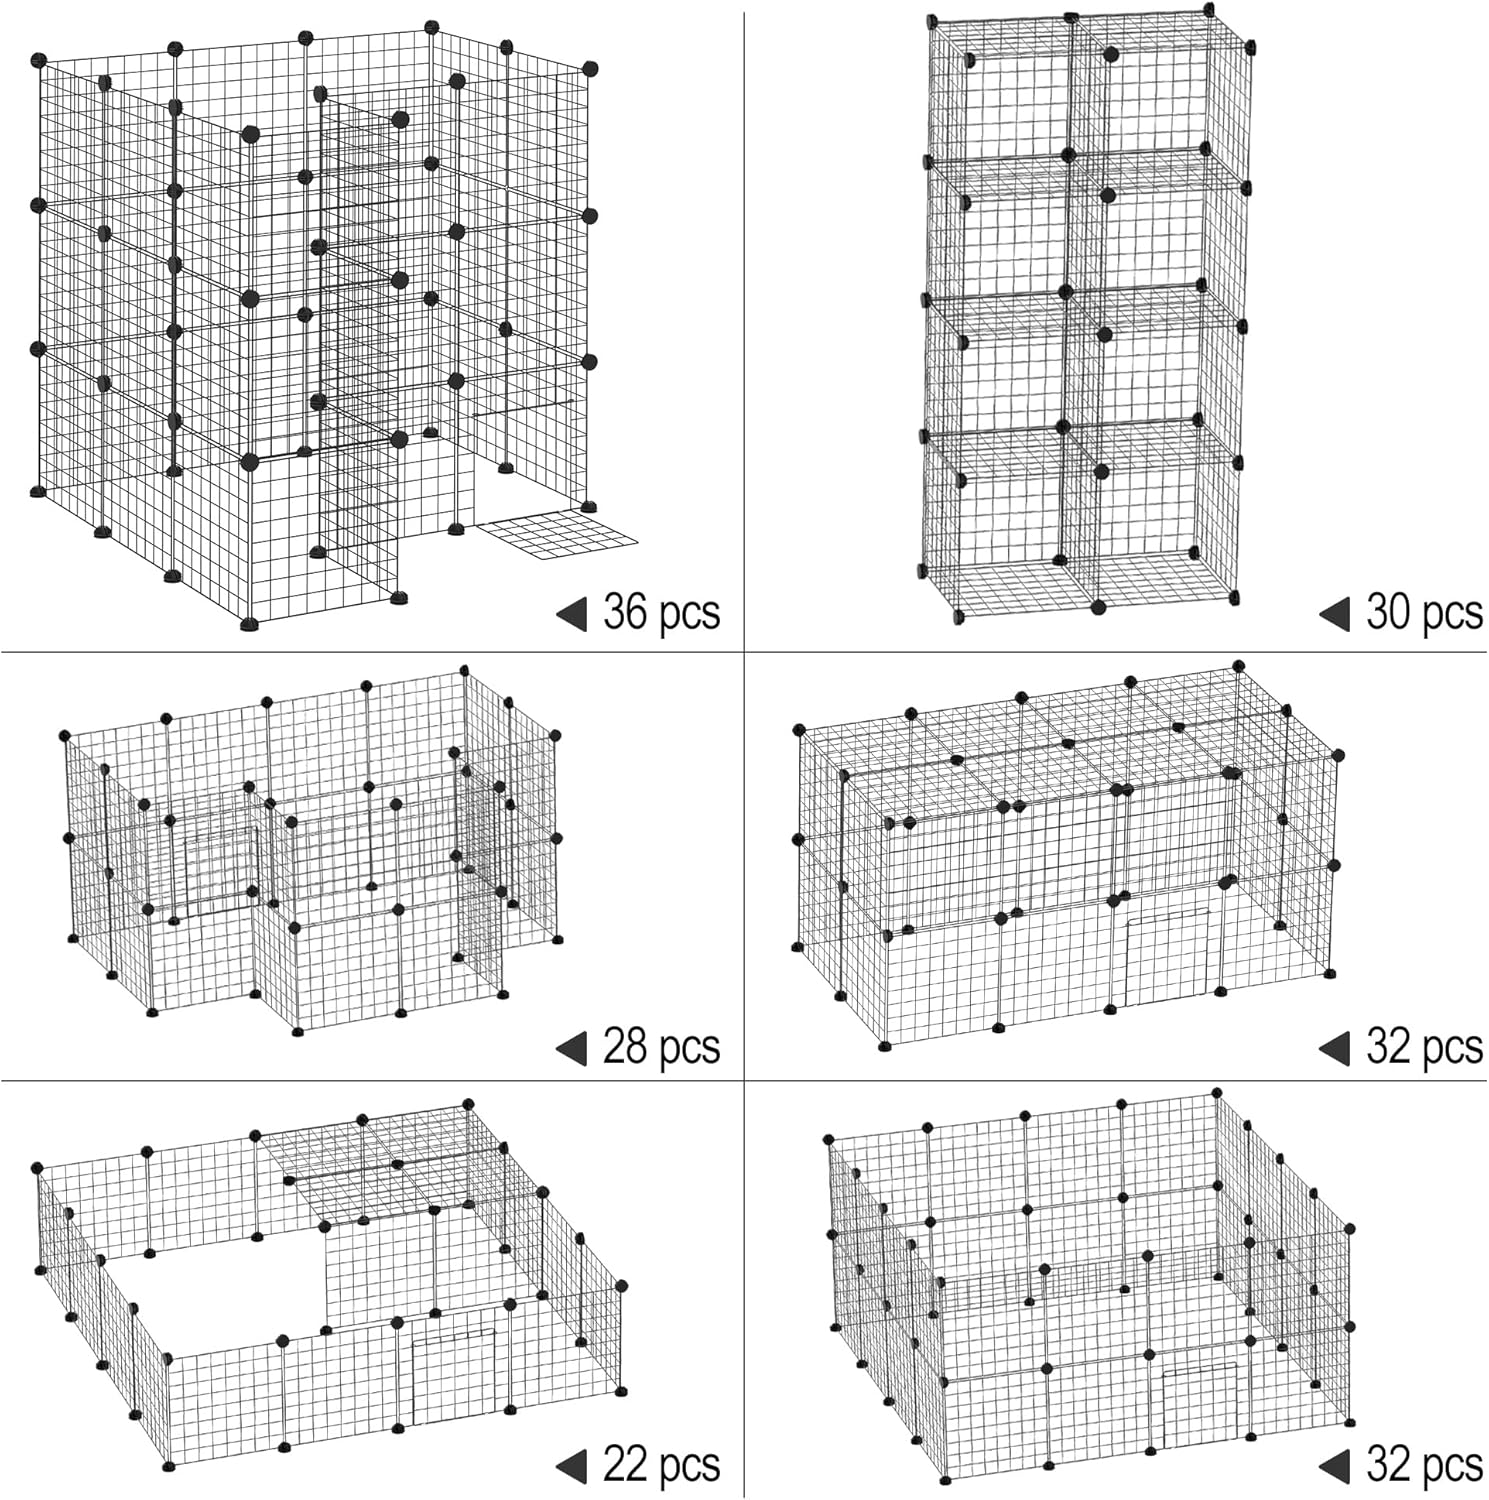
Figure 7: Product Dimensions and Grid Size
This image provides the overall dimensions of a typical setup (146L x 73W x 73H cm) and the grid size of the wire panels (4x4 cm).
| Feature | Detail |
|---|---|
| Model Number | D06-072 |
| Overall Dimensions (L x W x H) | 146 cm x 73 cm x 73 cm (approximate, configurable) |
| Panel Dimensions | 35 cm x 35 cm |
| Grid Size | 4 cm x 4 cm |
| Number of Panels | 36 (35 wire panels, 1 door panel) |
| Number of Levels | 2 (configurable) |
| Material | Metal wire panels, ABS plastic connectors |
| Color | Black (wire), Neutral (connectors) |
| Product Weight | 8.8 Kilograms |
| Recommended Species | Small animals (e.g., rabbits, guinea pigs, hedgehogs) |
| Special Features | Modular design, rounded edges, anti-slip mats |
Ask a question about this manual
Ask about setup, troubleshooting, compatibility, parts, safety, or missing instructions. Manuals+ will review the question and use this page’s manual context to help answer it.