1. Product Overview
The Sheng Bang HD-1688 is a fully automatic quartz clock movement designed for wall clocks. It features automatic time synchronization via the UK MSF radio signal and automatically adjusts for daylight saving time (summer/winter). This movement allows for the creation or customization of clocks, providing precise and reliable timekeeping.
Manual setup options are also available for regions outside the UK where the MSF signal may not be consistently received.

Figure 1: Front view of the Sheng Bang HD-1688 Quartz Clock Movement. This image shows the main body of the clock mechanism with the central shaft for attaching the clock hands.
2. Package Contents
Please verify that all the following components are included in your package:
- Sheng Bang HD-1688 Quartz Clock Movement
- Set of Clock Hands (Hour, Minute, Second)
- Black Rubber Washer
- Metal Hook (for hanging)
- Golden Metal Washer
- Hexagonal Nut

Figure 2: Included clock hands. The set typically includes an hour hand, a minute hand, and a second hand, all in black.

Figure 3: Mounting hardware. This includes a metal hanging hook, a black rubber washer, a golden metal washer, and a hexagonal nut for securing the movement.
3. Setup and Installation
Follow these steps to install your HD-1688 clock movement:
- Prepare the Clock Face: Ensure your clock face has a central hole suitable for the movement's shaft. The movement's total stem length is 16 mm, with a thread length of 8.5 mm, suitable for a dial up to 6 mm thick.
- Insert the Movement: Carefully insert the clock movement shaft through the central hole from the back of your clock face.
- Secure the Movement:
- Place the black rubber washer over the shaft on the front side of the clock face.
- Place the golden metal washer over the shaft.
- Thread the hexagonal nut onto the shaft and tighten it gently to secure the movement to the clock face. Do not overtighten.
- If using the metal hook for hanging, ensure it is positioned correctly before fully tightening the nut.
- Install Clock Hands:
- Before installing, remove any protective gasket from the clock hands.
- Align all hands to the 12 o'clock position.
- Gently press the hour hand onto the hour shaft.
- Gently press the minute hand onto the minute shaft.
- Gently press the second hand onto the second shaft.
- Ensure the hands are parallel to each other and do not touch. Adjust if necessary to prevent interference.
- Insert Battery: Open the battery compartment on the back of the movement. Insert one AA battery (not included), ensuring correct polarity (+/-).
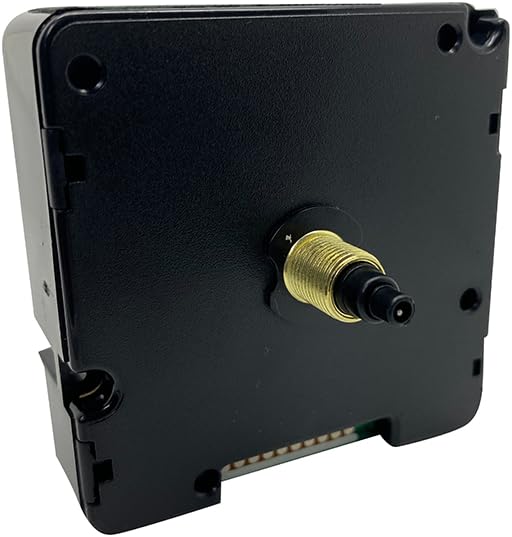
Figure 4: Side view of the movement. This image illustrates the shaft length and the overall dimensions of the mechanism, crucial for fitting into a clock face.
4. Operating Instructions
The HD-1688 movement is designed for automatic operation.
4.1 Automatic Time Synchronization (MSF)
Upon battery insertion, the movement will automatically search for the UK MSF radio signal to set the correct time. This process may take several minutes. Ensure the clock is placed in an area with good signal reception, away from large metal objects or electronic interference.
The movement will also automatically adjust for daylight saving time changes (summer/winter).
4.2 Manual Time Setting
If you are outside the UK or experience persistent signal reception issues, you can manually set the time using the buttons on the back of the movement.

Figure 5: Back view of the movement. This image displays the battery compartment and the control buttons labeled M.SET, RESET, and REC, used for manual adjustments and signal reception.
- M.SET (Manual Set): Press this button to manually advance the minute hand. Hold to advance rapidly.
- RESET: Press this button to reset the movement, typically used after battery replacement or if the clock is not synchronizing correctly. This will usually send the hands to 12 o'clock and initiate a new signal search.
- REC (Receive): Press this button to manually initiate a signal reception attempt.
5. Maintenance
5.1 Battery Replacement
The movement operates on one AA battery. When the clock stops or begins to lose time, it is an indication that the battery needs to be replaced.
- Remove the old battery from the compartment on the back of the movement.
- Insert a new AA battery, ensuring the correct polarity (+/-).
- The clock will then attempt to synchronize automatically.
Note: Always dispose of used batteries responsibly according to local regulations.
6. Troubleshooting
- Clock not running after battery insertion:
- Check battery polarity.
- Ensure the battery is new and fully charged.
- Press the RESET button on the back of the movement.
- Clock hands are stuck or not moving smoothly:
- Ensure the clock hands are not touching each other or the clock face/glass. Gently bend them if necessary to create clearance.
- Verify that the hands are securely attached to their respective shafts.
- Clock is not keeping accurate time or not synchronizing:
- Ensure the clock is placed in an open area, away from potential sources of interference such as large metal objects, televisions, computers, or other electronic devices.
- Try pressing the REC button to force a signal reception attempt.
- If outside the UK, manual time setting may be required.
- Replace the battery with a fresh one.
7. Specifications
| Brand | Dans Clock Shop |
| Model Number | HD-1688 |
| Manufacturer | HD-1688 Quartz |
| Color | Black |
| Material | Plastic |
| Product Dimensions (L x W x H) | 5.6 x 3.81 x 5.6 cm |
| Item Weight | 0.5 grams |
| Power Source | Battery Powered (1 x AA battery, not included) |
| Display Type | Analog |
| Special Feature | Indoor use, Automatic Time Synchronization (MSF) |
| Shaft Length | 16 mm (Total), 8.5 mm (Thread) |
| Dial Thickness Compatibility | Up to 6 mm |
8. Warranty and Support
Specific warranty information for the Sheng Bang HD-1688 movement is not provided in the product details. For further assistance, detailed assembly instructions, or to inquire about warranty, please visit the manufacturer's official website:
Dans Clock Shop Assembly Instructions
Please refer to the product label for any specific instruction manual numbers if prompted on the website.