1. Introduction
This manual provides detailed instructions for the DasMikro DSK-143 FUTABA S-FHSS Micro 7CH Surface Receiver. This micro receiver is designed for remote control applications, offering 7 channels of PWM output or 8 channels of PPM output, compatible with FUTABA S-FHSS protocol transmitters.

Figure 1: Top view of the DasMikro DSK-143 receiver, highlighting its compact size and integrated components.
2. Specifications
| Feature | Detail |
|---|---|
| Brand | DasMikro |
| Item Name | FUTABA SFHSS 7CH Micro RC Receiver |
| Channels | 7 channels (PWM), 8 channels (PPM) |
| Receiving Sensitivity | -99dBm |
| Frequency Range | 2.4-2.48GHz |
| Power Input | 3.7-5V DC |
| Weight | 0.6g |
| Antenna Length | 30mm |
| Size | 15mm x 12mm x 2.5mm |
| Color | Yellow |
3. Setup and Connections
Proper connection of the receiver to your system is crucial for correct operation. Refer to the diagram below for pin assignments.
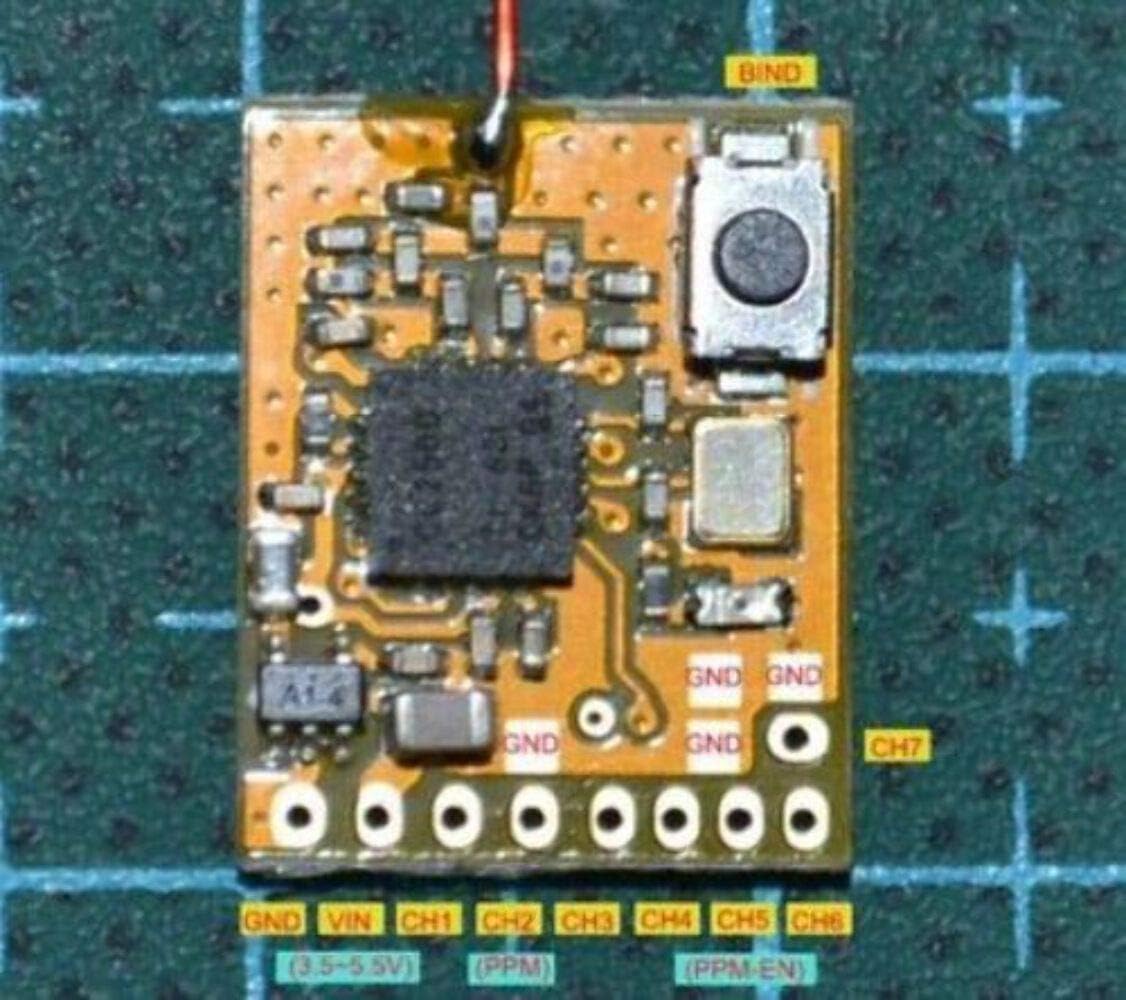
Figure 2: Pinout diagram for the DSK-143 receiver. Note the VIN (3.5-5.5V) and channel outputs.
3.1 Pin Assignments
- GND: Ground connection.
- VIN: Power input (3.5-5.5V DC).
- CH1-CH7: Normal PWM signal outputs for channels 1 through 7.
- PPM Output: When CH5 is connected to GND, CH2 outputs an 8-channel PPM signal.
- Bind Button: Used for pairing the receiver with your transmitter.
4. Operating Instructions: Binding and Failsafe
The receiver must be bound to your FUTABA S-FHSS compatible transmitter before use. Failsafe settings are configured during the binding process.
4.1 Binding Procedure
- Power On: Ensure both your transmitter and the DSK-143 receiver are powered on.
- Set Failsafe Positions: On your transmitter, adjust each control channel to the desired position for failsafe mode. These positions will be saved during binding.
- Transmitter Pair Mode: Set your transmitter to its pairing or bind mode according to its specific instructions.
- Receiver LED: The receiver's LED should be illuminated, indicating it is ready for binding.
- Press Bind Button: Locate and long-press the bind button on the DSK-143 receiver.
- Observe LED: After approximately 2 seconds, the receiver's LED will begin to flash rapidly. Continue holding the button.
- Binding Complete: The LED will then turn solid ON again. This indicates that the binding process is complete and the failsafe data has been successfully saved.
- Power Cycle: Power off both the transmitter and the receiver. Then, power them on again to confirm successful binding and failsafe operation. The receiver should now respond to transmitter inputs.
4.2 Failsafe Function
The failsafe function is automatically configured and saved during the binding process. If signal loss occurs, the receiver will command the servos to the positions that were set on the transmitter during step 2 of the binding procedure. This feature is critical for safety in RC applications.
5. Signal Output Configuration
The DSK-143 receiver supports two primary signal output modes:
- PWM Output: By default, channels CH1 through CH7 output standard Pulse Width Modulation (PWM) signals, suitable for direct connection to servos or Electronic Speed Controllers (ESCs).
- PPM Output: For systems requiring a single-wire PPM signal, connect the CH5 pin to a Ground (GND) pin. When CH5 is grounded, the CH2 pin will output an 8-channel PPM signal. This is useful for flight controllers or other devices that accept a consolidated PPM stream.
6. Troubleshooting
- Receiver Not Binding:
- Ensure your transmitter is set to FUTABA S-FHSS mode.
- Verify the receiver is receiving adequate power (3.7-5V DC).
- Confirm the bind button is pressed for the correct duration (approx. 2 seconds until LED flashes rapidly, then turns solid).
- Try moving the transmitter closer to the receiver during the binding process.
- No Signal Output:
- Check all wiring connections for correct polarity and secure fit.
- Ensure the receiver is successfully bound to the transmitter (LED solid ON).
- Verify power supply to the receiver and connected components.
- Intermittent Signal:
- Check for sources of interference (e.g., other 2.4GHz devices, large metal objects).
- Ensure the antenna is not damaged and is positioned correctly, away from carbon fiber or metal.
7. Maintenance
The DSK-143 receiver is a delicate electronic component. Follow these guidelines for optimal performance and longevity:
- Keep Dry: Avoid exposure to moisture, humidity, and liquids.
- Protect from Impact: Mount the receiver securely to prevent damage from vibrations or crashes.
- Clean Gently: If cleaning is necessary, use a soft, dry cloth. Do not use solvents or harsh chemicals.
- Antenna Care: Ensure the antenna wire is not cut, kinked, or excessively bent. Proper antenna placement is vital for signal reception.
8. Warranty and Support
For warranty information or technical support regarding your DasMikro DSK-143 receiver, please refer to the documentation provided at the point of purchase or contact your retailer. Specific warranty terms and support channels may vary by region and seller.