
Thermomart 6f287765-cb03-4719-9664-3d7ed6487f08
Thermomart Digital Temperature Control Box User Manual
Model: 6f287765-cb03-4719-9664-3d7ed6487f08
Introduction
This manual provides comprehensive instructions for the safe and efficient operation of your Thermomart Plug & Play Digital Temperature Control Box. This device is designed for precise temperature regulation in various applications, including electric BBQs, smokers, sous vide setups, beer brewing, cheese making, fermentation chambers, incubators, kegerators, and wine fridges.
Please read this manual thoroughly before operating the device to ensure proper usage and to prevent damage or injury. Keep this manual for future reference.

Figure 1: Front view of the Thermomart Digital Temperature Control Box, displaying its digital temperature readout.
Safety Information
- Ensure the power supply matches the device's requirements (100-120 V AC/DC).
- Do not immerse the control box in water or expose it to excessive moisture.
- Always disconnect power before cleaning or performing maintenance.
- Do not attempt to open or repair the device yourself. Refer to qualified personnel.
- Keep out of reach of children.
- Ensure proper ventilation around the device during operation.
Product Components
- Digital Temperature Controller Box
- L-Shape Temperature Sensor (approx. 3m / 10 feet cable length)
- Integrated 15 Amp Circuit Breaker
- User Manual (this document)
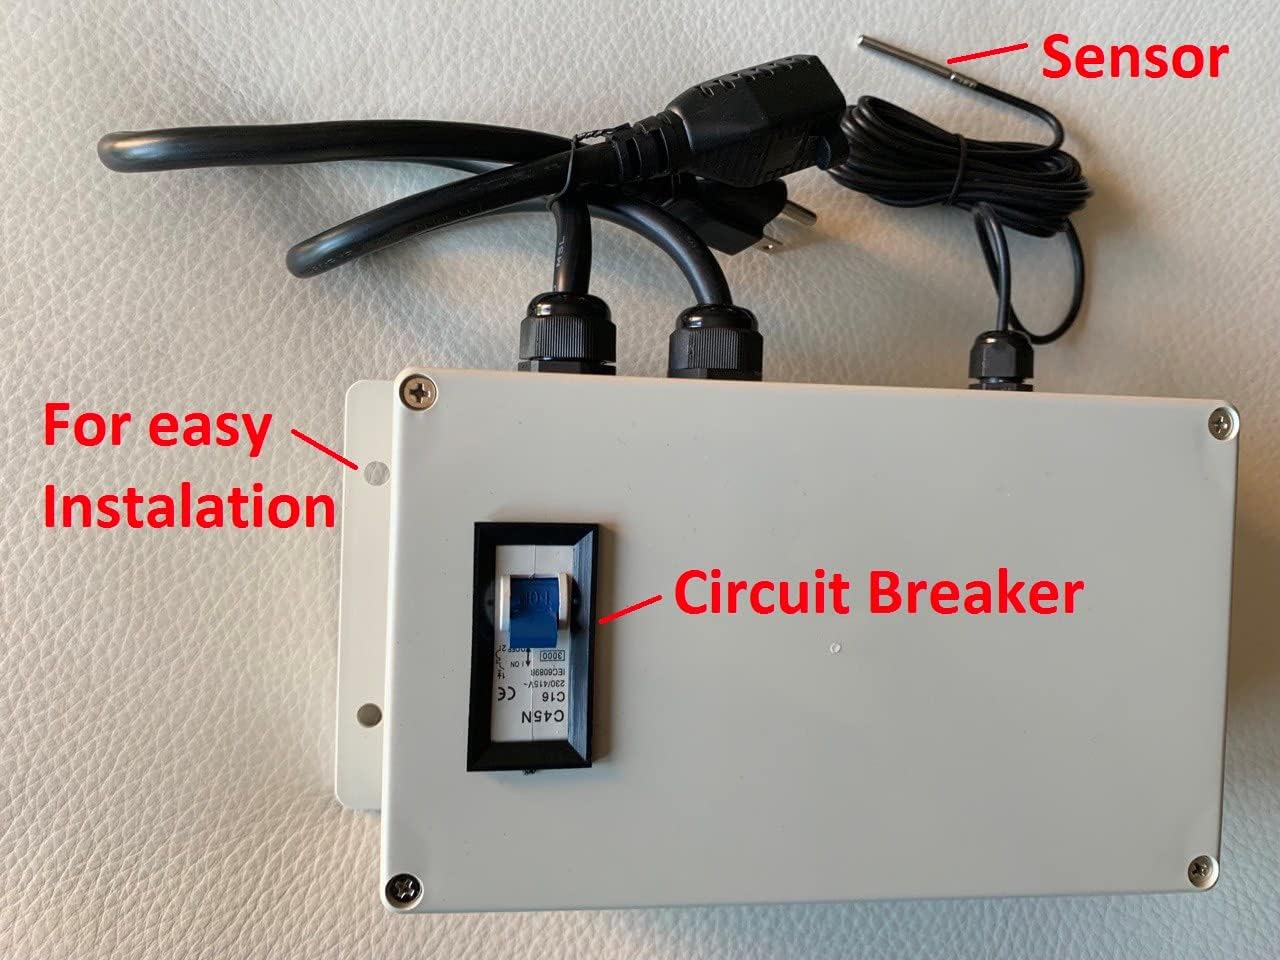
Figure 2: Overview of the control box components, highlighting the sensor, circuit breaker, and mounting features.

Figure 3: Side view illustrating the circuit breaker and the design for easy installation.
Setup
- Mounting: The control box features mounting points for easy installation. Secure the unit in a stable, dry location away from direct heat or excessive moisture.
- Sensor Placement: Insert the L-shape temperature sensor into the environment or substance you wish to monitor and control. Ensure the sensor tip is fully immersed or positioned correctly for accurate readings. The L-shape design helps protect wires from direct heat.
- Connecting the Device: This is a plug-and-play device. Connect your heating or cooling appliance (e.g., electric smoker, heater, cooler) to the output receptacle on the control box.
- Power Connection: Plug the control box's power cord into a standard 100-120V AC/DC electrical outlet.
- Circuit Breaker: Ensure the integrated 15 Amp circuit breaker is in the "ON" position.

Figure 4: Top view illustrating the power input, appliance output, and sensor connections.
Operating Instructions
Basic Operation
- The large LCD display will show the current temperature.
- Use the "Set" button to enter the setting mode.
- Use the Up and Down arrows to adjust values.
- The device supports dual heating and cooling functions.
Setting Temperature
- Press the Set button once. The display will show the current set temperature.
- Use the Up or Down arrows to adjust the desired temperature set value.
- Press Set again to confirm and exit, or wait a few seconds for it to auto-save.
Adjusting Temperature Difference (Hysteresis)
The hysteresis setting determines the temperature range within which the device will operate before activating or deactivating the connected appliance. This prevents rapid cycling of the appliance.
- Press and hold the Set button for approximately 3 seconds to enter advanced settings.
- Navigate through the settings using the Set button until you find the hysteresis setting (often labeled as "d" or "dif").
- Use the Up or Down arrows to adjust the value (range: 0.1 - 25 degrees).
- Press Set to confirm and move to the next setting, or wait to exit.
Temperature Calibration
If you suspect the temperature reading is inaccurate, you can calibrate the sensor.
- Press and hold the Set button for approximately 3 seconds to enter advanced settings.
- Navigate to the calibration setting (often labeled as "CA" or "P7").
- Use the Up or Down arrows to adjust the offset (up to 9 degrees in each direction).
- Press Set to confirm.
Timer Function
The device includes a timer function (0-999 minutes) with two types of timer actions.
- Access timer settings through the advanced menu (press and hold Set).
- Locate the timer setting (refer to the specific menu code in the full manual if available, otherwise experiment).
- Adjust the desired timer duration and select the timer action type.
- Confirm settings.
Switching Between Celsius and Fahrenheit
The unit supports both Celsius and Fahrenheit display modes.
- Refer to the device's specific button combination or menu option for switching temperature units. This is typically found within the advanced settings.
Audible Alarms
The control box is equipped with audible alarms for high and low temperature limits.
- Set the high temperature alarm (AH) and low temperature alarm (AL) values in the advanced settings.
- An alarm will sound if the measured temperature exceeds the high limit or falls below the low limit.
Maintenance
- Cleaning: Wipe the control box with a soft, damp cloth. Do not use abrasive cleaners or solvents. Ensure the device is unplugged before cleaning.
- Sensor Care: Handle the temperature sensor with care. Avoid bending the cable sharply or exposing the sensor tip to extreme physical stress.
- Storage: When not in use, store the device in a cool, dry place, away from direct sunlight and extreme temperatures.
- Circuit Breaker: The integrated 15 Amp circuit breaker protects the device from overcurrent. If it trips, disconnect the appliance, reset the breaker, and investigate the cause of the overload before reconnecting.
Troubleshooting
| Problem | Possible Cause | Solution |
|---|---|---|
| Device does not power on. | No power from outlet; Circuit breaker tripped; Loose connection. | Check power outlet; Reset circuit breaker; Ensure all connections are secure. |
| Inaccurate temperature reading. | Sensor improperly placed; Sensor damaged; Calibration needed. | Ensure sensor is correctly positioned; Inspect sensor for damage; Perform temperature calibration (refer to Operating Instructions). |
| Appliance not turning on/off as expected. | Incorrect temperature set point; Hysteresis set too wide/narrow; Appliance malfunction. | Verify set temperature; Adjust hysteresis setting; Test appliance independently. |
| Audible alarm sounds frequently. | Alarm limits set too close to operating temperature; Rapid temperature fluctuations. | Adjust high/low alarm limits (AH/AL); Ensure stable environment for sensor. |
Specifications
| Feature | Detail |
|---|---|
| Brand | Thermomart |
| Model Number | 6f287765-cb03-4719-9664-3d7ed6487f08 |
| Control Type | Digital, Push Button |
| Display Type | LCD with Backlight |
| Temperature Measuring & Controlling Range | -30 to 300 °C (-22 to 572 °F) |
| Controlling Resolution | 0.1 degree |
| Control Temperature Difference (Hysteresis) | 0.1 - 25 degrees (adjustable) |
| Timer Range | 0-999 minutes (with 2 types of action) |
| Circuit Breaker Capacity | 15 Amp (for heating or cooling) |
| Compressor Delay Protection Time | 0 ~ 10 minutes (adjustable) |
| Power Supply | 100-120 V AC/DC |
| Cable Length (Sensor) | 3 m (approx. 10 feet) |
| Alarms | High (AH) or Low (AL) temperature buzzer alarm |
| Connectivity Technology | Wired |
| Included Components | Temperature Controller, L Shape Temperature Sensor, Circuit Breaker, Manual |
| UPC | 769675373375 |
| Country of Origin | Canada |
Warranty and Support
For warranty information and technical support, please contact Thermomart directly. Refer to the contact information provided with your product packaging or visit the official Thermomart website.
Note: The product description mentions "Thermomart" as the seller. For specific support, it's best to refer to the brand's official channels.
Ask a question about this manual
Ask about setup, troubleshooting, compatibility, parts, safety, or missing instructions. Manuals+ will review the question and use this page’s manual context to help answer it.