
Product Overview
The Master Terminals Service Kit by Tool Aid is a comprehensive set of tools designed for servicing various electrical terminals. This kit typically includes a range of crimping tools and terminal release tools, essential for automotive, marine, and industrial electrical work. It is engineered to facilitate precise and secure connections and disconnections of electrical wiring.
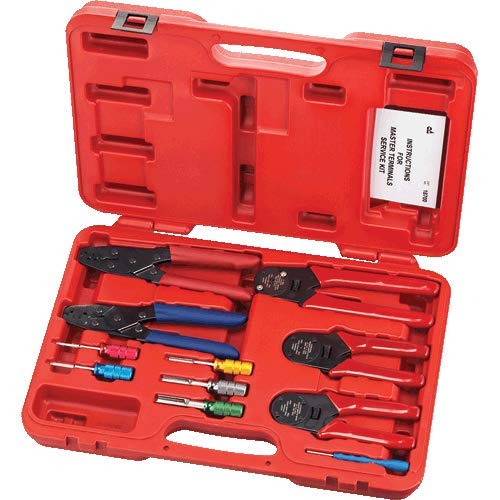
Figure 1: The Tool Aid Master Terminals Service Kit, displayed open in its red protective carrying case. The kit contains various crimping tools with red and blue handles, and an assortment of terminal release tools with colored tips (red, blue, yellow, silver, green).
Kit Contents
The Master Terminals Service Kit includes a variety of tools for different terminal types. While specific contents may vary, a typical kit contains:
- Crimping Tools: Various sizes and types for different wire gauges and terminal connectors.
- Terminal Release Tools: A selection of tools designed to safely remove terminals from connectors without damage.
- Protective Carrying Case: A durable case for organized storage and transport of all components.
Setup and Preparation
Before using the Master Terminals Service Kit, ensure you have a clean and well-lit workspace. Identify the type of terminal you are working with to select the appropriate tool from the kit.
- Inspect Tools: Before each use, visually inspect all tools for any signs of damage, wear, or corrosion. Do not use damaged tools.
- Identify Terminal Type: Determine the specific terminal design (e.g., Deutsch, Weather Pack, Metri-Pack) to choose the correct crimping die or release tool.
- Safety Precautions: Always wear appropriate personal protective equipment (PPE), such as safety glasses, when working with electrical components and tools.
Operating Instructions
Using Crimping Tools
Crimping tools are used to securely attach electrical terminals to wires. Follow these general steps:
- Strip Wire: Carefully strip the insulation from the end of the wire to the recommended length for the terminal. Avoid cutting or nicking the wire strands.
- Select Die: Choose the correct crimping die for the specific terminal and wire gauge. Refer to the terminal manufacturer's specifications if available.
- Insert Terminal and Wire: Place the terminal into the crimping die. Insert the stripped wire into the terminal's barrel.
- Crimp: Squeeze the crimping tool handles firmly until the crimp cycle is complete. The tool should release automatically or require a full closure for a proper crimp.
- Inspect Crimp: Visually inspect the crimp for proper formation. Perform a gentle pull test to ensure the wire is securely held by the terminal.
Using Terminal Release Tools
Terminal release tools are designed to disengage locking tabs within connectors, allowing for the removal of individual terminals without damage. Always consult the specific connector's design before attempting removal.
- Identify Locking Mechanism: Locate the locking tab or mechanism on the terminal within the connector.
- Select Release Tool: Choose the appropriate terminal release tool that matches the size and shape of the locking mechanism.
- Insert Tool: Carefully insert the release tool into the connector opening, aligning it with the locking tab. Apply gentle pressure to depress or disengage the tab.
- Remove Terminal: While holding the release tool in place, gently pull the wire from the back of the connector to remove the terminal. Do not force the terminal.
- Inspect: After removal, inspect both the terminal and the connector for any damage.
Maintenance and Storage
Proper maintenance and storage will extend the life of your Master Terminals Service Kit.
- Cleaning: After each use, wipe down tools with a clean, dry cloth to remove any dirt, grease, or debris. For stubborn grime, a mild degreaser can be used, followed by thorough drying.
- Lubrication: Periodically apply a light coat of machine oil to the pivot points and moving parts of the crimping tools to ensure smooth operation and prevent rust.
- Storage: Always store the tools in their designated slots within the protective carrying case. Store the case in a dry environment, away from direct sunlight and extreme temperatures, to prevent corrosion and material degradation.
- Inspection: Regularly inspect the carrying case for damage that might compromise its protective capabilities.
Troubleshooting
| Problem | Possible Cause | Solution |
|---|---|---|
| Poor Crimp Quality | Incorrect die size; insufficient pressure; worn tool; incorrect wire stripping. | Ensure correct die for wire/terminal; apply full pressure; inspect tool for wear; verify wire strip length. |
| Terminal Difficult to Remove | Incorrect release tool; locking tab not fully disengaged; bent terminal. | Verify correct release tool for connector type; ensure tool fully depresses tab; inspect terminal for damage. |
| Tool Jams or Sticks | Lack of lubrication; debris in mechanism; damaged pivot. | Clean and lubricate moving parts; remove any debris; if damaged, discontinue use and consider replacement. |
Specifications
- Product Name: Master Terminals Service Kit
- Brand: Tool Aid
- Model Number: B084HNJCTB
- UPC: 679360081570
- Connector Type: Crimp (as per product specifications)
- Kit Contents: Assorted crimping tools and terminal release tools (specific types and sizes vary by kit version).
- Case Material: Durable plastic (typically red).
Warranty and Support
For warranty information or technical support regarding your Tool Aid Master Terminals Service Kit, please refer to the documentation included with your purchase or contact Tool Aid customer service directly. Contact details are typically available on the manufacturer's official website.
