QJZ 518518
QJZ 518518 Front Wheel Hub Bearing Assembly Repair Kit Instruction Manual
Model: 518518
Introduction
This manual provides comprehensive instructions for the installation, operation, and maintenance of the QJZ 518518 Front Wheel Hub Bearing Assembly Repair Kit. This kit is designed to replace worn or damaged front wheel hub bearing assemblies on compatible vehicles, ensuring proper wheel rotation and vehicle safety.
Important Safety Information: Always consult a qualified mechanic if you are unsure about any installation steps. Wear appropriate personal protective equipment (PPE) including safety glasses and gloves. Ensure the vehicle is securely supported on jack stands before beginning any work.
Product Overview
The QJZ 518518 kit includes two complete front wheel hub bearing assemblies, suitable for both driver and passenger sides. Each assembly is engineered to meet or exceed OEM specifications for fitment and performance.
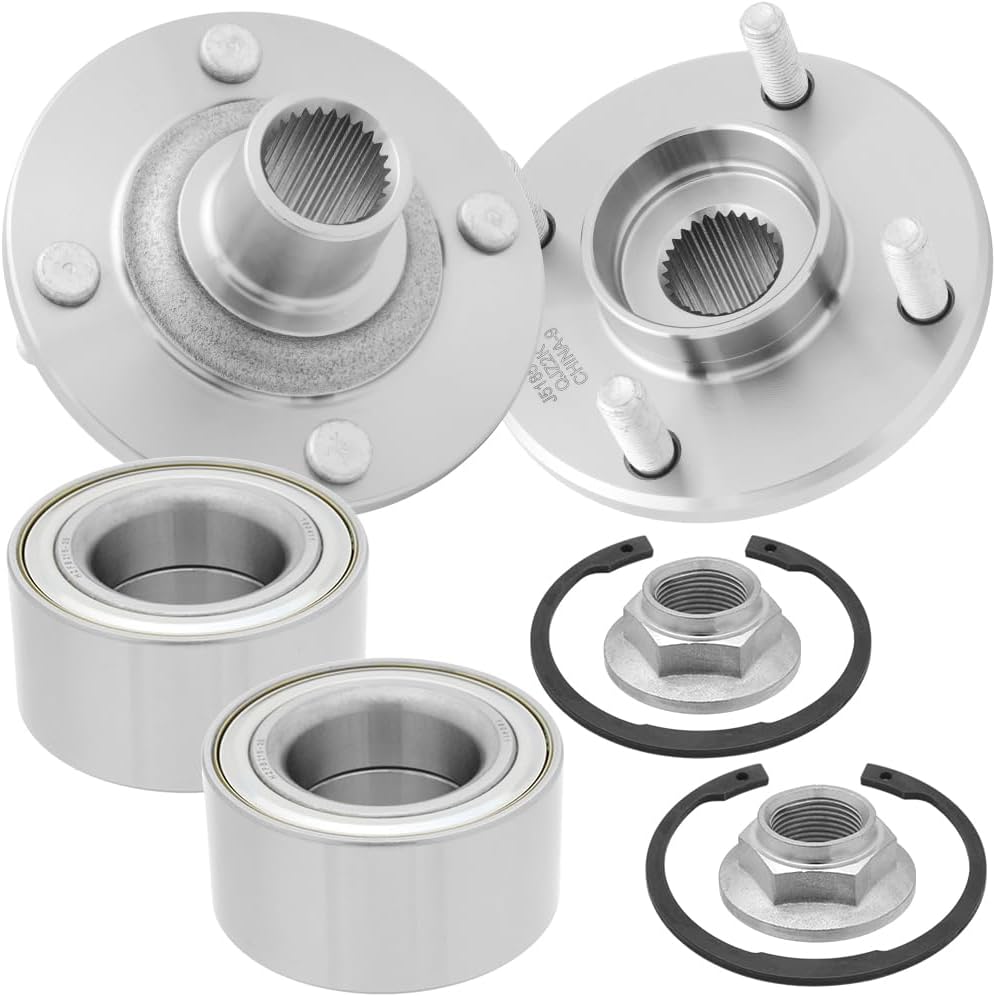
Image: Complete QJZ 518518 Front Wheel Hub Bearing Assembly Repair Kit. This image displays the two hub assemblies, two separate wheel bearings, two axle nuts, and two snap rings included in the kit.

Image: Front view of a single QJZ 518518 wheel hub bearing assembly. This view highlights the central splined bore for the axle shaft and the four wheel studs for mounting the wheel.

Image: Rear view of a single QJZ 518518 wheel hub bearing assembly. The rear side shows the mounting flange and the stamped part number and manufacturing details.
Specifications
| Attribute | Detail |
|---|---|
| Model Number | 518518 |
| OEM Part Numbers | HA590510, WA518518, 30818024, 308180240, 308180249, 30818028, 30855922, 30884539, 308845390, 308845395, 5027447, 5027448, 5027620, 93BB1215AB, EC0126151, EC0126151A, F5RZ1215A, YL841225AB, YL8Z1225AA, YL8Z1225AB, F5RZ1104A |
| Fitment Position | Front Driver Side and Passenger Side |
| Compatible Vehicles |
|
| Quantity in Package | 2 Pieces of Wheel Hub Assembly Repair Kit |
| Item Weight | 11.37 pounds (total package) |
Setup and Installation
Installation of a wheel hub bearing assembly requires specialized tools and mechanical knowledge. If you are not confident in your ability to perform this repair, it is recommended to seek professional assistance.
Required Tools and Materials:
- Vehicle Jack and Jack Stands
- Wheel Chocks
- Lug Nut Wrench
- Socket Set (various sizes, including axle nut socket)
- Torque Wrench
- Breaker Bar
- Hammer/Mallet
- Pry Bar
- Rust Penetrant (e.g., WD-40)
- Brake Cleaner
- Wire Brush
- New Cotter Pins (if applicable)
- New Axle Nut (often included with new hub assembly)
Installation Steps:
- Prepare the Vehicle:
- Park the vehicle on a flat, level surface.
- Engage the parking brake.
- Place wheel chocks behind the rear wheels (if working on front).
- Loosen the lug nuts on the wheel to be removed, but do not remove them completely.
- Jack up the front of the vehicle and secure it safely on jack stands. Ensure the vehicle is stable before proceeding.
- Remove the lug nuts and the wheel.
- Remove Brake Components:
- Remove the brake caliper bolts and carefully slide the caliper off the rotor. Do not let the caliper hang by the brake hose; support it with a wire or bungee cord.
- Remove the brake rotor. It may be held on by retaining clips or small screws.
- Access the Axle Nut:
- If present, remove the dust cap and cotter pin from the axle nut.
- Using a large socket and breaker bar, loosen and remove the axle nut. This nut is often very tight.
- Disconnect Steering/Suspension Components (if necessary):
- Depending on the vehicle, you may need to disconnect the tie rod end, lower ball joint, or strut bolts to allow enough movement to remove the hub assembly and axle shaft.
- Use appropriate pullers or pry bars as needed.
- Remove the Old Hub Assembly:
- Locate the bolts that secure the hub assembly to the steering knuckle. There are typically 3 or 4 bolts on the backside of the knuckle.
- Remove these bolts.
- Carefully pull the hub assembly away from the steering knuckle. The axle shaft may need to be pushed inward to clear the hub.
- If the hub is seized, use a hammer or slide hammer to carefully tap it out.
- Install the New Hub Assembly:
- Clean the mating surface on the steering knuckle thoroughly with a wire brush and brake cleaner.
- Slide the new QJZ 518518 hub assembly onto the axle shaft and into position on the steering knuckle. Ensure the splines of the axle shaft engage correctly with the hub.
- Install the hub assembly mounting bolts and tighten them hand-tight.
- Torque the hub assembly bolts to vehicle manufacturer specifications. Refer to your vehicle's service manual for exact torque values.
- Install the new axle nut and tighten it hand-tight.
- Torque the axle nut to vehicle manufacturer specifications. Install a new cotter pin if applicable.
- Reassemble Brake Components and Wheel:
- Reinstall any disconnected steering or suspension components, torquing all fasteners to manufacturer specifications.
- Reinstall the brake rotor.
- Reinstall the brake caliper and its mounting bolts. Torque caliper bolts to manufacturer specifications.
- Reinstall the wheel and hand-tighten the lug nuts.
- Final Steps:
- Lower the vehicle off the jack stands.
- Torque the lug nuts to vehicle manufacturer specifications in a star pattern.
- Pump the brake pedal several times to restore brake pressure before driving.
- Test drive the vehicle in a safe area to ensure proper function and no abnormal noises.
Note: Specific torque specifications and procedures may vary by vehicle model and year. Always refer to your vehicle's official service manual for precise instructions.
Operating Considerations
After installation, it is crucial to ensure all components are properly seated and torqued. Pay attention to any unusual noises or vibrations during initial operation. A properly installed wheel hub bearing assembly should operate quietly and smoothly.
Avoid harsh braking or sudden maneuvers immediately after installation to allow components to settle. If you notice any issues, such as grinding noises, looseness, or excessive heat from the wheel area, stop driving immediately and inspect the installation.
Maintenance
Wheel hub bearing assemblies are generally maintenance-free components designed for long service life. However, regular vehicle maintenance practices can help identify potential issues early:
- Regular Inspections: During tire rotations or brake service, visually inspect the wheel hub area for any signs of damage, leaks, or excessive play.
- Listen for Noises: Pay attention to any humming, grinding, or roaring noises that increase with vehicle speed, as these can indicate a failing wheel bearing.
- Check for Play: With the wheel off the ground, grasp the wheel at the 12 and 6 o'clock positions and try to rock it. Any significant play could indicate a worn bearing. Repeat at 3 and 9 o'clock.
- Avoid Overloading: Operating the vehicle within its specified load capacity helps prevent premature wear on suspension and bearing components.
Troubleshooting
If you experience issues after installing the QJZ 518518 wheel hub bearing assembly, consider the following common problems and solutions:
| Symptom | Possible Cause | Solution |
|---|---|---|
| Humming, grinding, or roaring noise from wheel area (increases with speed) |
|
|
| Vibration in steering wheel or vehicle |
|
|
| Wheel feels loose or has excessive play |
|
|
Always prioritize safety. If you cannot resolve an issue, consult a certified automotive technician.
Warranty and Support
For information regarding product warranty, returns, or technical support, please refer to the seller's policy on the platform where the product was purchased or visit the official QJZ brand store.
QJZ Brand Store: Visit the QJZ Store on Amazon
When contacting support, please have your product model number (518518) and purchase details readily available.
Ask a question about this manual
Ask about setup, troubleshooting, compatibility, parts, safety, or missing instructions. Manuals+ will review the question and use this page’s manual context to help answer it.