
1. Introduction
The KYHOPE LS200 Glass Thickness Meter is a specialized instrument designed for accurately measuring the thickness of glass panes and the air space within insulated glass (IG) units. This device utilizes a laser reflection method, allowing for measurements to be taken from a single side of the glass. It is particularly useful in situations where traditional measurement tools are impractical, such as measuring installed windows or glass bottles.
2. Product Overview
Familiarize yourself with the components of your LS200 Glass Thickness Meter:

Image 2.1: The KYHOPE LS200 Glass Thickness Meter. It features a main body with a graduated scale for glass and air space thickness, and a control unit with a power button and model designation.
- Measurement Scale: Displays both glass thickness (top scale) and air space thickness (bottom scale) in millimeters.
- Laser Emitter/Receiver: Located within the device, projects a laser beam onto the glass surface.
- Power Button: Activates and deactivates the device.
- Control Unit: Houses the electronics and power button.
3. Specifications
| Feature | Detail |
|---|---|
| Model | LS200 |
| Measurement Principle | Laser Reflection |
| Accuracy | ± 0.5mm |
| Glass Thickness Scale Range | 0 - 70mm |
| Air Space Thickness Scale Range | 0 - 34mm |
| Dimensions (L×W×H) | 160mm × 55mm × 25mm |
| Application | Single, Double, Triple Pane Insulated Glass (IG) Units, individual glass panes, glass bottles. |
4. Setup
4.1 Battery Installation
The LS200 Glass Thickness Meter requires a CR2032 button cell battery for operation. Follow these steps to install or replace the battery:
- Locate the battery compartment cover on the back of the control unit.
- Using a small screwdriver, gently turn the battery cover counter-clockwise to unlock it.
- Insert the CR2032 battery with the positive (+) side facing upwards.
- Replace the battery cover and turn it clockwise to secure.
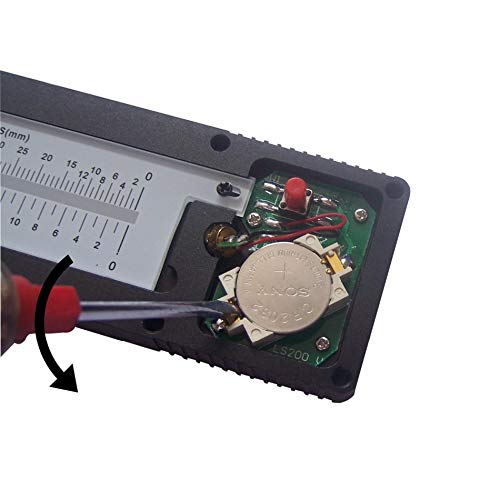
Image 4.1: Illustration of battery installation. A screwdriver is used to open the battery compartment, revealing a CR2032 battery slot.
Ensure the battery is correctly oriented to prevent damage to the device.
5. Operating Instructions
5.1 Powering On/Off
- To power on the device, press the red power button on the control unit. The laser will activate.
- To power off, press the red power button again. The laser will deactivate.
5.2 Measuring Glass Thickness
To measure the thickness of a single pane of glass or the individual panes within an insulated glass unit:
- Ensure the device is powered on.
- Place the measurement end of the LS200 flat against the glass surface.
- Observe the graduated scale. The laser dot will reflect onto the scale.
- Read the value indicated by the laser dot on the "GLASS THICKNESS (mm)" scale (top scale). This value represents the thickness of the glass pane.
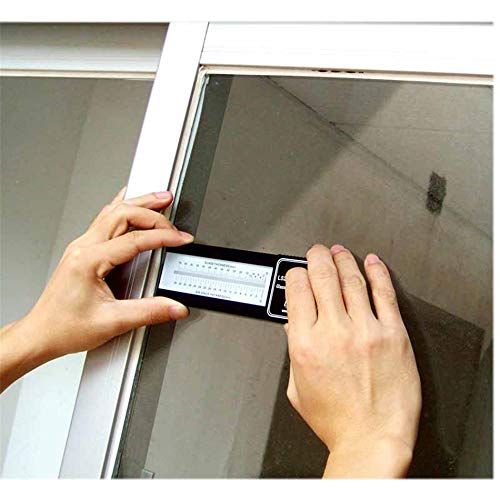
Image 5.1: A user holding the LS200 Glass Thickness Meter against a window pane to take a measurement. The device is positioned flush against the glass surface.
5.3 Measuring Air Space Thickness (Insulated Glass Units)
For insulated glass units (double or triple pane), the LS200 can also measure the air space between panes:
- Ensure the device is powered on.
- Place the measurement end of the LS200 flat against the outermost glass surface of the IG unit.
- Observe the graduated scale. Multiple laser dots may appear, corresponding to reflections from different glass surfaces.
- Identify the laser dot that reflects from the inner surface of the first pane and the outer surface of the second pane.
- Read the value indicated by the laser dot on the "AIR SPACE THICKNESS (mm)" scale (bottom scale). This value represents the thickness of the air gap.
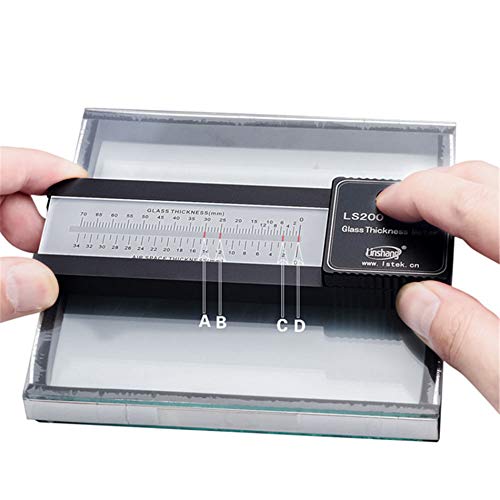
Image 5.2: The LS200 positioned on an insulated glass unit, showing how laser reflections (labeled A, B, C, D) correspond to different glass layers and air spaces on the measurement scale.
Note: For accurate readings, ensure the device is held perpendicular to the glass surface and that the laser dot is clearly visible on the scale.
6. Maintenance
- Cleaning: Wipe the device with a soft, dry cloth. Do not use abrasive cleaners or solvents. Ensure the laser window and measurement scale are kept clean for accurate readings.
- Storage: Store the LS200 in a dry, cool place, away from direct sunlight and extreme temperatures.
- Battery: If the device will not be used for an extended period, remove the battery to prevent leakage.
- Handling: Handle the device with care to avoid dropping or impact, which could affect its calibration and functionality.
7. Troubleshooting
| Problem | Possible Cause | Solution |
|---|---|---|
| Device does not power on. | Dead or incorrectly installed battery. | Check battery orientation. Replace with a new CR2032 battery. |
| Laser dot is dim or not visible. | Low battery; dirty laser window or glass surface. | Replace battery. Clean the laser window and the glass surface being measured. |
| Inaccurate readings. | Device not held perpendicular; dirty scale; damaged unit. | Ensure the device is flush and perpendicular to the glass. Clean the measurement scale. If issues persist, contact support. |
8. Warranty and Support
For specific warranty information regarding your KYHOPE LS200 Glass Thickness Meter, please refer to the documentation provided at the time of purchase or contact the seller directly. Warranty terms typically cover manufacturing defects for a specified period.
For technical support, troubleshooting assistance beyond this manual, or inquiries about replacement parts, please reach out to KYHOPE customer service or your authorized distributor. Contact information can usually be found on the product packaging or the manufacturer's official website.