1. Introduction
1.1 Product Overview
The TEMPO PA901081 CoaxReady Deluxe Kit is a comprehensive solution designed for professionals and enthusiasts involved in LAN/Ethernet, video, and CATV installations. This kit provides essential tools for working with a wide variety of coaxial connectors, including those used in mini-coax and HDTV applications. It is housed in a durable zipper case for convenient storage and transport.
1.2 Kit Contents
The CoaxReady Deluxe Kit includes the following components:
- Coaxial Crimping Tool with various dies
- Coaxial Cable Stripper
- Coaxial Cable Tester
- RJ45 Cable (for testing purposes)
- Assortment of coaxial connectors (F-type, BNC, RCA)
- Terminators and Adapters
- Durable Zipper Carrying Case
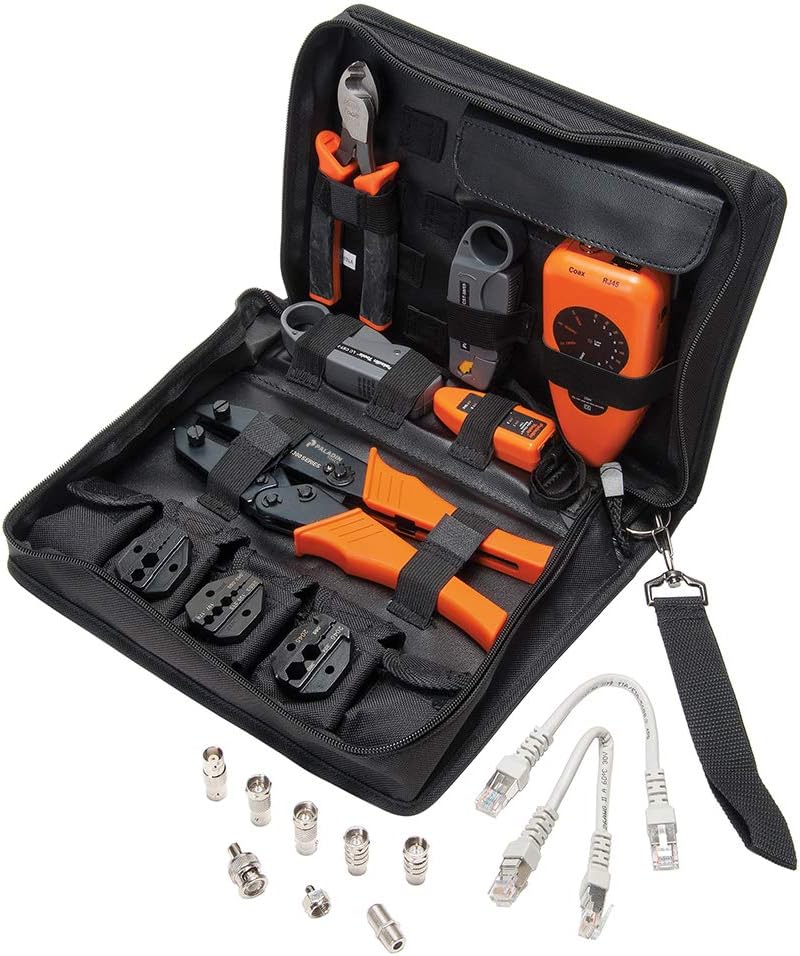
Figure 1: Contents of the TEMPO PA901081 CoaxReady Deluxe Kit, including crimper, stripper, tester, connectors, and cables, neatly organized in its carrying case.
2. Setup
2.1 Unpacking and Inspection
Upon receiving your CoaxReady Deluxe Kit, carefully open the zipper case and inspect all components for any signs of damage. Ensure all listed items in Section 1.2 are present. If any items are missing or damaged, contact Tempo Communications customer support immediately.
2.2 Tool Identification and Purpose
- Crimping Tool: Used to securely attach coaxial connectors to cables. Features interchangeable dies for various connector types.
- Cable Stripper: Designed for precise removal of cable jackets and dielectric material, preparing the cable for connector attachment.
- Cable Tester: Verifies continuity and proper wiring of coaxial and RJ45 cables.
- Connectors: Various types (F-type, BNC, RCA) for different applications.
- Terminators/Adapters: Used for impedance matching or connecting different cable types.
3. Operating Instructions
3.1 Coaxial Cable Preparation (Stripping)
- Select the appropriate stripping blade setting on the cable stripper for your coaxial cable type (e.g., RG59, RG6).
- Insert the end of the coaxial cable into the stripper, ensuring it is seated firmly against the stop.
- Rotate the stripper around the cable several times until the outer jacket and dielectric are cleanly cut.
- Remove the cable from the stripper and carefully pull off the stripped sections, exposing the center conductor and braided shield.
- Trim any stray strands of the braided shield to prevent short circuits.
3.2 Coaxial Connector Crimping
- After stripping the cable, slide the chosen coaxial connector onto the prepared cable end. Ensure the center conductor protrudes correctly and the braided shield is properly positioned.
- Select the correct crimping die for your connector type and install it into the crimping tool if not already present.
- Place the connector with the cable into the designated crimping cavity of the tool.
- Squeeze the crimping tool handles firmly and completely until the ratchet mechanism releases. This ensures a secure and consistent crimp.
- Inspect the crimped connection to ensure it is tight and the connector is securely attached to the cable.
3.3 Cable Testing (Coaxial and RJ45)
The included cable tester can verify the integrity of both coaxial and RJ45 cables.
- For Coaxial Cables: Connect one end of the coaxial cable to the "Main" port and the other end to the "Remote" port (if applicable, or loop back to the main unit if it's a single-unit tester). Activate the tester. Observe the indicator lights to confirm continuity and proper connection.
- For RJ45 Cables: Connect one end of the RJ45 cable to the "Main" RJ45 port and the other end to the "Remote" RJ45 port. Activate the tester. The sequence of lights will indicate if all wires are correctly connected and if there are any open or short circuits.

Figure 2: Detailed view of the primary tools within the kit, including the crimper with interchangeable dies, the cable stripper, and the coaxial cable tester.
4. Maintenance
4.1 Cleaning
After each use, wipe down all tools with a clean, dry cloth to remove any dust, dirt, or cable debris. For stubborn grime, a slightly damp cloth can be used, followed by thorough drying. Avoid using harsh chemicals or abrasive cleaners.
4.2 Storage
Store the CoaxReady Deluxe Kit in its original zipper carrying case in a cool, dry place, away from direct sunlight and extreme temperatures. Ensure all tools are securely placed in their designated compartments to prevent damage during transport or storage.
4.3 Blade and Die Inspection
Periodically inspect the blades of the cable stripper and the crimping dies for wear or damage. Dull blades or worn dies can lead to poor cable preparation and unreliable connections. Replace components as necessary.
5. Troubleshooting
| Problem | Possible Cause | Solution |
|---|---|---|
| Poor crimp connection | Incorrect die size; cable not fully inserted; worn crimping tool. | Ensure correct die is used. Verify cable and connector are fully seated. Inspect crimping tool for wear. |
| Cable not stripping cleanly | Incorrect blade setting; dull blades; cable not rotated enough. | Adjust blade depth. Replace stripper blades if dull. Ensure full rotation of the stripper. |
| Cable tester shows errors | Faulty cable; incorrect connection to tester; low battery in tester. | Inspect cable for damage. Ensure secure connection to tester ports. Replace tester batteries. |
6. Specifications
| Feature | Detail |
|---|---|
| Brand | TEMPO |
| Model Number | PA901081 |
| Manufacturer | Tempo Communications |
| Item Weight | 4 Pounds (1.81 kg) |
| Grip Type | Ergonomic |
| UPC | 810025416775 |
| ASIN | B0848D63FC |
7. Warranty and Support
For detailed warranty information, technical support, or to inquire about replacement parts, please contact Tempo Communications directly. Refer to the official Tempo Communications website or product packaging for the most current contact details.
Manufacturer: Tempo Communications


