1. Introduction
This manual provides comprehensive instructions for the safe and efficient operation of your Nedis Ultra HD 4K Dashcam (Model DCAM44BK). This device is designed to record your car journeys in high definition, offering advanced features for enhanced road safety and evidence collection. Please read this manual thoroughly before using the product and retain it for future reference.
2. Package Contents
Ensure all items listed below are present in your package:
- Nedis Ultra HD 4K Dashcam (DCAM44BK)
- Magnetic Mount
- Car Charger (Micro USB)
- USB Data Cable
- User Manual (this document)

Figure 2.1: Dashcam and included accessories.
3. Product Features
The Nedis Ultra HD 4K Dashcam offers a range of features to enhance your driving experience and security:
- Ultra HD 4K Recording: Captures video at 4K resolution (24 frames per second) for clear and detailed footage.
- 2.4-inch LCD Display: Integrated screen for instant video playback and menu navigation.
- 140° Wide Viewing Angle: Provides a broad perspective of the road, capturing more details.
- Micro USB Connectivity: For power supply and connection to a PC/notebook.
- Micro SD Card Support: Supports Micro SD cards up to 128 GB for ample storage (card not included).
- Loop Recording: Automatically overwrites the oldest footage when the memory card is full, ensuring continuous recording.
- Built-in Microphone and Speaker: For recording and playing back audio with video.
- G-Sensor: Detects sudden impacts or collisions and automatically locks the current video file to prevent it from being overwritten.
- Parking Mode: Activates recording when vibrations are detected while the vehicle is parked, providing surveillance.
- Night Vision: Ensures clear recordings even in low-light conditions.
- Magnetic Mounting: Allows for easy attachment and removal of the dashcam.
Video 3.1: An overview of the Nedis Dashcam's key features and benefits.
4. Setup
4.1 Inserting a Micro SD Card
- Ensure the dashcam is powered off.
- Locate the Micro SD card slot on the side of the dashcam.
- Insert a compatible Micro SD card (Class 10 or higher, up to 128 GB) into the slot until it clicks into place.
- To remove, gently push the card in until it springs out.

Figure 4.1: Micro SD card slot location.
4.2 Mounting the Dashcam
- Clean the desired area on your windshield where you intend to mount the dashcam. Ensure it does not obstruct your view.
- Attach the magnetic mount to the windshield using its adhesive pad. Press firmly for several seconds.
- Align the dashcam with the magnetic mount. The strong magnets will securely hold the dashcam in place.
- Adjust the camera angle to ensure it captures the road ahead clearly.

Figure 4.2: Dashcam with magnetic mount.

Figure 4.3: Magnetic contact points on the dashcam.
4.3 Powering the Dashcam
- Connect the Micro USB end of the car charger to the dashcam's Micro USB port.
- Plug the other end of the car charger into your vehicle's 12V power outlet (cigarette lighter socket).
- The dashcam will typically power on automatically when the vehicle's ignition is turned on and begin recording.
5. Operating Instructions
5.1 Basic Operation
- Power On/Off: The dashcam powers on automatically with vehicle ignition. To manually power on/off, press and hold the Power button (refer to Figure 5.1 for button layout).
- Recording: Once powered on, the dashcam will automatically start recording. A flashing red indicator or icon on the screen usually indicates active recording.
- Stop/Start Recording: During recording, press the OK button to stop recording. Press it again to resume.
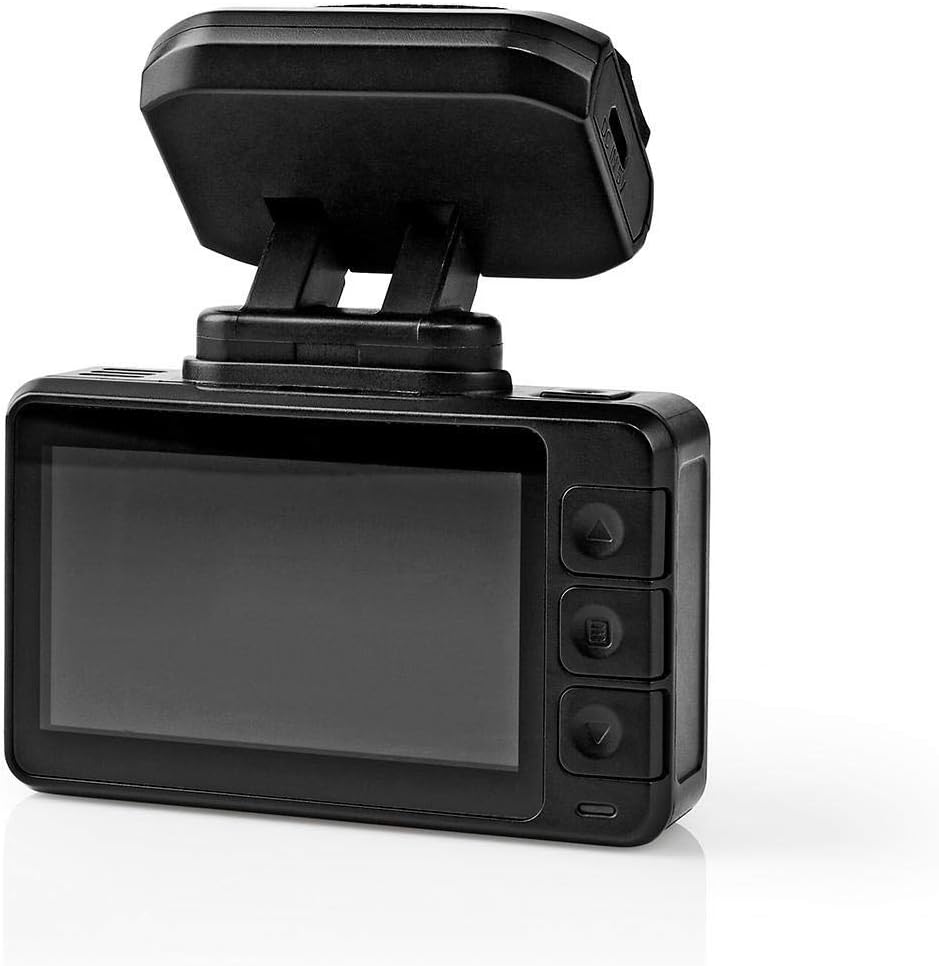
Figure 5.1: Dashcam rear view with LCD and control buttons.
5.2 Menu Navigation
Use the buttons on the side of the dashcam (Up, Down, Menu/Mode, OK) to navigate through settings and options on the LCD screen.
- Menu Button: Press to enter the settings menu. Press again to cycle through different menu pages (e.g., video settings, system settings).
- Up/Down Buttons: Use to scroll through menu options.
- OK Button: Press to confirm a selection or enter a sub-menu.
5.3 Video Playback
- Stop recording if currently active.
- Press the Mode button (often combined with Menu) to switch to playback mode.
- Use the Up/Down buttons to browse through recorded video files.
- Press the OK button to play the selected video.
- To exit playback mode, press the Mode button again.
5.4 G-Sensor Function
The built-in G-Sensor detects sudden acceleration, braking, or impacts. When triggered, it automatically locks the current video segment, preventing it from being overwritten by loop recording. The sensitivity of the G-Sensor can usually be adjusted in the settings menu.
5.5 Parking Mode
When parking mode is enabled and the vehicle is stationary, the dashcam will automatically start recording if it detects vibrations or impacts. This feature provides surveillance for your parked vehicle. Ensure the dashcam has a continuous power supply (e.g., hardwired kit, not included) for extended parking mode operation.
5.6 Night Vision
The dashcam is equipped with night vision capabilities, allowing it to capture clear video footage even in low-light conditions or at night. This feature typically activates automatically.
6. Maintenance
- Cleaning: Use a soft, dry cloth to clean the dashcam lens and screen. Do not use abrasive cleaners or solvents.
- Storage: If storing the dashcam for an extended period, remove the Micro SD card and store the device in a cool, dry place away from direct sunlight.
- Micro SD Card: Periodically format the Micro SD card (at least once a month) to maintain optimal performance and prevent data corruption. Back up any important files before formatting.
7. Troubleshooting
| Problem | Possible Cause | Solution |
|---|---|---|
| Dashcam does not power on. | No power supply; faulty car charger; loose connection. | Check car charger connection; ensure vehicle's 12V outlet is working; try a different USB cable/charger. |
| Recording stops unexpectedly. | Full Micro SD card; slow Micro SD card; card error. | Format the Micro SD card; use a Class 10 or higher card; replace the card if faulty. |
| Video footage is blurry or unclear. | Dirty lens; protective film still on lens; incorrect focus. | Clean the lens with a soft cloth; remove any protective film; ensure the camera is securely mounted. |
| G-Sensor is too sensitive/not sensitive enough. | G-Sensor sensitivity setting is too high/low. | Adjust G-Sensor sensitivity in the dashcam's settings menu. |
8. Specifications
| Feature | Detail |
|---|---|
| Model Number | DCAM44BK |
| Brand | Nedis |
| Video Recording Resolution | 4K |
| Frames Per Second (FPS) | 24 |
| Display Type | LCD |
| Screen Size | 2.4 inch |
| Viewing Angle | 140 Degrees |
| Connectivity Technology | USB |
| Mounting Type | Magnetic Mount |
| Control Method | Touch |
| Optical Sensor Technology | CMOS |
| Special Features | Night Vision, G-Sensor, Parking Mode, Loop Recording |
| Product Dimensions | 5.7 x 73 x 38 cm |
| Item Weight | 85 Grams |
9. Safety Information
- Do not operate the dashcam in extreme temperatures or humidity.
- Ensure the dashcam is securely mounted and does not obstruct the driver's view or interfere with vehicle safety features.
- Do not attempt to disassemble or repair the device yourself. Contact qualified service personnel.
- Use only the provided or recommended accessories.
- Keep the device away from children.
- Adhere to all local laws and regulations regarding the use of dashcams.
10. Warranty and Support
Nedis products are manufactured to high quality standards. In the unlikely event of a defect during the warranty period, please contact your retailer for support. The warranty terms and conditions are typically provided by your retailer at the time of purchase. For further assistance or product information, please visit the official Nedis website or contact their customer support.