1. Introduction
Thank you for choosing the Outsunny 10' x 20' Pop Up Canopy Tent. This manual provides essential instructions for the safe assembly, operation, and maintenance of your canopy. Please read this manual thoroughly before use and retain it for future reference. This canopy is designed to provide temporary shade and shelter for outdoor activities such as parties, garden events, and patio use.

Image 1.1: The Outsunny 10' x 20' Pop Up Canopy Tent providing shade over an outdoor dining area.
2. Safety Information
Please observe the following safety precautions to prevent injury or damage to the product:
- Do not leave the tent unattended during adverse weather conditions such as strong winds, heavy rain, or snow. Severe weather can cause damage to the canopy and potential injury.
- Always stake the canopy to the ground for stability using the provided ground stakes and ropes. Failure to do so may result in the canopy being lifted by wind.
- Exercise caution when adjusting the height of the canopy to avoid pinching fingers or hands.
- Be careful when handling the wheeled carry bag, as the packed canopy can be heavy. Use proper lifting techniques or seek assistance.
- Ensure all locking mechanisms are securely engaged after assembly and height adjustment.
- Keep children and pets away from the canopy during setup and takedown.
- Do not use open flames or heating appliances inside or near the canopy.
3. Parts List
The Outsunny Pop Up Canopy Tent includes the following components:
- Canopy Frame (pre-assembled)
- Canopy Top (PU-coated Oxford fabric)
- Wheeled Carrying Bag
- Ground Stakes
- Ropes

Image 3.1: Detailed view of key components: reinforced corners, durable Oxford cloth with PVC coating, anchor kit (stakes and ropes), sturdy steel frame, firm connection points, and stable feet.
4. Setup Instructions
The Outsunny Pop Up Canopy Tent is designed for quick and easy setup, typically requiring two people. No tools are required for assembly.
- Unpack the Frame: Remove the folded canopy frame from the wheeled carrying bag. Place the frame in the desired setup location.
- Expand the Frame: With a person on each side, gently pull the outer legs of the frame outwards until it is partially open. Do not fully extend the legs yet.
- Attach the Canopy Top: Drape the canopy fabric over the partially opened frame. Secure the corners of the canopy to the frame's corner posts using the hook-and-loop fasteners or ties provided. Ensure the canopy is centered and taut.
- Fully Extend the Frame: Continue to pull the outer legs of the frame until the frame is fully extended and the central locking mechanism clicks into place.
- Adjust Height: Press the red button on each leg to release the locking pin and extend the lower leg sections to your desired height. Ensure all four legs are set to the same height and the locking pins are securely engaged. (Refer to Section 5 for more details on height adjustment).
- Secure the Canopy: Use the provided ground stakes and ropes to anchor the canopy securely to the ground. Attach ropes to the canopy corners and stake them into the ground at an angle, away from the canopy legs.
Video 4.1: Official Outsunny video demonstrating the setup process for the Pop Up Canopy. This video shows the frame expansion and canopy attachment.

Image 4.2: The foldable design includes a wheeled carrying bag for easy transport and storage.
5. Operation
5.1. Height Adjustment
The Outsunny Pop Up Canopy Tent features a 3-level adjustable height mechanism, allowing you to customize the canopy's height to suit your needs.
- To Raise: With the canopy partially or fully assembled, locate the red adjustment button on each leg. Press the button to release the internal locking pin. While holding the button, pull the lower leg section downwards to extend it to the next height setting. Ensure the pin clicks into place at the desired height. Repeat for all four legs.
- To Lower: Follow the same procedure as raising the canopy. Press the red button and push the lower leg section upwards until the pin clicks into the desired lower height setting. Repeat for all four legs.
Always ensure all four legs are adjusted to the same height level for stability and proper canopy tension.
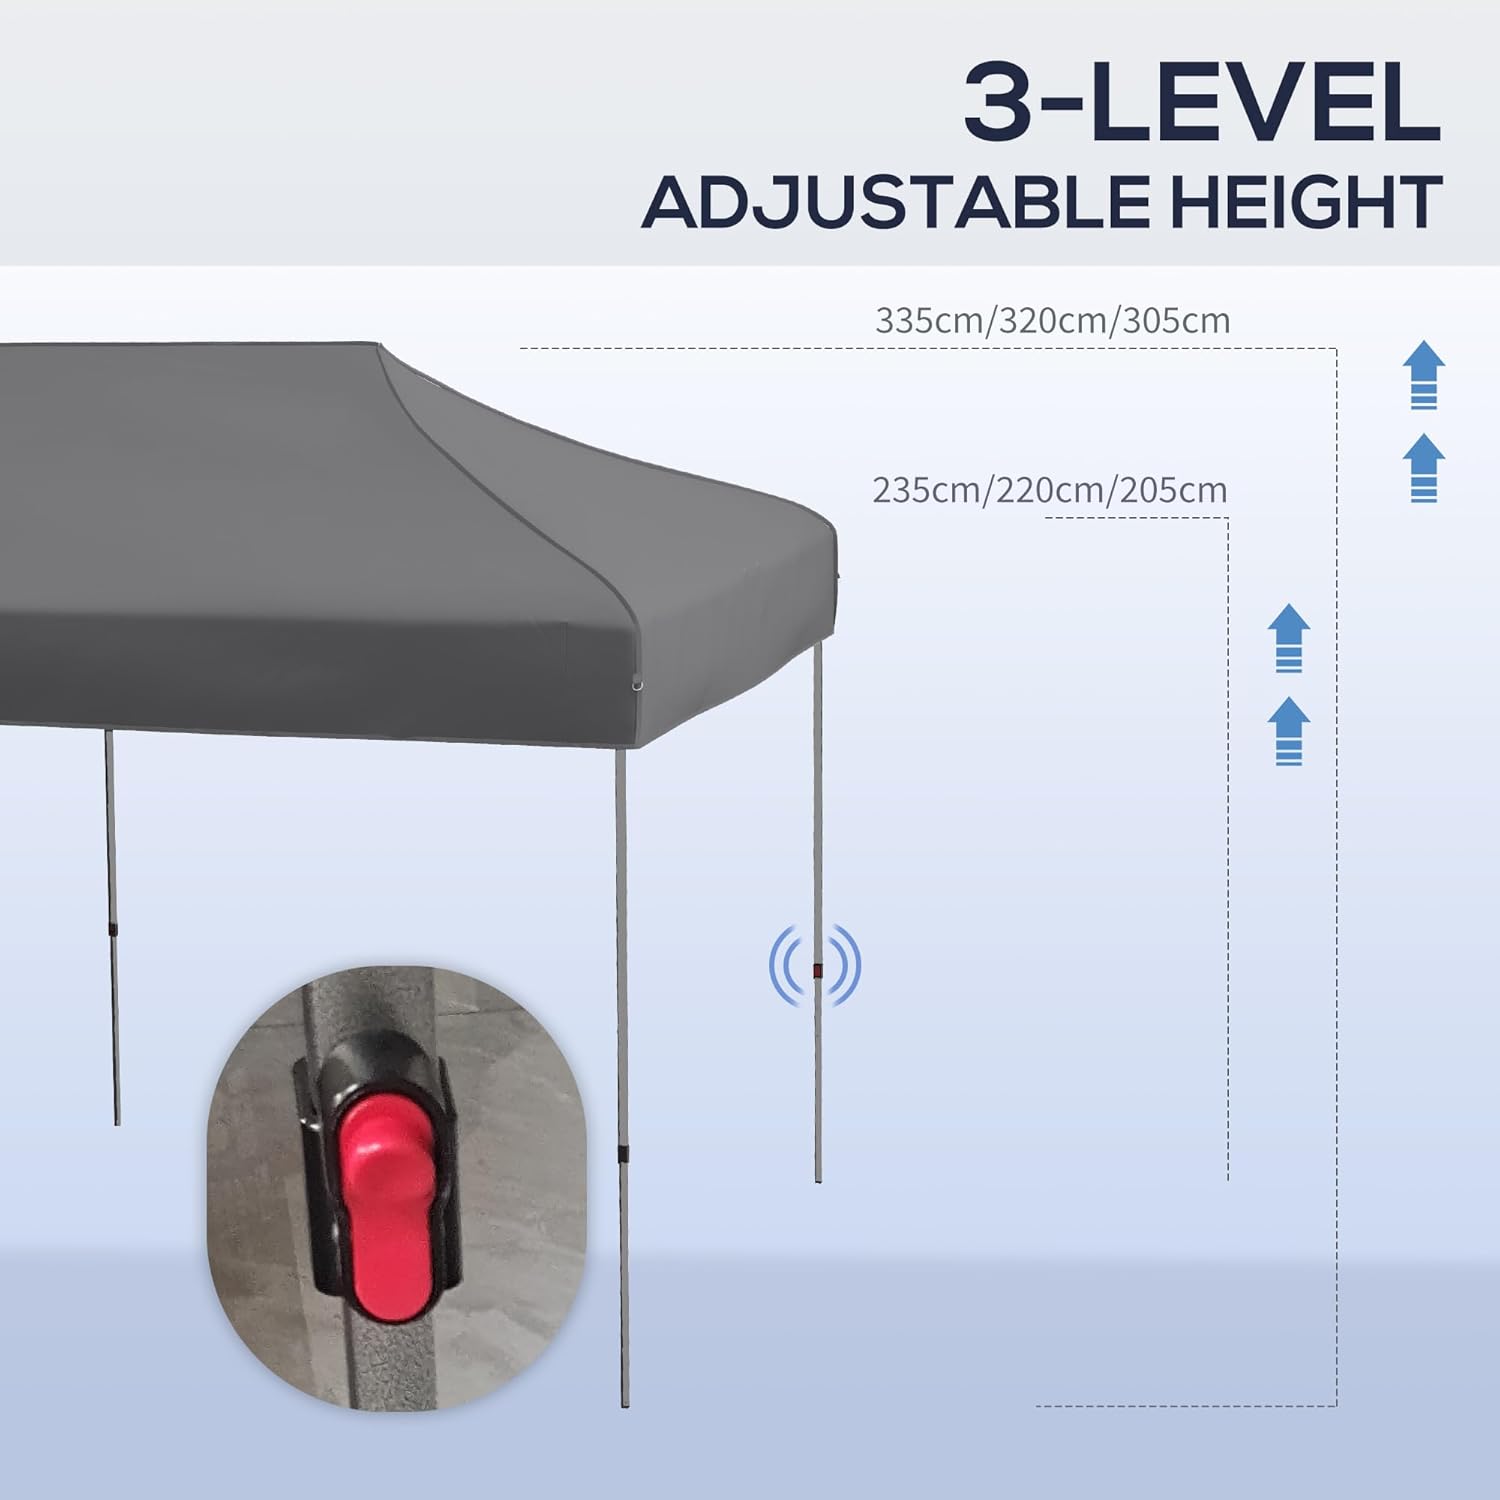
Image 5.1: The canopy offers three adjustable height settings, controlled by a push-button mechanism on each leg.
5.2. Sun Protection
The canopy top is made from PU-coated Oxford fabric, providing shade and UV protection. This material is also water-resistant to help protect against light rain.

Image 5.2: The canopy fabric is 600D Oxford cloth with PVC coating, offering breathability and UV protection.
6. Maintenance
6.1. Cleaning
- Clean the canopy fabric with mild soap and water. Do not use harsh detergents or abrasive cleaners, as these can damage the fabric's coating.
- Rinse thoroughly and allow the fabric to air dry completely before folding and storing.
- Wipe the steel frame with a damp cloth to remove dirt and debris. Dry thoroughly to prevent rust.
6.2. Storage
- Ensure the canopy fabric and frame are completely dry before folding and storing to prevent mold, mildew, and rust.
- Fold the canopy frame carefully and place it back into the wheeled carrying bag.
- Store the canopy in a cool, dry place, away from direct sunlight and extreme temperatures.
7. Troubleshooting
| Problem | Possible Cause | Solution |
|---|---|---|
| Canopy is unstable or wobbly. | Not properly anchored; legs not fully extended or locked; uneven ground. | Ensure all legs are fully extended and locking pins are engaged. Use ground stakes and ropes. Set up on level ground. |
| Water accumulates on the canopy top. | Insufficient tension in the canopy fabric; heavy rainfall. | Ensure the canopy fabric is pulled taut and secured at all corners. The canopy has 12 drainage holes to prevent accumulation; check if they are clear. |
| Difficulty extending or collapsing the frame. | Frame joints are stiff or dirty; locking mechanisms are stuck. | Clean and lubricate frame joints if necessary. Ensure adjustment buttons are fully pressed when attempting to move legs. |
| Canopy fabric tears or rips. | Exposure to sharp objects; excessive force during setup/takedown; strong winds. | Handle with care. Avoid setting up near sharp objects. Do not use in strong winds. Small tears may be repaired with a patch kit. |
8. Specifications
- Brand: Outsunny
- Model Number: 84C-157V02GY
- Overall Dimensions (L x W x H): 9.6' x 19.2' x 11' / 10.5' / 10' (adjustable)
- Peak Height: 11' / 10.5' / 10' (adjustable)
- Eave Height: 7.7' / 7.2' / 6.7' (adjustable)
- Folding Dimensions (W x D x H): 15.25" x 8.25" x 61.75"
- Floor Area: 184 Square Feet
- Occupancy: Up to 18 people
- Material: Steel frame, PU-coated Oxford Fabric canopy
- Color: Gray
- Item Weight: 87 Pounds
- Water Resistance Level: Water Resistant
- Ultraviolet Light Protection: Yes
- Included Components: Carrying Bag, Drainage Holes, Ground Stakes, Ropes
- Required Assembly: Yes

Image 8.1: Dimensional diagram of the canopy tent, showing its extended and folded measurements.
9. Warranty & Support
9.1. Manufacturer Warranty
This Outsunny Pop Up Canopy Tent comes with a 1 Year Warranty Against Manufacturer Defects. Please retain your proof of purchase for warranty claims.
9.2. Customer Support
For any questions, missing parts, or assistance with assembly or operation, please contact Outsunny customer support. Refer to the contact information provided with your purchase or visit the official Outsunny website for support details.