Important Safety Information
Read and understand all instructions before assembly and use. Failure to follow these instructions may result in injury or damage to the product.
- Always ensure the gazebo is securely anchored to the ground using the provided stakes and ropes.
- Do not use the gazebo in strong winds, heavy rain, or snow. Disassemble and store the gazebo during adverse weather conditions.
- Keep all flame and heat sources away from the gazebo fabric.
- Exercise caution during assembly and disassembly to prevent pinching fingers or hands.
- Ensure adequate clearance around the gazebo to prevent obstruction or damage.
- This gazebo is intended for temporary outdoor use only. It is not designed as a permanent structure.
Package Contents
Verify that all components are present before beginning assembly. If any parts are missing or damaged, contact customer support.

Image: Sunjoy Lambert Pop Up Hexagon Gazebo with all components including frame, canopy, mesh walls, carry bag, stakes, and ropes.
- Pop-Up Steel Frame (1)
- Canopy Top (1)
- Mesh Sidewalls (6 panels, pre-attached or separate)
- Carry Bag (1)
- Ground Stakes (6)
- Guy Ropes (6)
Setup Instructions
Assembly typically requires two people. Choose a level surface for setup.
Step 1: Unpacking and Initial Placement
- Remove the gazebo frame and canopy from the carry bag.
- Place the folded frame in the desired setup location.
Step 2: Expanding the Frame
- With one person at each end, gently pull the frame outwards to partially expand it.
- Lift the frame slightly and continue pulling outwards until the frame is about three-quarters open.
- Ensure all cross-bars are extending evenly.

Image: Interior view of the gazebo frame structure, showing the central hub and connecting bars.
Step 3: Attaching the Canopy
- Drape the canopy top over the partially expanded frame. Align the corners of the canopy with the corners of the frame.
- Secure the canopy to the frame using the hook-and-loop fasteners or ties located on the underside of the canopy.

Image: Close-up of the canopy attachment mechanism to the gazebo frame, showing ties.
Step 4: Fully Extend the Frame and Adjust Height
- From underneath the canopy, push up on the central hub of the frame until it locks into place.
- Extend each leg of the gazebo by pressing the push-button release and sliding the lower leg section down until it locks into the desired height setting.

Image: Detail of the height-adjustable press button design on the gazebo leg.
Step 5: Securing the Gazebo
- Insert ground stakes through the footpads at the base of each leg and firmly into the ground.
- Attach guy ropes to the canopy corners and stake them into the ground at an angle, ensuring tension for stability.

Image: Anchoring kit components, including stakes and ropes.
Step 6: Attaching Mesh Sidewalls (if separate)
- If your mesh sidewalls are not pre-attached, hang them from the frame using the integrated hooks or ties.
- Zip the sidewalls together to create an enclosed space.
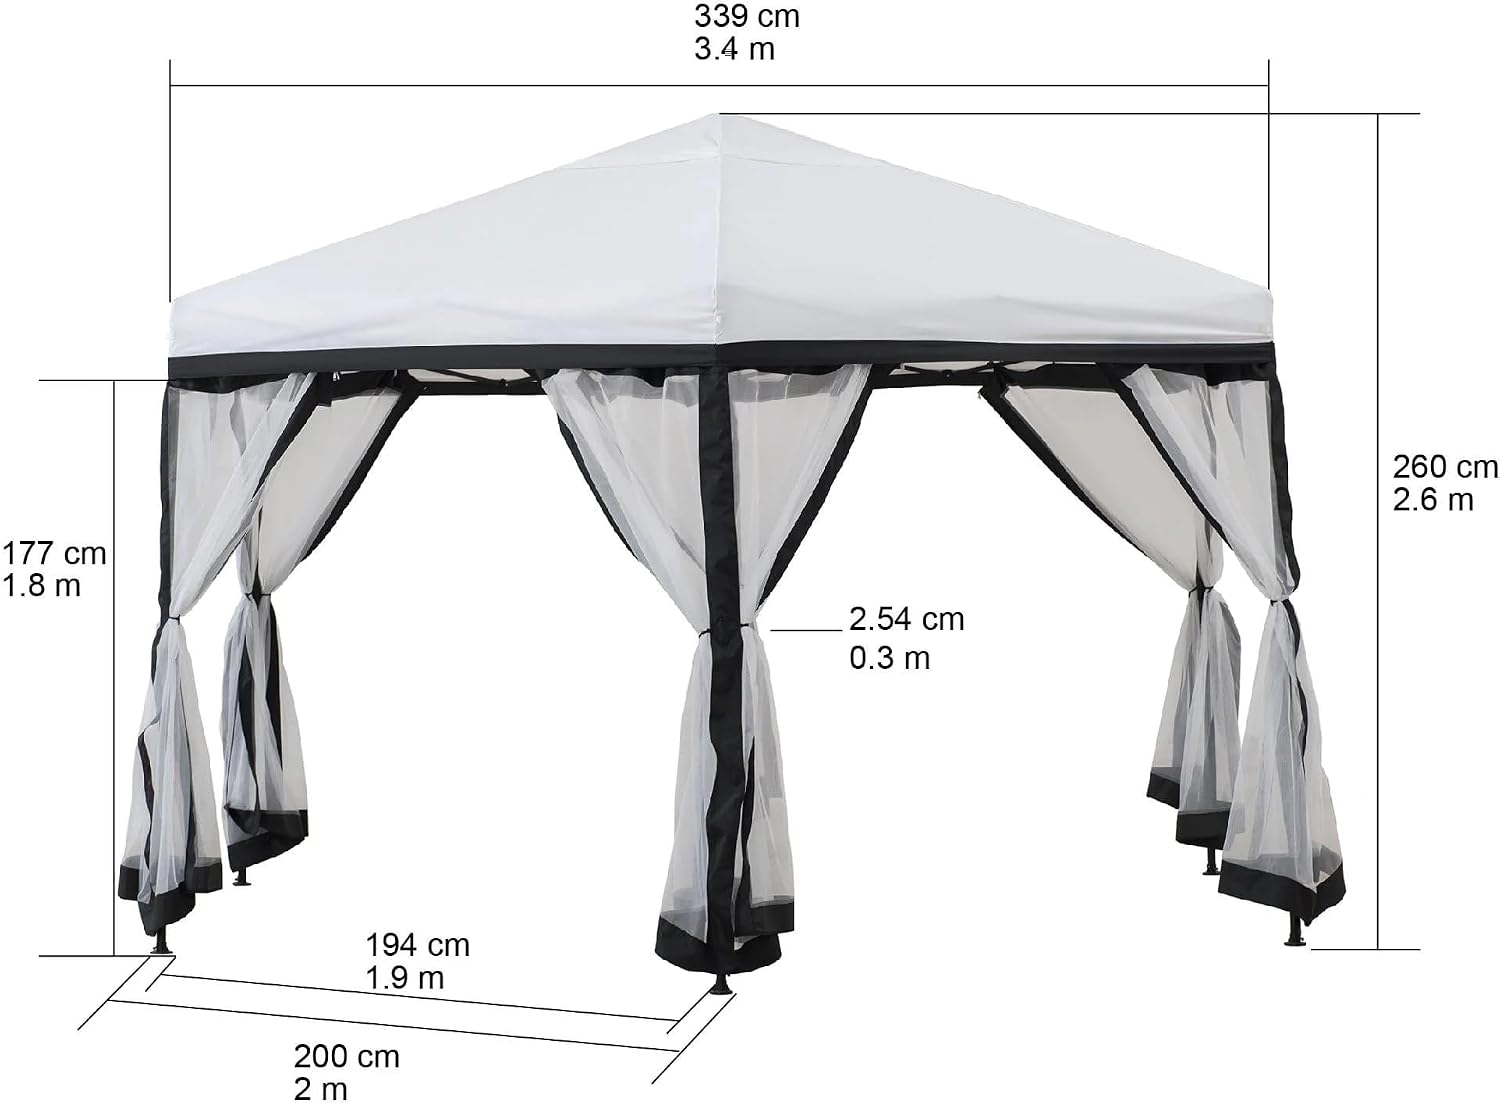
Image: Gazebo with all mesh sidewalls zipped closed, providing insect protection.
Operating Instructions
- Adjusting Height: To adjust the height, press the push-button on each leg and slide the leg to the desired position. Ensure all legs are locked at the same height for stability.
- Using Mesh Sidewalls: The mesh sidewalls can be zipped closed to provide protection from insects or tied back to open up the space.
- Disassembly: To disassemble, reverse the assembly steps. Unlock the legs, collapse the frame, remove the canopy and sidewalls, and store all components in the carry bag.
Maintenance
- Cleaning: Clean the canopy and mesh sidewalls with mild soap and water. Do not use harsh chemicals or abrasive cleaners. Allow fabric to air dry completely before storage.
- Frame Care: Inspect the steel frame periodically for any signs of rust or damage. Clean any dirt or debris from the frame.
- Storage: When not in use, disassemble the gazebo and store all components in the provided carry bag in a cool, dry place away from direct sunlight. Ensure the fabric is completely dry to prevent mold and mildew.
- Inspection: Regularly check all connections, stakes, and ropes for wear or damage. Replace any worn parts immediately.
Troubleshooting
| Problem | Possible Cause | Solution |
|---|---|---|
| Gazebo is unstable or wobbly. | Not properly anchored; uneven ground; legs not fully extended/locked. | Ensure all stakes and ropes are securely fastened. Move to a level surface. Verify all legs are fully extended and locked. |
| Canopy does not fit correctly. | Canopy not aligned; frame not fully expanded. | Ensure canopy corners match frame corners. Fully expand the frame before attaching the canopy. |
| Difficulty collapsing the frame. | Legs are still locked; central hub not disengaged. | Press the release buttons on each leg to unlock them. Gently push down on the central hub to disengage the locking mechanism. |
Specifications

Image: Diagram showing the dimensions of the Sunjoy Lambert Pop Up Hexagon Gazebo.
| Feature | Detail |
|---|---|
| Product Dimensions (L x W x H) | 3.39L x 3.39W x 2.6H Meters (133.5 x 133.5 x 102.4 inches) |
| Item Weight | 32.85 Pounds (14.9 kg) |
| Frame Material | Alloy Steel, Powder-Coated |
| Canopy Material | Weather-resistant Fabric |
| Shape | Hexagonal |
| Color | White & Black |
| Water Resistance Level | Waterproof |
| Ultraviolet Light Protection | Yes |
| Assembly Required | Yes |
| Occupancy | 4 US (Approximate) |
Warranty and Support
This Sunjoy product comes with a 1-year manufacturer's warranty from the date of purchase, covering defects in materials and workmanship under normal use.
For warranty claims, missing parts, or technical support, please contact Sunjoy customer service. Keep your proof of purchase for warranty validation.
- Manufacturer: Sunjoy
- Place of Business: REDLANDS, CA, 92374 US
For the most up-to-date support information, please visit the official Sunjoy website or refer to the contact details provided with your product packaging.