
1. Introduction
Thank you for choosing the Aquamarin Electric Water Heater. This manual provides important information for the safe and efficient installation, operation, and maintenance of your new water heater. Please read this manual thoroughly before installation and keep it for future reference.
2. Safety Instructions
Your safety and the safety of others are paramount. Please observe all safety warnings and instructions in this manual. Failure to do so may result in property damage, personal injury, or even death.
- Electrical Safety: Ensure the water heater is connected to a properly grounded electrical outlet with the correct voltage (220-240V) and frequency (50Hz). Do not use extension cords. Disconnect power before any maintenance or repair.
- Water Pressure: The maximum operating pressure is 0.8 Mpa. Install the included safety valve to prevent overpressure.
- Water Temperature: Hot water can cause severe burns. Exercise caution when using hot water, especially around children and the elderly. The maximum temperature is 75°C.
- Installation: Installation must be performed by a qualified professional in accordance with local codes and regulations. Ensure the unit is securely mounted vertically.
- Water Resistance: The unit has an IPX4 waterproof rating, meaning it is protected against splashing water. However, do not immerse the unit in water.
- Maintenance: Regular maintenance, including checking the safety valve and anode, is crucial for safe and long-term operation.
3. Product Overview
The Aquamarin Electric Water Heater is designed for efficient hot water supply. Familiarize yourself with its main components.

Figure 3.1: Front view of the Aquamarin Electric Water Heater, showing the temperature gauge and control knob.

Figure 3.2: Detailed view of the control panel with signal lamp and the bottom connections, including the safety valve.

Figure 3.3: Internal view illustrating the enamelled steel tank and heating elements, designed for corrosion protection.
4. Setup and Installation
Proper installation is critical for the safe and efficient operation of your water heater. It is recommended that installation be performed by a certified plumber or electrician.
4.1 Unpacking
Carefully remove the water heater and all accessories from the packaging. Check for any signs of damage. The package includes:
- 1 x Electric Water Heater (ELKESS-30L)
- 1 x Thermostat (integrated)
- 1 x Power Cable with Plug (1.5 m / 16 A / 250 V)
- 1 x Safety Valve
- 1 x Set of Fasteners
- 1 x Instruction Manual (EN/FR/DE/IT)
4.2 Mounting
The Aquamarin water heater is designed for vertical wall mounting. Ensure the wall can support the weight of the unit when full (approx. 11.4 kg dry weight + 30 kg water = ~41.4 kg).
- Determine the desired mounting location, ensuring sufficient space for connections and maintenance.
- Use the provided fasteners and follow the diagram for drilling holes. The distance between the suspension and the top edge is 8.3 cm.
- Securely attach the mounting bracket to the wall.
- Carefully lift and hang the water heater onto the mounted bracket.
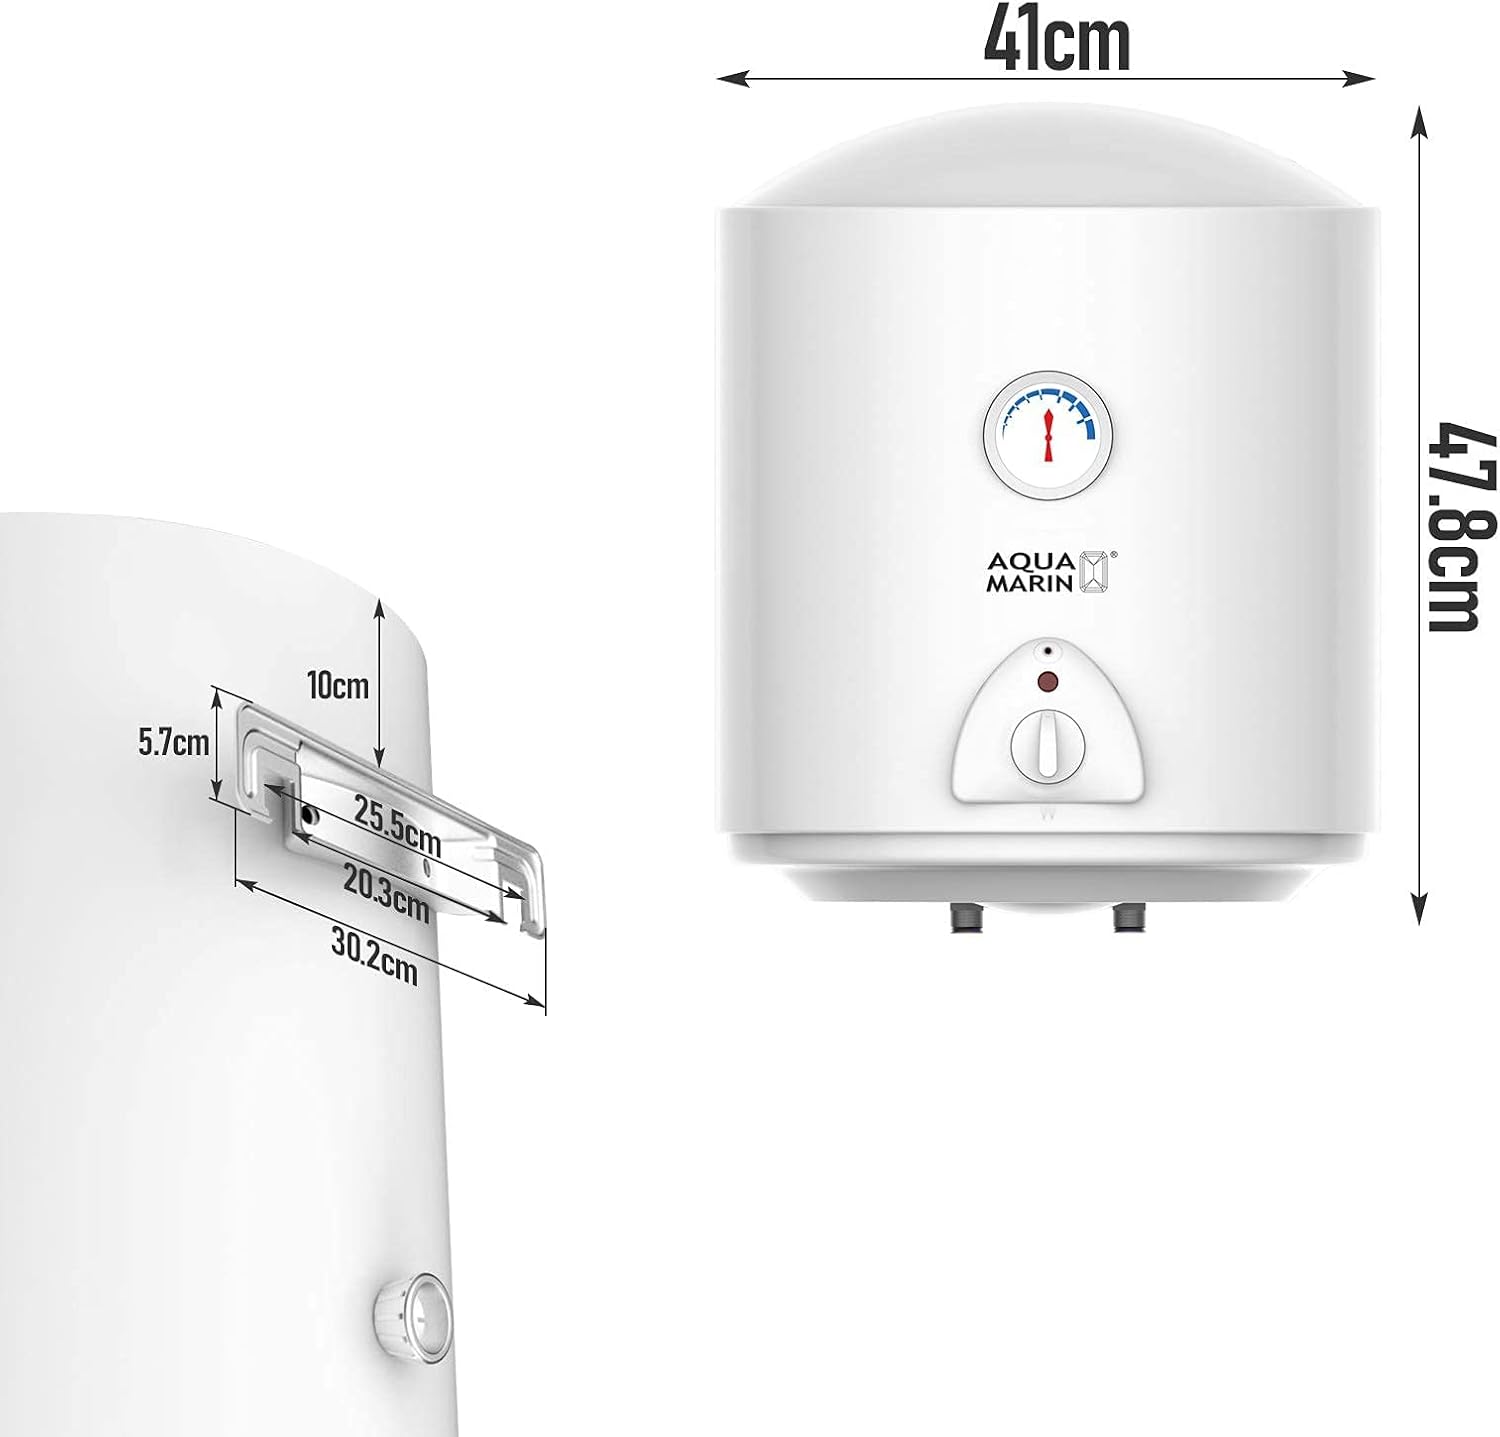
Figure 4.1: Dimensions and mounting specifications for installation.
4.3 Water Connections
Connect the water inlet and outlet pipes to the corresponding ports at the bottom of the unit. The improved inlet pipe pumps water directly to the bottom of the tank for efficient heating.
- Install the safety valve on the cold water inlet pipe.
- Ensure all connections are sealed with high-quality silicone sealing rings to prevent leaks.
- Once connections are made, slowly open the cold water supply valve to fill the tank. Open a hot water faucet in your home to allow air to escape until water flows steadily.
4.4 Electrical Connection
Connect the power cable to a suitable grounded electrical outlet. Ensure the electrical circuit can handle the 1500W power consumption of the unit.
5. Operating Instructions
Once installed and filled with water, your Aquamarin water heater is ready for operation.
5.1 Powering On
After ensuring the tank is completely filled with water, plug the power cable into the electrical outlet. The signal lamp on the control panel will illuminate, indicating that the unit is receiving power and the heating element is active.
5.2 Setting Temperature
Use the control knob on the front of the unit to adjust the desired water temperature. The maximum temperature setting is 75°C. The integrated thermostat will maintain the set temperature automatically.

Figure 5.1: The water heater in operation, capable of maintaining hot water for up to 48 hours and reaching a maximum temperature of 75°C.
5.3 Energy Saving
The water heater boasts an energy efficiency class B and a heating efficiency of over 90%. To maximize energy savings, avoid setting the temperature higher than necessary and consider using the unit during off-peak electricity hours if applicable.
6. Maintenance
Regular maintenance ensures the longevity and optimal performance of your water heater.
6.1 Safety Valve Check
Periodically check the safety valve (pressure relief valve) to ensure it is not blocked and is functioning correctly. Refer to the safety valve manufacturer's instructions for specific testing procedures. This typically involves lifting the lever to allow a small amount of water to discharge.
6.2 Anode Rod Inspection/Replacement
The water heater is equipped with a magnesium protective anode, designed for a significantly longer lifespan (5 times longer than standard models). This anode protects the enamelled steel tank from corrosion. It should be inspected periodically (e.g., annually) by a qualified technician and replaced if significantly depleted.
6.3 Draining the Tank
If the water heater will be out of use for an extended period (e.g., during winter in an unheated area to prevent freezing) or for major maintenance, the tank should be drained. Ensure the water heater is cold and disconnected from power before draining.
6.4 Cleaning
Clean the exterior of the water heater with a soft, damp cloth. Do not use abrasive cleaners or solvents.
7. Troubleshooting
If you encounter issues with your water heater, refer to the following common problems and solutions. For complex issues, contact a qualified technician.
| Problem | Possible Cause | Solution |
|---|---|---|
| No hot water | No power; Thermostat set too low; Heating element failure | Check power supply/breaker; Adjust thermostat; Contact technician for element replacement |
| Insufficient hot water | Thermostat set too low; Tank size inadequate for demand; Sediment buildup | Increase temperature setting; Reduce hot water usage; Consider professional descaling |
| Water too hot | Thermostat set too high | Lower temperature setting |
| Leaking from unit | Loose connections; Faulty safety valve; Tank corrosion | Tighten connections; Inspect/replace safety valve; Contact technician for tank inspection |
| Unusual noises | Sediment buildup in tank | Professional descaling recommended |
8. Specifications
Detailed technical specifications for the Aquamarin Electric Water Heater (ELKESS-30L-SNGL).
| Feature | Specification |
|---|---|
| Model Number | ELKESS-30L-SNGL |
| Capacity | 30 Liters |
| Dimensions (Ø x H) | 41 x 47.8 cm |
| Weight (empty) | Approx. 11.40 kg |
| Material (Tank) | Enamelled Steel |
| Anode Type | Magnesium Protective Anode |
| Voltage | 220-240 V |
| Frequency | 50 Hz |
| Power | 1500 W |
| Max Temperature | 75 °C |
| Heating Efficiency | > 90% |
| Max Pressure | 0.8 Mpa |
| Waterproof Level | IPX4 |
| Energy Efficiency Class | B |
| Color | White |
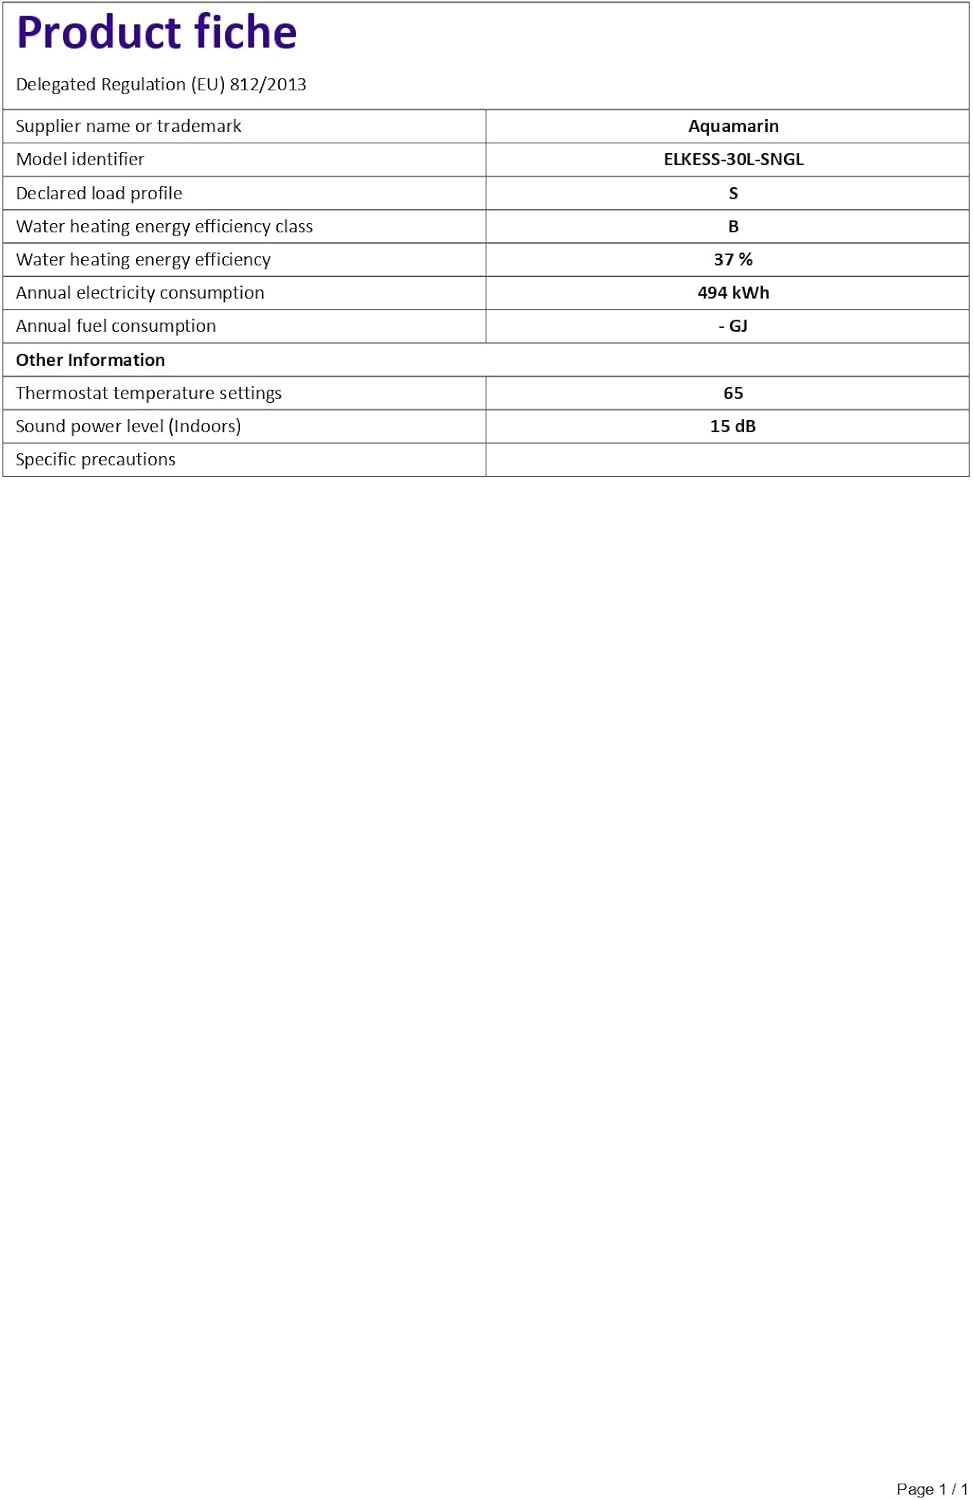
Figure 8.1: Product fiche detailing energy regulation compliance and technical specifications.
9. Warranty and Support
For warranty information, please refer to the specific warranty card or section included with your product packaging. This manual is provided in multiple languages (DE/EN/FR/IT/ES).
If you require technical assistance or have questions not covered in this manual, please contact Aquamarin customer support through the vendor from whom you purchased the product. Please have your model number (ELKESS-30L-SNGL) and purchase details ready when contacting support.
Please note that information regarding the availability of spare parts is currently unavailable.

