Spyder 5086747
User Manual
Spyder Auto 5086747 LED Tail Lights
For Subaru Impreza WRX 2008-2014 5Dr Hatchback Wagon
Product Overview
The Spyder Auto 5086747 LED Tail Lights are designed to enhance the appearance and functionality of your Subaru Impreza WRX 2008-2014 5Dr Hatchback Wagon. These tail lights feature modern LED technology, including sequential turn signals, and come in a black smoke finish for a distinctive look. They are engineered for a direct bolt-on installation, ensuring an OEM-like fitment.

Image: A pair of Spyder Auto 5086747 LED Tail Lights, showcasing their black smoke lens and integrated LED elements.
Package Contents
Verify that all components are present in the package before beginning installation.
- 1x Left LED Tail Light Assembly
- 1x Right LED Tail Light Assembly
- Necessary wiring harnesses (pre-attached or included)
- Installation instructions (this manual)

Image: Rear view of one tail light assembly, showing the integrated wiring harness and mounting points.
Safety Information
Always prioritize safety when working on your vehicle. Failure to follow safety guidelines may result in injury or damage to the vehicle.
- Ensure the vehicle is turned off and the battery is disconnected before starting any electrical work.
- Wear appropriate personal protective equipment (PPE), such as gloves and eye protection.
- If you are unsure about any step, consult a qualified automotive technician.
- These lights are designed for specific vehicle models. Verify fitment before installation.
Installation (Setup)
This section provides a general guide for installing the Spyder Auto 5086747 LED Tail Lights. Specific steps may vary slightly depending on your vehicle's configuration. Professional installation is recommended.
Tools Required:
- Socket Wrench Set
- Screwdriver Set (Phillips and Flathead)
- Plastic Trim Removal Tool (recommended to prevent scratches)
- Clean Cloth
Installation Steps:
- Preparation: Park the vehicle on a level surface and engage the parking brake. Turn off the ignition and disconnect the negative terminal of the vehicle's battery.
- Access Old Tail Lights: Open the rear hatch/trunk. Locate the access panels or trim pieces that cover the tail light mounting bolts from inside the vehicle. Carefully remove these panels using a trim removal tool.
- Disconnect Wiring: Once the old tail light assembly is accessible, disconnect the electrical connectors by pressing the release tab and pulling them apart.
- Remove Old Tail Lights: Unscrew the mounting bolts or nuts holding the tail light assembly in place. There are typically 2-3 bolts. Gently pull the tail light assembly straight out from the vehicle body. Be careful not to scratch the paint.
- Inspect and Clean: Before installing the new lights, inspect the mounting area for any debris or corrosion. Clean the area thoroughly with a clean cloth.
- Install New Tail Lights: Carefully align the new Spyder Auto LED Tail Light assembly with the mounting holes on the vehicle body. Push it firmly into place until it sits flush.
- Secure New Tail Lights: Reinstall the mounting bolts or nuts and tighten them securely. Do not overtighten.
- Connect Wiring: Connect the electrical connectors from the new tail light assembly to the vehicle's wiring harness. Ensure a secure connection. The new lights are designed for plug-and-play installation.
- Test Functionality: Before reassembling the interior trim, reconnect the vehicle's battery. Test all tail light functions: parking lights, brake lights, reverse lights, and turn signals (including sequential function).
- Final Assembly: Once all functions are verified, reinstall any removed interior trim panels or access covers.

Image: A close-up view of the electrical connector, highlighting the plug-and-play design for easy installation.
Operation
The Spyder Auto 5086747 LED Tail Lights operate in conjunction with your vehicle's existing lighting system. No special controls are required for their basic function.
- Parking Lights: Activated when your vehicle's parking lights or headlights are turned on.
- Brake Lights: Illuminate brighter when the brake pedal is pressed.
- Reverse Lights: Activate when the vehicle is shifted into reverse gear.
- Turn Signals: Activate when the turn signal lever is engaged. These tail lights feature a sequential signal, where the LEDs illuminate in a flowing pattern in the direction of the turn.
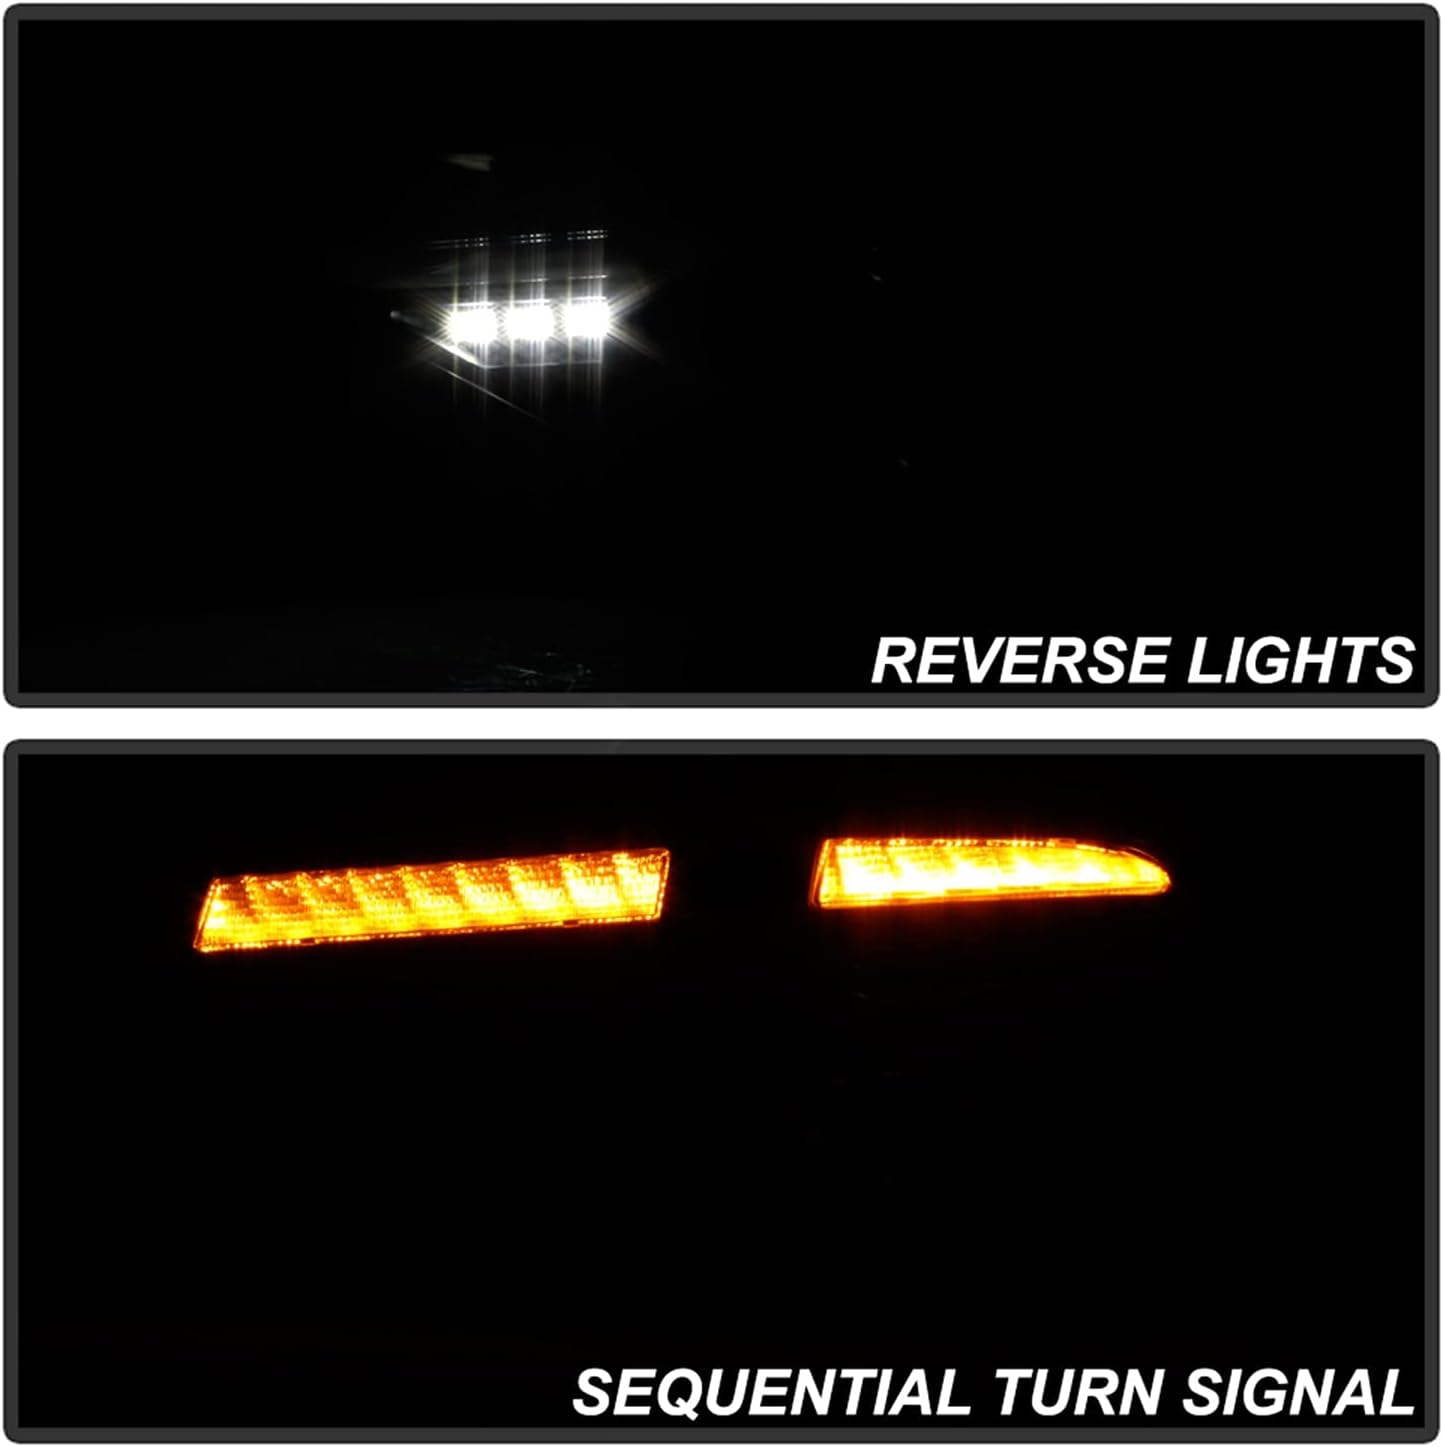
Image: Top panel shows the bright white reverse lights illuminated. Bottom panel shows the amber sequential turn signal in action, indicating the direction of turn.

Image: Top panel shows the red parking lights illuminated. Bottom panel shows the brighter red brake lights activated.
Maintenance
These LED tail lights are designed for long-lasting performance with minimal maintenance. Follow these guidelines to ensure their longevity and optimal appearance:
- Cleaning: Clean the lens surfaces regularly with a soft cloth and mild automotive soap. Avoid abrasive cleaners or harsh chemicals that could damage the plastic lens.
- Inspection: Periodically inspect the tail lights for any signs of condensation, cracks, or damage. Ensure all wiring connections remain secure.
- Bulb Replacement: As these are LED lights, individual LED bulbs are not user-replaceable. If an LED segment fails, the entire assembly may need replacement.
- Waterproof Feature: The lights are designed to be waterproof. However, avoid directing high-pressure water streams directly at the seals during car washes.
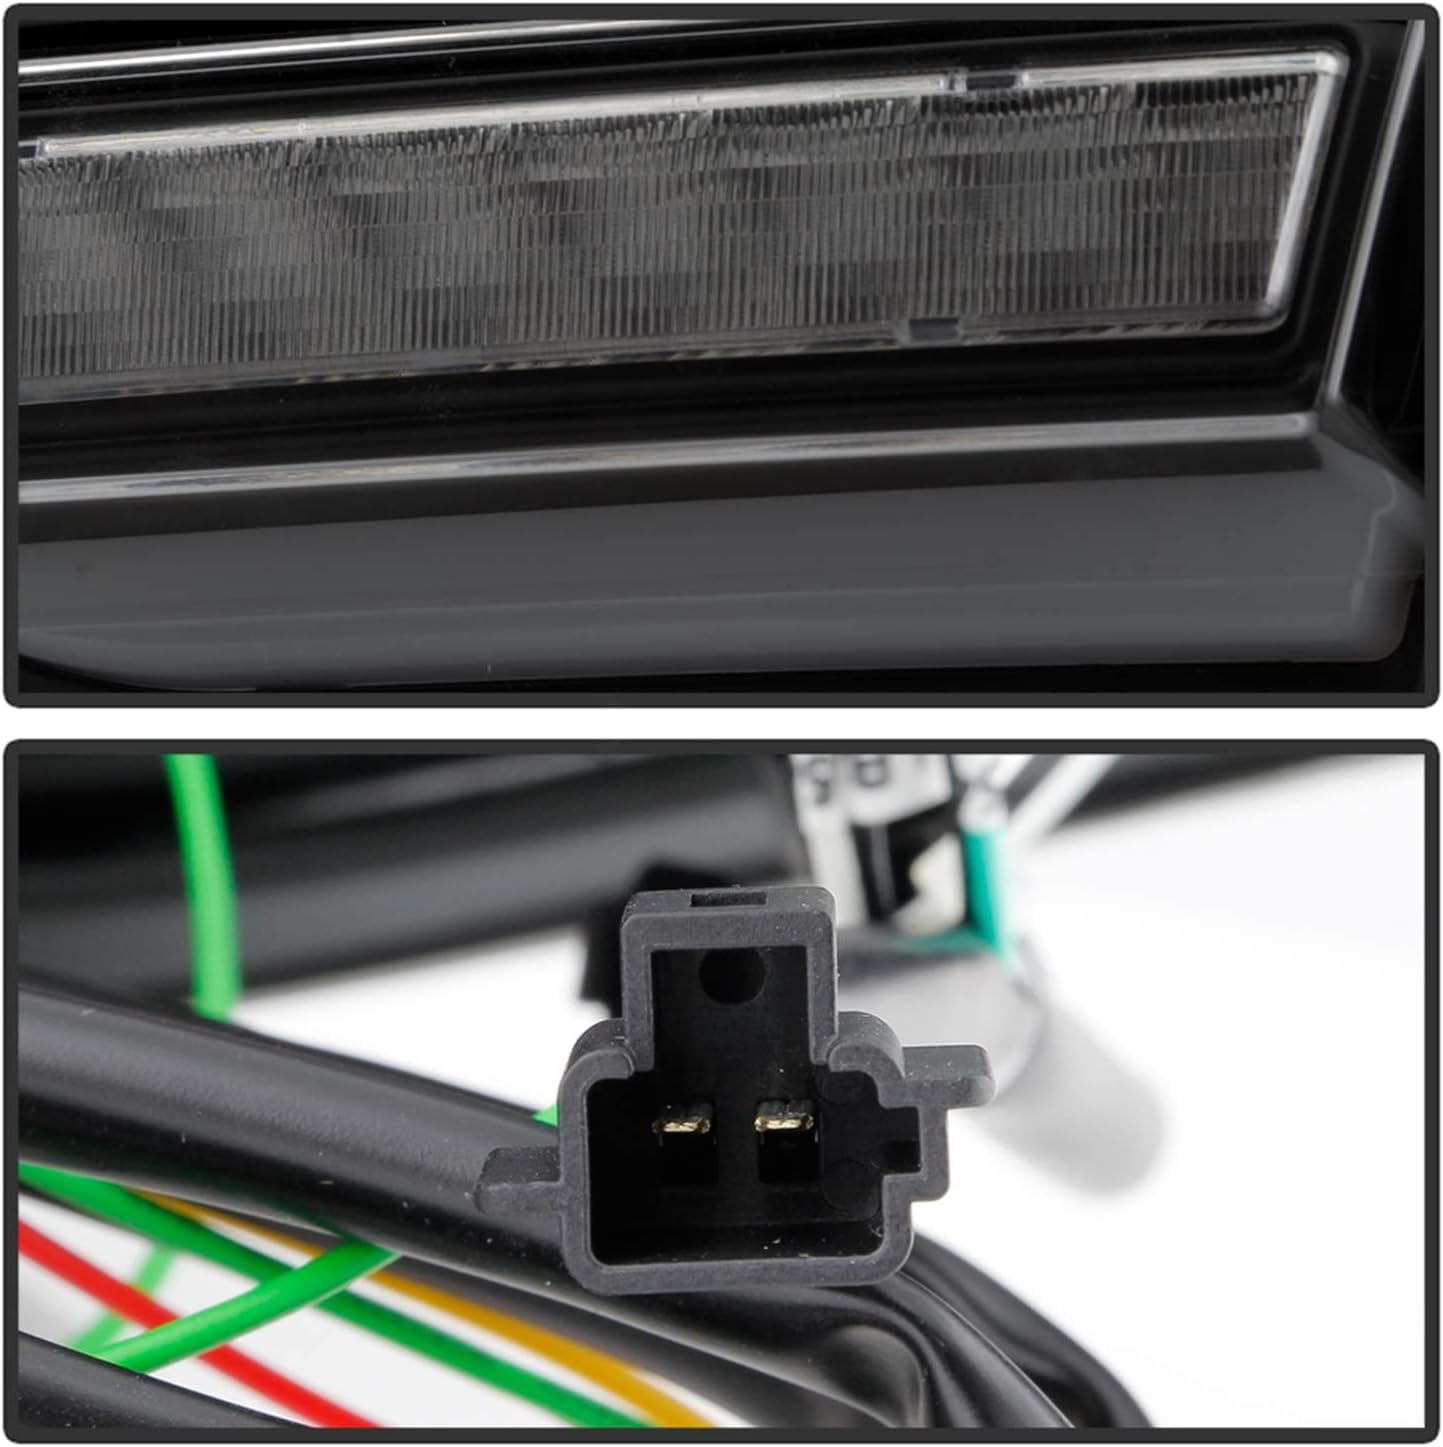
Image: A detailed close-up of the LED array, showing the individual light-emitting diodes that provide illumination.
Troubleshooting
If you encounter issues with your Spyder Auto LED Tail Lights, refer to the following common problems and solutions:
| Problem | Possible Cause | Solution |
|---|---|---|
| Lights not illuminating | Loose electrical connection, blown fuse, incorrect installation. | Check all wiring connections for tightness. Inspect vehicle's fuse box for blown fuses related to tail lights. Re-verify installation steps. |
| Only some LEDs are working | Internal LED failure (rare), partial connection issue. | Ensure connections are fully seated. If problem persists, contact customer support for warranty information. |
| Sequential signal not working correctly | Wiring issue, control module malfunction (unlikely for integrated unit). | Check turn signal wiring. Ensure proper voltage supply. If issue persists, professional diagnosis may be required. |
| Condensation inside lens | Temperature changes, minor seal issue. | Small amounts of condensation may dissipate naturally. If excessive or persistent, inspect seals for damage. Ensure vent holes (if present) are not blocked. |
Specifications
| Feature | Detail |
|---|---|
| Model Number | 5086747 |
| Brand | Spyder Auto |
| Vehicle Compatibility | Subaru Impreza WRX 2008-2014 5Dr Hatchback Wagon |
| Light Type | LED Tail Lights |
| Signal Type | Sequential Turn Signal |
| Lens Color | Smoke |
| Housing Color | Black |
| Material | Plastic Lens |
| Special Features | Waterproof, OEM Fitment |
| Dimensions (L x W x H) | 23 x 14 x 14 inches (approximate, per assembly) |
| Item Weight | 8.29 pounds (approximate, per assembly) |
| UPC | 847245086747 |

Image: Close-up view of the tail light housing, showing the SAE DOT compliance markings, indicating adherence to safety standards.
Warranty and Support
Spyder Auto products are manufactured to high-quality standards. For specific warranty details and support, please refer to the information provided at the time of purchase or contact Spyder Auto directly.
- Manufacturer: Spyder Auto
- Website: www.spyderauto.com
- Customer Service: Refer to the manufacturer's website for contact information.
Please retain your proof of purchase for any warranty claims.