1. Product Overview
The HP Z230 Workstation Desktop PC is designed for professional workloads and multitasking. It features an Intel Core i5-4590 processor, 16GB of RAM, and a 240GB Solid State Drive (SSD) for efficient data access. Connectivity options include integrated WiFi and Bluetooth, along with a DVD-RW drive. This workstation operates on Windows 11 Pro.

Figure 1: HP Z230 Workstation Desktop PC
2. Setup Instructions
2.1 Unpacking
- Carefully remove the workstation and all accessories from the packaging.
- Verify that all components are present: HP Z230 Workstation, power cable, keyboard, and mouse.
2.2 Connecting Peripherals
Connect your monitor, keyboard, mouse, and other devices to the appropriate ports on the workstation.

Figure 2: Front Panel Ports (USB 3.0, USB 2.0, Headphone, Microphone/Headphone)
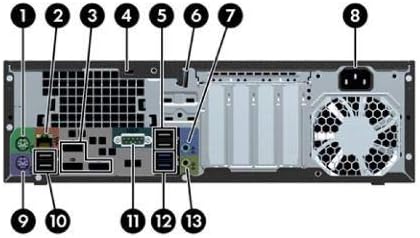
Figure 3: Rear Panel Ports (USB, DisplayPort, DVI, VGA, Ethernet, Audio, Power)
- Monitor: Connect your monitor to one of the available video output ports (VGA, DVI, or DisplayPort) on the rear panel.
- Keyboard and Mouse: Connect the keyboard and mouse to any available USB ports on either the front or rear panel.
- Power: Connect the power cable to the power connector on the rear of the workstation and then to a power outlet.
- Network (Optional): For a wired connection, connect an Ethernet cable to the RJ-45 port on the rear panel. For wireless, ensure the workstation is within range of a Wi-Fi network.

Figure 4: Standard USB Keyboard and Mouse for connection
2.3 Initial Power-On and Windows 11 Setup
- Press the power button on the front of the workstation.
- Follow the on-screen instructions to complete the initial Windows 11 setup, including language, region, network connection, and user account creation.
3. Operating Instructions
3.1 Power On/Off
- To Power On: Press the power button on the front panel.
- To Shut Down: Click the Start button in Windows, then select Power > Shut down.
- To Restart: Click the Start button in Windows, then select Power > Restart.
3.2 Using the DVD-RW Drive
The workstation includes a DVD-RW drive for reading and writing optical discs.
- Press the eject button on the DVD-RW drive to open the disc tray.
- Place a disc onto the tray with the label side facing up.
- Gently push the tray back into the drive. The operating system will typically detect the disc automatically.
3.3 USB and Audio Connections
- USB Devices: Connect USB devices such as external hard drives, printers, or webcams to any available USB ports.
- Audio: Use the headphone or microphone/headphone combo jack on the front panel for audio output or input. Rear audio jacks are also available for speakers or other audio devices.
4. Maintenance
4.1 Cleaning
- Ensure the workstation is powered off and unplugged before cleaning.
- Use a soft, lint-free cloth dampened with water or a mild cleaning solution to wipe exterior surfaces.
- Use compressed air to clear dust from vents and ports periodically to maintain proper airflow.
4.2 Software Updates
Regularly update your operating system and drivers to ensure optimal performance and security.
- Windows Updates: Go to Start > Settings > Windows Update to check for and install updates.
- Driver Updates: Visit the HP support website for the latest drivers for your specific model.
4.3 Data Backup
Regularly back up important data to an external drive or cloud storage to prevent data loss.
5. Troubleshooting
5.1 No Power
- Ensure the power cable is securely connected to both the workstation and the power outlet.
- Verify the power outlet is functional by plugging in another device.
5.2 No Display
- Check that the monitor is powered on and the video cable is securely connected to both the workstation and the monitor.
- Ensure the correct input source is selected on your monitor.
- Try connecting the monitor to a different video output port on the workstation, if available.
5.3 Slow Performance
- Close unnecessary applications running in the background.
- Check for and install any pending Windows updates.
- Run a disk cleanup and defragmentation (for HDD, not necessary for SSD).
- Scan for malware or viruses.
5.4 Network Connectivity Issues
- Wired: Ensure the Ethernet cable is properly connected and the network router/modem is working.
- Wireless: Verify Wi-Fi is enabled in Windows settings and you are connected to the correct network with the correct password. Restart your router/modem if necessary.
6. Specifications
| Feature | Detail |
|---|---|
| Brand | HP |
| Model Name | HP Z230 |
| Model Number | J9H88UT#ABA |
| Operating System | Windows 11 |
| CPU Model | Intel Core i5-4590 |
| CPU Speed | 3.6 GHz |
| RAM Memory Installed Size | 16 GB DDR3 |
| Memory Storage Capacity | 240 GB SSD |
| Graphics Coprocessor | Intel HD Graphics 4600 |
| Optical Storage Device | DVD-RW |
| Connectivity Technology | Bluetooth, Wi-Fi |
| Total USB Ports | 6 |
| Video Output Interface | VGA, DVI |
| Item Dimensions | 23 x 20 x 9 inches |
| Item Weight | 7200 Grams |
7. Warranty Information
This HP Z230 Workstation Desktop PC comes with a 90-day limited warranty. Please refer to your purchase documentation for specific terms and conditions.
8. Support
For further assistance, technical support, or warranty claims, please contact your retailer or visit the official HP support website. Have your product model and serial number ready when contacting support.
- HP Support Website: www.hp.com/support