
Introduction
This manual provides essential instructions for the assembly, painting, and care of your Revell RV03710 Combat Set, featuring 1:72 scale plastic model kits of the Messerschmitt Bf109G-10 and the Supermarine Spitfire Mk.V. These kits are designed for model builders aged 10 and older, offering an engaging and rewarding construction experience. Please read all instructions carefully before beginning assembly.

Image: The product box for the Revell RV03710 Combat Set, displaying both the Bf109G-10 and Spitfire Mk.V models in a dynamic aerial scene. The box indicates 'LEVEL 3' difficulty and '76 PARTS'.
Safety Information
Warning: This product is not suitable for children under 36 months due to small parts which may present a choking hazard. Adult supervision is recommended during assembly, especially when using sharp tools or adhesives. Always work in a well-ventilated area when painting or using glues.
Kit Contents
The Revell RV03710 Combat Set includes:
- Plastic parts for one Messerschmitt Bf109G-10 model.
- Plastic parts for one Supermarine Spitfire Mk.V model.
- Decal sheet for authentic markings.
- Illustrated assembly instructions.
- Total of 76 parts for both models.

Image: The two fully assembled and painted models from the Revell Combat Set, a Messerschmitt Bf109G-10 and a Supermarine Spitfire Mk.V, displayed side-by-side.
Preparation and Tools
Before starting assembly, ensure you have a clean, well-lit workspace. Gather the following recommended tools:
- Plastic Cement: Specifically designed for plastic models.
- Hobby Knife or Sprue Cutters: For carefully removing parts from the sprue.
- Sanding Sticks or Fine-Grit Sandpaper: For cleaning up mold lines and sprue attachment points.
- Tweezers: For handling small parts and decals.
- Paint Brushes: Various sizes for detailed painting.
- Model Paints: Acrylic or enamel paints suitable for plastic models. Refer to the kit's specific instructions for recommended colors.
- Decal Setting Solution: To help decals conform to surfaces.
Assembly Instructions
Follow the detailed, step-by-step diagrams provided in your kit's specific instruction booklet. The general process involves:
- Part Preparation: Carefully cut each part from the sprue using sprue cutters or a hobby knife. Clean any excess plastic (flash) or mold lines with a hobby knife or sanding stick.
- Dry Fitting: Before applying glue, dry-fit parts together to ensure a proper fit. This helps identify any areas that may require trimming or sanding.
- Gluing: Apply a small amount of plastic cement to one of the mating surfaces. Press the parts together firmly and hold until the glue sets. Avoid using too much glue, as it can damage the plastic.
- Sub-Assemblies: Build smaller sections (e.g., cockpit, landing gear, wings) before joining them to the main fuselage.
- Fuselage and Wings: Assemble the fuselage halves, then attach the wings and tail sections. Ensure proper alignment.
- Small Details: Attach smaller components such as landing gear, propellers, antennas, and ordnance as indicated in the instructions.

Image: A detailed view of the assembled and painted Supermarine Spitfire Mk.V model, showcasing its camouflage pattern and markings.

Image: A detailed view of the assembled and painted Messerschmitt Bf109G-10 model, highlighting its distinctive German Luftwaffe markings and camouflage.
Painting and Decaling
Painting and decaling bring your models to life. Refer to the kit's painting guide for accurate color schemes and decal placement.
- Painting: Apply paint in thin, even coats. Multiple thin coats are better than one thick coat. Allow each coat to dry thoroughly before applying the next. Use masking tape for sharp lines between colors.
- Decals: Cut out each decal close to its edge. Dip the decal in lukewarm water for a few seconds until it slides freely on its backing paper. Carefully slide the decal onto the model surface. Position it correctly using tweezers. Gently blot excess water with a soft cloth or cotton swab. Apply decal setting solution to help the decal conform to panel lines and irregular surfaces.

Image: A close-up view of the tail section of the Supermarine Spitfire Mk.V model, showing the intricate decal work and camouflage paint scheme.
Display and Handling
Once your models are complete, they are ready for display. Handle them carefully to prevent damage.
- Display Location: Choose a stable, level surface away from direct sunlight, extreme temperatures, and high humidity to prevent fading, warping, or decal degradation.
- Handling: Always pick up the model by its main body (fuselage or wings) rather than delicate parts like landing gear, antennas, or propellers.
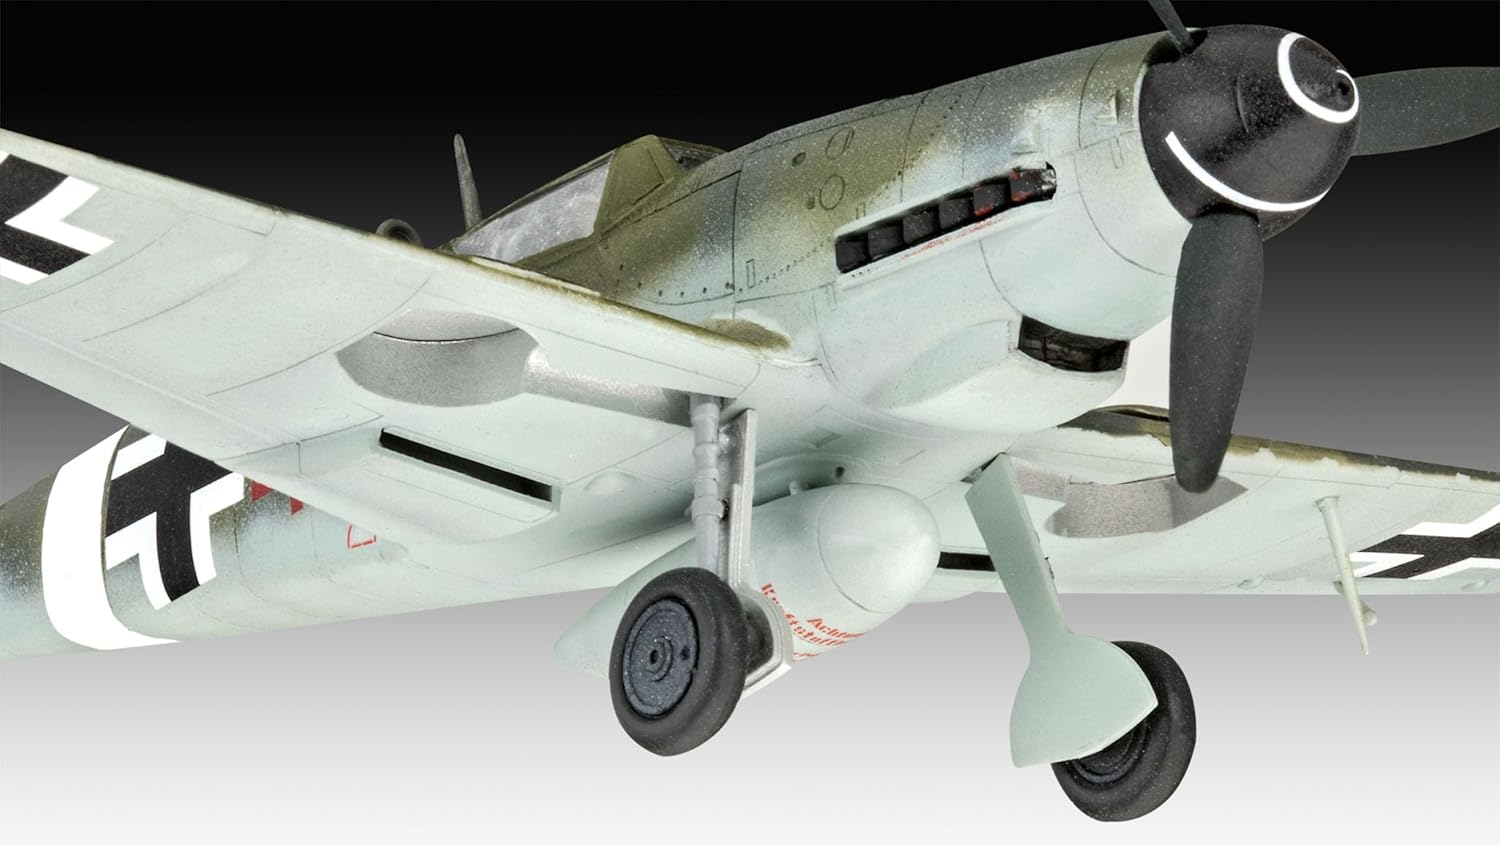
Image: An underside view of the Messerschmitt Bf109G-10 model, highlighting the landing gear, external fuel tank, and panel line details.

Image: An underside view of the Supermarine Spitfire Mk.V model, showing the landing gear, propeller, and wing details.
Maintenance
To keep your models in pristine condition:
- Cleaning: Dust regularly with a soft, dry brush or a can of compressed air. Avoid using water or chemical cleaners, as these can damage paint and decals.
- Storage: If storing for extended periods, place models in a sealed container to protect them from dust and environmental factors.
Troubleshooting Common Issues
Here are solutions to some common problems encountered during model assembly:
- Parts Not Fitting: Ensure all sprue gates are cleanly removed and check for any excess plastic (flash). Dry-fit again and gently sand or trim as needed.
- Gaps Between Parts: Small gaps can be filled with plastic putty or a small amount of stretched sprue dissolved in liquid cement. Sand smooth once dry.
- Decals Not Adhering: Ensure the surface is clean and smooth. Use decal setting solution to help them conform and adhere better. A gloss coat before decaling can also improve adhesion.
- Paint Issues: If paint is too thick, thin it slightly. If it's uneven, apply more thin coats. Ensure the surface is clean before painting.
Specifications
| Feature | Detail |
|---|---|
| Brand | Revell |
| Model Name | Combat Set Bf109G-10 & Spitfire |
| Model Number | RV03710 |
| Scale | 1:72 |
| Number of Pieces | 76 |
| Material | Plastic |
| Color | Unpainted |
| Theme | Military (WWII Aircraft) |
| Recommended Age | 10 years and up (Manufacturer recommended age: 3 years and up, but 10+ for model building enjoyment) |
| Item Weight | 7.4 Ounces |
| Included Components | Parts to make one plastic model. (Note: This refers to the kit containing parts for two models) |
Warranty and Support
Revell products are manufactured to high-quality standards. If you encounter any issues with missing or defective parts, please contact Revell customer support directly. Keep your proof of purchase for any warranty claims. Specific warranty details may vary by region; refer to the official Revell website or contact their customer service for more information.