Xprite 52013-6-Y
Xprite Amber LED Hideaway Strobe Lights Kit
Model: 52013-6-Y
Brand: Xprite
1. Product Overview
The Xprite Amber LED Hideaway Strobe Lights Kit is designed to enhance visibility and safety for emergency and hazard vehicles. This unit features high-output LEDs and a redesigned control panel for ease of use. It is intended for internal mounting within vehicle light assemblies such as headlights, taillights, and fog lights.
Key features include:
- High Output LEDs: Each light is equipped with 4 high-output LED chips, providing enhanced brightness for day and night conditions.
- Quick Mode Control System: The control panel allows for easy switching between 20 distinct flashing patterns, including quick-select directional patterns.
- Universal Compatibility: Designed for universal fit in 12V emergency and hazard vehicles, including ATVs, cars, pickups, snowmobiles, trucks, and UTVs.
- Durable Design: Features encapsulated electronics for moisture and vibration resistance, ensuring durability in harsh weather conditions.

Figure 1: Overview of the Xprite Amber LED Hideaway Strobe Lights Kit, showing the six lightheads, control panel, and a vehicle with the lights installed.
2. Package Contents
Verify that all components are present in the package:
- LED Hideaway Strobe Lights Kit (6 lightheads)
- 1 x Control Box
- 1 x Power Module
- Associated wiring and connectors

Figure 2: Detailed view of the package contents, including lightheads, control box, power module, and wiring with approximate lengths.
3. Specifications
| Attribute | Detail |
|---|---|
| Brand | Xprite |
| Model Number | 52013-6-Y |
| Color | Amber |
| LEDs per Lighthead | 4 High Output LEDs |
| Operating Voltage | 12V DC |
| Number of Flashing Patterns | 20 |
| Special Features | Waterproof, Encapsulated Electronics |
| Mounting Requirement | 1-inch (2.54 cm) hole drilling |
| Lens Material | Polycarbonate or Acrylic |
| Item Weight | 3.04 pounds (approx. 1.38 kg) |
| Package Dimensions | 15.83 x 12.36 x 2.56 inches (approx. 40.2 x 31.4 x 6.5 cm) |
4. Setup and Installation
Proper installation is crucial for optimal performance and safety. It is recommended that installation be performed by a qualified professional if you are not familiar with automotive electrical systems.
4.1 Pre-Installation Checklist
- Ensure the vehicle's power is off and the battery is disconnected before beginning installation.
- Identify suitable mounting locations within headlights, taillights, fog lights, or other light assemblies. Ensure sufficient space behind the mounting surface for the lighthead and wiring.
- Gather necessary tools: drill with a 1-inch hole saw, wire strippers, crimping tool, electrical tape or heat shrink tubing, zip ties, and a multimeter.
4.2 Installation Steps
- Drill Mounting Holes: For each lighthead, a 1-inch (2.54 cm) hole is required. Carefully select the drilling location to avoid damaging existing wiring or components.
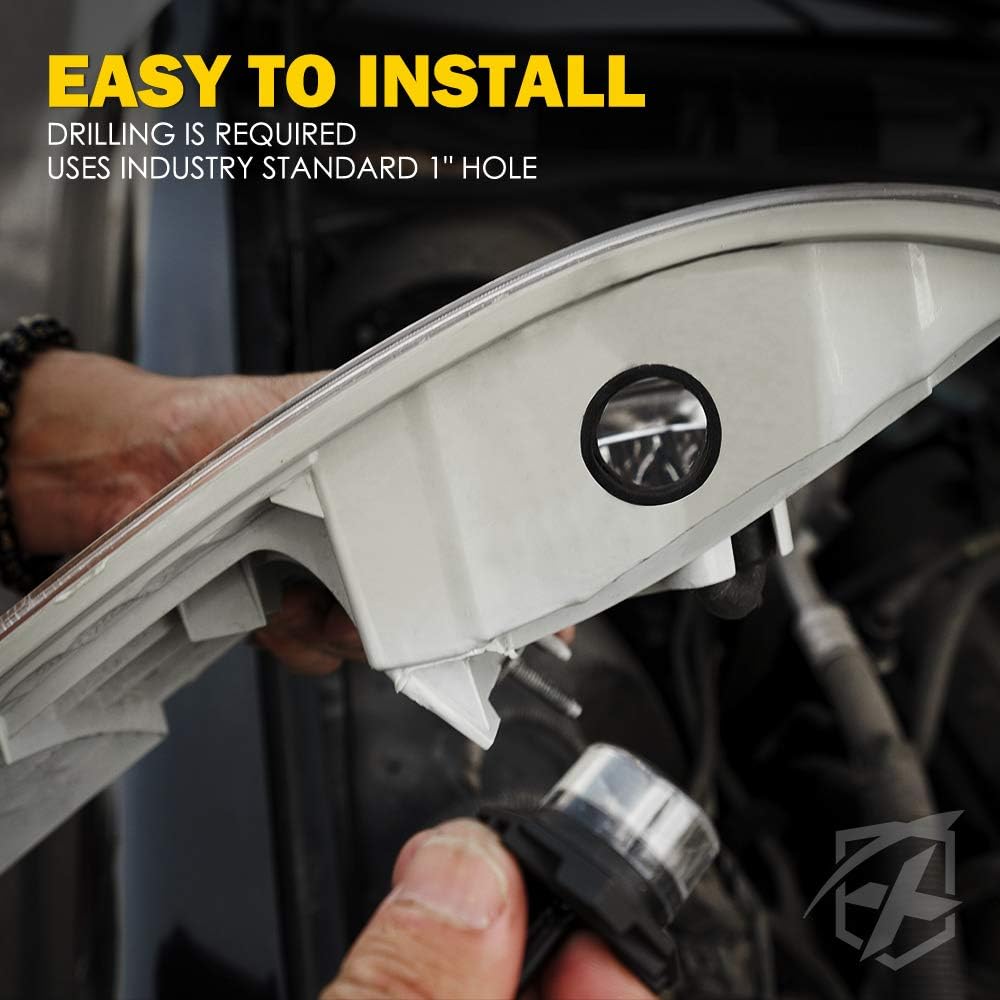
Figure 3: Drilling a standard 1-inch hole for lighthead installation. Ensure the hole is clean and free of debris.
- Insert Lightheads: Gently push each lighthead into its drilled hole until the rubber grommet seats firmly, creating a secure and waterproof seal.
Video 1: Demonstrates the process of drilling the 1-inch hole and inserting the Xprite LED hideaway strobe lighthead into a vehicle's light assembly. This video also shows the final appearance of the lights installed on a vehicle.
- Connect Wiring: Connect the wiring from each lighthead to the power module and control box according to the provided wiring diagram (not included in this manual, refer to product packaging for specific diagram). Ensure all connections are secure and properly insulated to prevent short circuits.
- Mount Control Box: Find a suitable location inside the vehicle cabin for the control box, ensuring it is easily accessible to the operator. Secure the control box using screws or adhesive.

Figure 4: The control box features buttons for pattern display, switching between 20 patterns, quick-select directional buttons, static light display, and an on/off switch.
- Connect to Power: Connect the power module to a 12V power source in the vehicle. It is recommended to connect to a fused circuit to protect the system.
- Test Functionality: Reconnect the vehicle battery and test all lightheads and control box functions to ensure proper operation.
Note: For optimal performance and longevity, ensure all connections are waterproofed if exposed to the elements. Extension cables may be required for certain vehicle installations and are sold separately.
5. Operating Instructions
The Xprite Strobe Lights Kit features a user-friendly control panel to manage the various flashing patterns.
5.1 Power On/Off
- To turn the lights ON, press the "Power" button on the control panel.
- To turn the lights OFF, press the "Power" button again.
5.2 Pattern Selection
The control panel offers 20 different flashing patterns. Use the "Pattern" button to cycle through the available patterns. The control box includes indicator lights to show the currently active pattern.
5.3 Directional Patterns
Utilize the "Quick-Select Directional Buttons" for specific directional warning patterns:
- Press the left arrow button for left-sweeping patterns.
- Press the right arrow button for right-sweeping patterns.
- Press the center arrow button for center-out patterns.
5.4 Memory Recall
The system is equipped with a memory recall function. When the unit is powered off and then on again, it will automatically resume the last selected flashing pattern.
Video 2: Demonstrates various flashing patterns and directional sweeps available with the Xprite LED Hideaway Strobe Lights Kit, including the memory recall function.
6. Maintenance
The Xprite LED Hideaway Strobe Lights Kit is designed for durability and requires minimal maintenance.
- Regular Cleaning: Periodically clean the lighthead lenses with a soft, damp cloth to ensure maximum light output. Avoid abrasive cleaners that could scratch the lens material.
- Wiring Inspection: Annually inspect all wiring and connections for signs of wear, corrosion, or damage. Secure any loose connections and repair damaged insulation.
- Mounting Security: Check the mounting of each lighthead and the control box to ensure they remain securely fastened.

Figure 5: The lightheads feature a waterproof design with encapsulated electronics, making them resistant to moisture and vibration.
7. Troubleshooting
If you encounter issues with your Xprite LED Hideaway Strobe Lights Kit, refer to the following common troubleshooting steps:
| Problem | Possible Cause | Solution |
|---|---|---|
| Lights do not turn on. | No power supply, loose wiring, blown fuse, faulty control box. | Check power connections, inspect fuse in vehicle's fuse box, ensure all wires are securely connected, test control box. |
| Some lightheads are not working. | Loose connection to specific lighthead, damaged lighthead, damaged wiring. | Inspect wiring and connections for the affected lightheads. If necessary, replace the individual lighthead. |
| Patterns are not changing. | Faulty control box, incorrect button press. | Ensure the "Pattern" button is pressed firmly. If the issue persists, the control box may need replacement. |
| Lights flicker or dim. | Insufficient power, loose connection, voltage drop. | Verify the power source provides stable 12V. Check all connections for tightness. Ensure wiring gauge is adequate for the length and load. |
If these steps do not resolve the issue, contact Xprite customer support for further assistance.
8. Warranty and Support
Xprite products are designed for quality and reliability. For specific warranty information, please refer to the warranty card included with your product or visit the official Xprite website. Keep your purchase receipt as proof of purchase for any warranty claims.
For technical support, replacement parts, or further inquiries, please contact Xprite customer service through their official channels. You can often find contact information on the product packaging or the Xprite brand store on Amazon.
Visit the Xprite Store for more products and support resources.
Ask a question about this manual
Ask about setup, troubleshooting, compatibility, parts, safety, or missing instructions. Manuals+ will review the question and use this page’s manual context to help answer it.