1. Introduction
This manual provides essential instructions for the setup, operation, maintenance, and troubleshooting of your I-life ZED PC IL.1703.332BCSAE All-in-One computer. Please read this manual thoroughly before using your device to ensure proper functionality and to prevent damage.
2. Safety Information
- Always use the original power adapter provided with the device.
- Do not expose the device to extreme temperatures, direct sunlight, or high humidity.
- Keep the device away from water and other liquids.
- Avoid placing heavy objects on the device.
- Do not attempt to disassemble or repair the device yourself. Refer to qualified service personnel.
- Ensure proper ventilation around the device to prevent overheating.
3. Package Contents
Verify that all items are present in the package:
- I-life ZED PC IL.1703.332BCSAE All-in-One Computer
- Power Adapter
- Wireless Keyboard
- Wireless Mouse
- User Manual (this document)
4. Product Overview
The I-life ZED PC IL.1703.332BCSAE is an all-in-one desktop computer designed for various computing tasks. It features a 17.3-inch touch screen and comes with a wireless keyboard and mouse for a complete user experience.
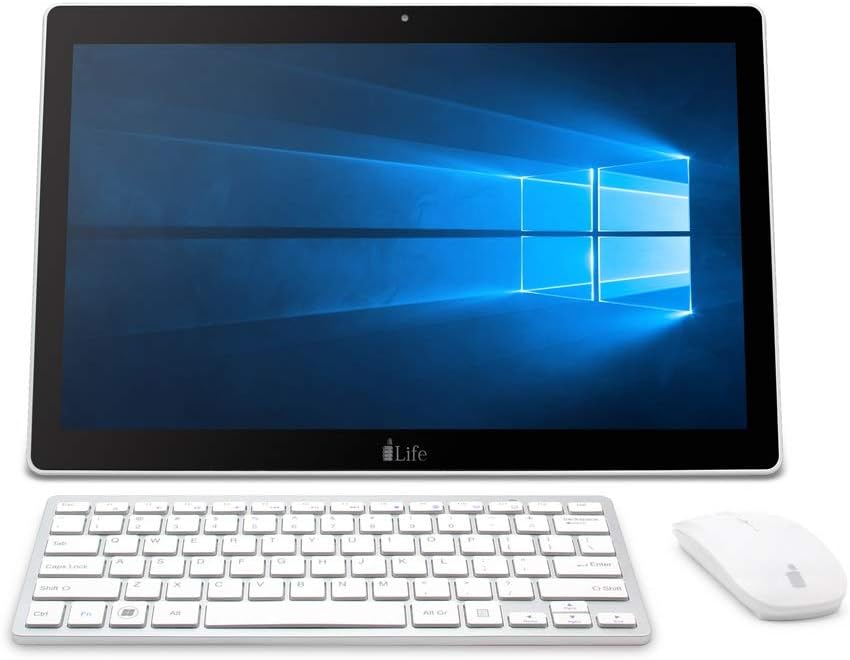
Figure 1: I-life ZED PC IL.1703.332BCSAE All-in-One computer. This image shows the I-life ZED PC IL.1703.332BCSAE, an all-in-one desktop computer. The main unit features a large 17.3-inch touch screen displaying the Windows 10 operating system. Below the screen, the 'i-Life' logo is visible. To the front of the main unit are a matching silver and white wireless keyboard and a white wireless mouse, indicating the complete desktop setup.
4.1 Front View
- 17.3-inch Touch Screen: Main display for user interaction.
- Webcam: Located at the top center of the screen bezel.
- Microphone: Integrated for audio input.
4.2 Rear/Side View (Typical Ports)
While specific port locations may vary, common ports include:
- Power Input: For connecting the power adapter.
- USB Ports: For connecting peripherals like the keyboard, mouse, and external storage.
- HDMI Port: For connecting to an external display.
- Ethernet Port (RJ45): For wired network connection.
- Audio Jack: For headphones or external speakers.
5. Setup
5.1 Initial Placement
Place the I-life ZED PC on a stable, flat surface. Ensure there is adequate space around the device for ventilation.
5.2 Connecting Peripherals
- Connect the Wireless Keyboard and Mouse: Insert the USB receiver (usually found in the mouse or keyboard battery compartment) into an available USB port on the PC. Ensure batteries are installed in the keyboard and mouse.
- Connect Power: Plug the power adapter into the power input port on the PC, then plug the other end into a wall outlet.
5.3 First Boot
- Press the power button (location typically on the side or back of the display unit).
- Follow the on-screen instructions to complete the Windows 10 setup process, including language selection, network connection, and user account creation.
6. Operating Instructions
6.1 Using the Touch Screen
The 17.3-inch display supports touch input. You can navigate Windows 10 by tapping, swiping, and pinching gestures similar to a tablet or smartphone.
- Tap: Equivalent to a mouse click.
- Tap and Hold: Equivalent to a right-click.
- Swipe: For scrolling or navigating through content.
- Pinch-to-Zoom: To zoom in or out on images and documents.
6.2 Windows 10 Basics
Your PC comes pre-installed with Windows 10 Home. Familiarize yourself with the Start Menu, Taskbar, and File Explorer for efficient operation. Online resources are available for detailed Windows 10 tutorials.
6.3 Connecting to the Internet
- Wi-Fi: Click the Wi-Fi icon in the taskbar, select your network, enter the password, and connect.
- Ethernet: Connect an Ethernet cable from your router/modem to the Ethernet port on the PC.
6.4 Shutting Down the PC
To properly shut down the PC, click the Start button, then select Power > Shut down. Avoid forced shutdowns by holding the power button unless absolutely necessary.
7. Maintenance
7.1 Cleaning the Device
- Use a soft, lint-free cloth to clean the screen and exterior.
- For stubborn marks, slightly dampen the cloth with water or a screen-cleaning solution.
- Do not spray cleaners directly onto the screen or device.
7.2 Software Updates
Regularly check for and install Windows updates to ensure system stability and security. Go to Settings > Update & Security > Windows Update.
7.3 Data Backup
It is recommended to regularly back up important data to an external drive or cloud storage to prevent data loss.
8. Troubleshooting
| Problem | Possible Cause | Solution |
|---|---|---|
| PC does not power on. | Power cable not connected; power adapter faulty; power outlet issue. | Ensure power cable is securely connected. Try a different power outlet. Contact support if the issue persists. |
| No display on screen. | PC is off; display settings issue. | Ensure PC is powered on. If connected to an external monitor, check display input settings. |
| Wireless keyboard/mouse not working. | Low battery; USB receiver not connected; driver issue. | Replace batteries. Ensure USB receiver is plugged into a working USB port. Reinstall drivers if necessary. |
| Slow performance. | Too many applications running; low disk space; malware. | Close unnecessary applications. Free up disk space. Run a virus scan. |
9. Specifications
The following are the technical specifications for the I-life ZED PC IL.1703.332BCSAE:
- Model Number: IL.1703.332BCSAE
- Processor: Intel Celeron N3350 (Dual Core, up to 2.4 GHz)
- RAM: 3 GB DDR3 SDRAM
- Storage: 500 GB HDD (Hard Disk Drive)
- Display: 17.3-inch Touch Screen, 1600 x 900 Resolution
- Graphics: Integrated Intel HD Graphics
- Operating System: Windows 10 Home
- Connectivity: Wi-Fi, Ethernet (if available), USB, HDMI
- Color: Silver
- Item Weight: 3.31 Kilograms
10. Warranty and Support
For warranty information and technical support, please refer to the warranty card included with your product or visit the official i-Life website. Do not attempt to repair the device yourself, as this may void your warranty.
For further assistance, you may contact i-Life customer service through their official channels.