1. Introduction
The Studiomaster DigiLive 8C is a compact 8-channel digital console designed for professional audio mixing applications. It features 8 inputs, including 6 microphone inputs and 1 stereo input, providing versatile connectivity for various audio sources. This manual provides detailed instructions for the setup, operation, and maintenance of your DigiLive 8C console to ensure optimal performance and longevity.
2. Important Safety Instructions
- Read these instructions thoroughly before operating the unit.
- Keep these instructions for future reference.
- Heed all warnings on the product and in the operating instructions.
- Follow all instructions.
- Do not use this apparatus near water.
- Clean only with a dry cloth.
- Do not block any ventilation openings. Install in accordance with the manufacturer's instructions.
- Do not install near any heat sources such as radiators, heat registers, stoves, or other apparatus (including amplifiers) that produce heat.
- Protect the power cord from being walked on or pinched, particularly at plugs, convenience receptacles, and the point where they exit from the apparatus.
- Only use attachments/accessories specified by the manufacturer.
- Unplug this apparatus during lightning storms or when unused for long periods of time.
- Refer all servicing to qualified service personnel. Servicing is required when the apparatus has been damaged in any way, such as power-supply cord or plug is damaged, liquid has been spilled or objects have fallen into the apparatus, the apparatus has been exposed to rain or moisture, does not operate normally, or has been dropped.
3. Product Overview
The Studiomaster DigiLive 8C features a robust hardware interface combined with intuitive software control, offering comprehensive mixing capabilities in a compact form factor. Below are key components and their functions.
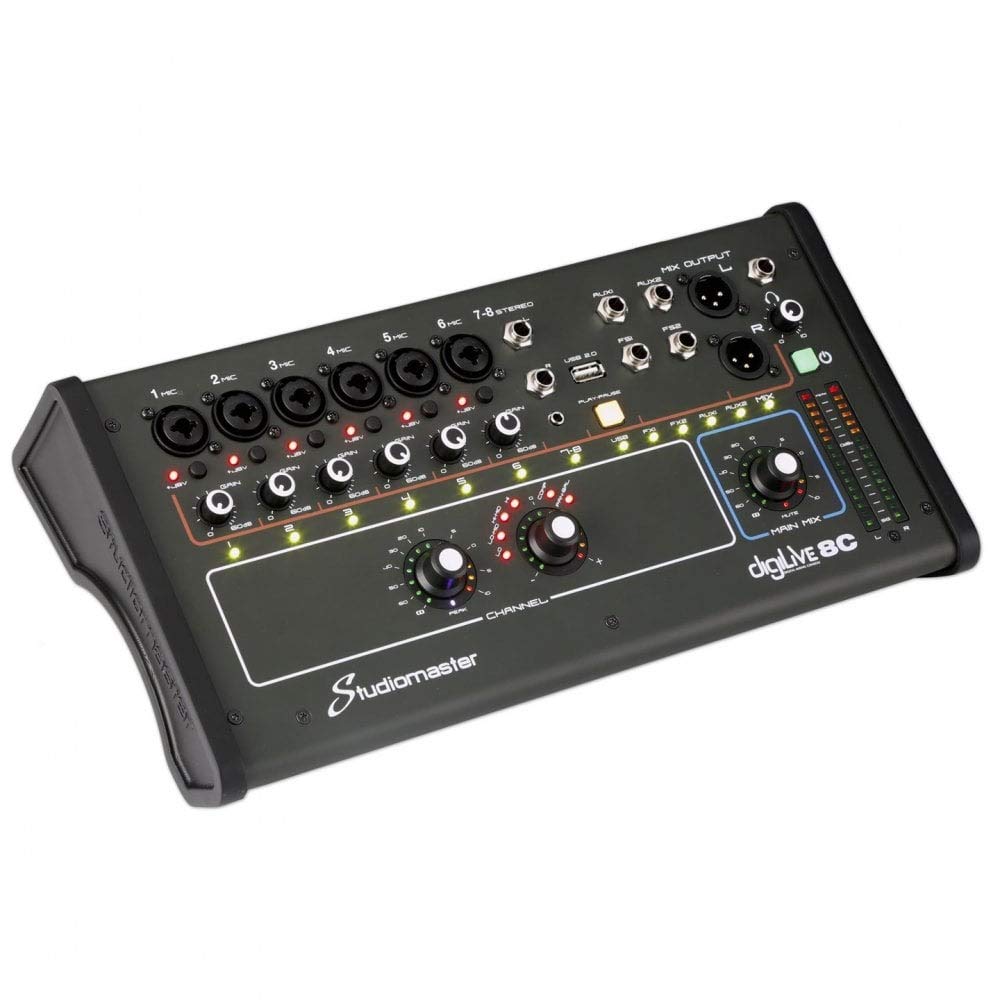
Figure 3.1: Front view of the Studiomaster DigiLive 8C digital console, showing all inputs, outputs, and control knobs.
This image displays the overall layout of the DigiLive 8C, highlighting the input section with 6 microphone inputs (1-6) and a stereo input (7-8), USB 2.0 ports, auxiliary outputs, and the main mix output. The control surface includes individual channel gain controls, signal indicators, and main mix level controls.

Figure 3.2: Angled view of the Studiomaster DigiLive 8C, providing a perspective of its compact design.
This angled view emphasizes the compact and portable nature of the DigiLive 8C, suitable for various setups where space is a consideration.
3.1. Input Section
- 1 MIC - 6 MIC: XLR/TRS combo jacks for microphone or line-level inputs. Each features a GAIN control and signal/peak indicators.
- 7-8 STEREO: TRS inputs for stereo line-level sources.
- USB 2.0: Ports for connecting USB devices for playback or recording, and for connecting to a computer or tablet for software control.
3.2. Output Section
- AUX1 / AUX2: TRS auxiliary outputs for monitor mixes or external effects.
- MIX OUTPUT L/R: XLR main stereo outputs for connecting to power amplifiers or PA systems.
- FS1 / FS2: Footswitch inputs for remote control of certain functions.
3.3. Control Surface
- CHANNEL Controls: Rotary encoders for individual channel adjustments (e.g., EQ, dynamics, sends) accessible via the digital interface.
- MAIN MIX Controls: Rotary encoder for main mix level and mute button.
- LED Meters: Visual indicators for input levels and main mix output.
- Power Button: On/Off switch for the console.
3.4. Software Interface
The DigiLive 8C is controlled via a dedicated application on a connected device (e.g., tablet, computer). The software provides access to advanced mixing parameters.

Figure 3.3: Software interface displaying channel faders and controls.
This screen shows the virtual faders for individual channels (CH1, CH2, CH3-4, MUSIC, REV, DEL, AUX) and the L-R MIX. Buttons for LISTEN (solo), MUTE, and various effects (FX) are also visible, allowing precise control over each input and output.

Figure 3.4: Software interface displaying the 4-band parametric equalizer.
This view illustrates the 4-band parametric equalizer (EQ) section within the software. Users can adjust frequency, gain, and Q factor for each band, along with a High-Pass Filter (HPF), to shape the tonal characteristics of individual channels or the main mix. Presets can be saved and loaded from the library.

Figure 3.5: Software interface displaying routing options.
This image shows the routing section, allowing users to send signals from channels to various auxiliary sends (AUX, REV, DEL) and the main L-R mix. The "Pre" indicators suggest pre-fader sends, useful for monitor mixes.

Figure 3.6: Software interface displaying dynamics processing (Gate and Compressor).
This screen displays the dynamics processing section, including a Gate and a Compressor. Users can adjust parameters such as Threshold, Attack, Release, Hold, Depth for the Gate, and Threshold, Attack, Release, Gain, Ratio for the Compressor, to control the dynamic range of audio signals.
4. Setup Guide
4.1. Unpacking and Placement
- Carefully remove the DigiLive 8C from its packaging. Retain all packaging materials for future transport or storage.
- Place the console on a stable, flat surface, ensuring adequate ventilation around the unit. Avoid placing it near heat sources or in direct sunlight.
4.2. Power Connection
- Ensure the DigiLive 8C's power switch is in the OFF position.
- Connect the provided power adapter to the DC IN port on the console.
- Plug the power adapter into a suitable electrical outlet. The unit operates on 12 Volts DC.
4.3. Audio Input Connections
- Microphones: Connect XLR cables from your microphones to the 1 MIC - 6 MIC combo jacks.
- Line-Level Devices: Connect TRS cables from instruments or other line-level devices to the 1 MIC - 6 MIC combo jacks or the 7-8 STEREO inputs.
4.4. Audio Output Connections
- Main Mix: Connect XLR cables from the MIX OUTPUT L/R to your power amplifier, powered speakers, or PA system.
- Auxiliary Outputs: Connect TRS cables from AUX1 and AUX2 to monitor speakers, external effects processors, or other destinations.
4.5. Control Connectivity (USB & Wi-Fi)
- USB Control: Connect a USB cable from the DigiLive 8C's USB 2.0 port to your computer or tablet. Install the Studiomaster control application on your device.
- Wi-Fi Control: The DigiLive 8C supports Wi-Fi connectivity. Refer to the Studiomaster website or the control application for instructions on connecting your device wirelessly for remote control.
5. Operating Instructions
5.1. Powering On and Initial Setup
- Ensure all connections are secure.
- Turn on any connected amplifiers or powered speakers after the DigiLive 8C.
- Press the power button on the DigiLive 8C. The console will initialize.
- Launch the Studiomaster control application on your connected device.
5.2. Basic Channel Operation
- Gain Adjustment: For each active input channel, speak or play into the microphone/instrument. Adjust the physical GAIN knob on the console until the signal indicator lights green, occasionally peaking yellow. Avoid constant red indication, which signifies clipping.
- Channel Faders: Use the virtual faders in the control application (refer to Figure 3.3) to set the individual volume levels for each channel.
- Mute/Solo: Use the MUTE and LISTEN (solo) buttons in the application to silence or isolate channels.
5.3. Equalization (EQ)
- Select a channel in the control application and navigate to the EQ section (refer to Figure 3.4).
- Adjust the 4-band parametric EQ parameters (Frequency, Gain, Q) to shape the tone of the selected channel. Use the High-Pass Filter (HPF) to remove unwanted low-frequency rumble.
5.4. Dynamics Processing (Gate & Compressor)
- Select a channel and navigate to the DYNAMICS section (refer to Figure 3.6).
- Gate: Use the Gate to reduce noise by setting a threshold below which the signal is attenuated.
- Compressor: Use the Compressor to control the dynamic range of a signal, making loud parts quieter and quiet parts louder, resulting in a more consistent sound.
5.5. Auxiliary Sends and Effects
- Navigate to the ROUTING or FX section in the control application (refer to Figure 3.5).
- Adjust the send levels for AUX1 and AUX2 to create separate monitor mixes or send signals to external effects processors.
- Utilize the built-in effects (REV, DEL) as needed, adjusting their parameters within the software.
5.6. Main Mix Control
- Adjust the physical MAIN MIX knob on the console or the virtual L-R MIX fader in the application to control the overall output volume.
- Monitor the main mix LED meters to ensure the output signal is not clipping.
5.7. USB Audio Playback/Recording
- Connect a USB drive to the USB 2.0 port for direct audio playback. Use the PLAY/PAUSE button on the console.
- When connected to a computer, the DigiLive 8C can function as a USB audio interface for multi-track recording or stereo playback. Refer to your Digital Audio Workstation (DAW) software's instructions for setup.
6. Maintenance
6.1. Cleaning
- Always disconnect the power before cleaning.
- Use a soft, dry cloth to wipe the exterior of the console.
- Do not use abrasive cleaners, solvents, or waxes, as these can damage the finish.
- Keep liquids away from the console's openings.
6.2. Storage
- If storing the unit for an extended period, disconnect all cables and store it in its original packaging or a protective case.
- Store in a cool, dry place, away from extreme temperatures and humidity.
6.3. Firmware Updates
Periodically check the Studiomaster official website for any available firmware updates for the DigiLive 8C. Firmware updates can provide new features, performance improvements, and bug fixes. Follow the instructions provided with the update package carefully.
7. Troubleshooting
| Problem | Possible Cause | Solution |
|---|---|---|
| No power | Power cable disconnected; faulty power adapter; power outlet issue. | Check power cable connections. Ensure power adapter is working. Try a different power outlet. |
| No sound output | Main mix fader down; channel fader down; mute engaged; incorrect output connections; amplifier off. | Increase main mix and channel faders. Check for active mute buttons. Verify output cables are correctly connected to active speakers/amplifier. Ensure amplifier is on and volume is up. |
| Distorted sound | Input gain too high (clipping); output level too high; faulty cable. | Reduce input GAIN until signal indicators are green/yellow. Lower main mix output. Test with different cables. |
| Control app not connecting | Incorrect USB connection; Wi-Fi network issue; app not updated. | Ensure USB cable is securely connected. Verify Wi-Fi connection settings. Restart the app and console. Check for app updates. |
| Hum or noise | Ground loop; faulty cable; interference from other electronics. | Ensure all equipment is on the same power circuit. Use balanced cables where possible. Try isolating the console from other electronic devices. |
8. Specifications
| Feature | Detail |
|---|---|
| Brand | Studiomaster |
| Model Number | DigiLive 8C |
| Mixer Channel Quantity | 8 |
| Hardware Interface | USB |
| Connectivity Technology | Auxiliary, Wi-Fi |
| Power Source | Corded Electric |
| Voltage | 12 Volts |
| Item Weight | 5 Kilograms (11 pounds) |
| Product Dimensions | 19.29 x 5.91 x 10.24 inches |
| Date First Available | February 17, 2020 |
9. Warranty and Support
9.1. Warranty Information
Studiomaster products are designed and manufactured to the highest quality standards. For detailed warranty information, including terms, conditions, and duration, please refer to the warranty card included with your product or visit the official Studiomaster website. Keep your proof of purchase for warranty claims.
9.2. Technical Support
Should you encounter any issues or have questions regarding your Studiomaster DigiLive 8C that are not covered in this manual, please contact Studiomaster technical support. Contact information can typically be found on the official Studiomaster website or on your product's packaging.
Before contacting support, please have your product model number (DigiLive 8C) and a description of the issue ready.


