gotonovo B083TS81GV
gotonovo Rainfall Bathroom Shower System Instruction Manual
Model: B083TS81GV
1. Introduction
This manual provides detailed instructions for the installation, operation, and maintenance of your gotonovo Rainfall Bathroom Shower System. Please read this manual thoroughly before installation and retain it for future reference. This system includes a 12-inch rain shower head, a handheld shower, and a pressure-balancing mixer valve, all finished in matte black.
2. Safety Information
Important Safety Instructions:
- Ensure all local plumbing and building codes are followed during installation.
- Turn off the main water supply before beginning any installation or maintenance.
- If you are unsure about any part of the installation, consult a qualified plumber.
- The pressure-balancing valve is designed to prevent scalding by maintaining a constant temperature. Do not tamper with this mechanism.
- Use appropriate tools and wear safety glasses during installation.
3. Package Contents
Verify that all components are present before beginning installation:
- 12-inch Square Rain Shower Head
- Handheld Shower Spray
- 59-inch Shower Hose
- 15.7-inch Shower Arm
- Handheld Holder
- Pressure Balance Valve (Rough-in Valve)
- Control Panel
- Handle
- Decoration Cover
- Installation Hardware
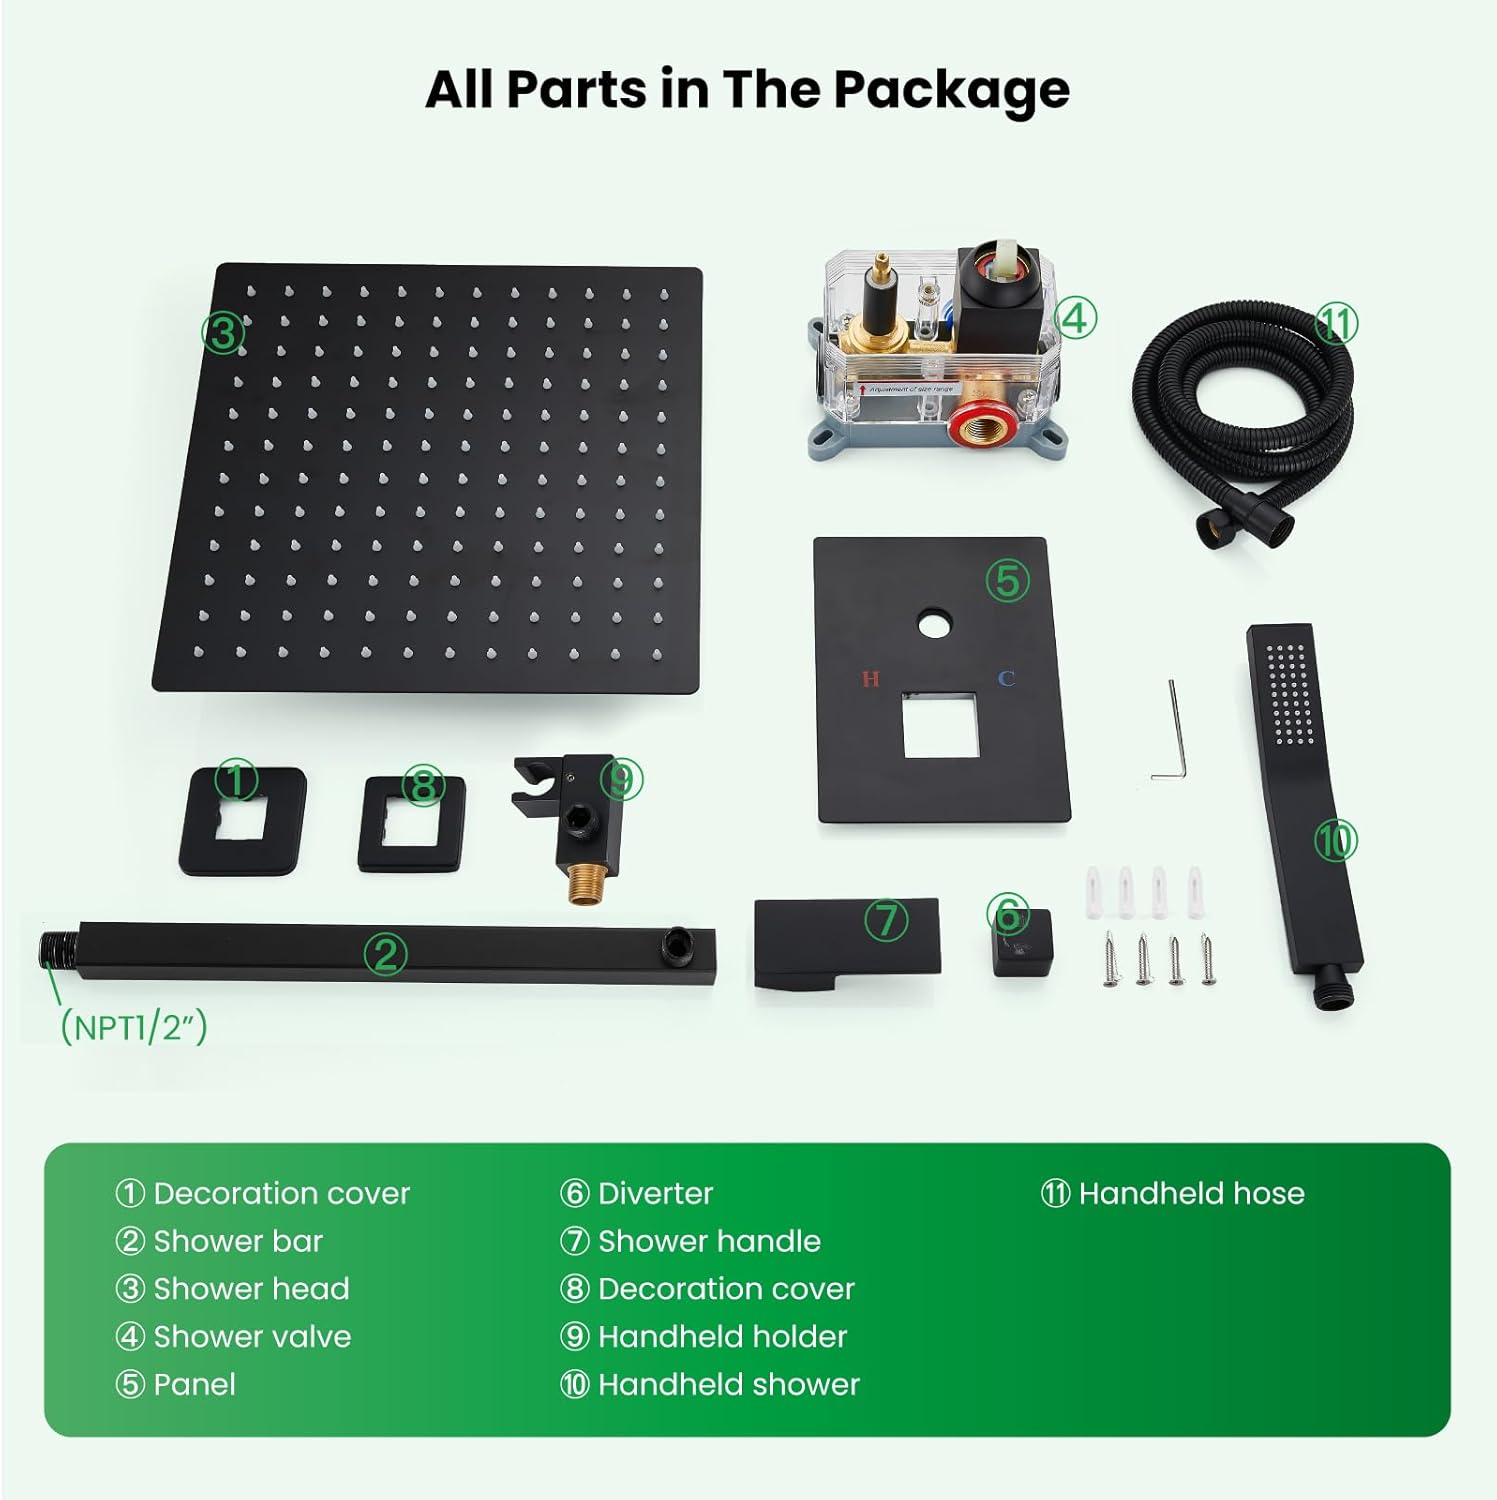
Figure 1: All Parts in the Package
4. Setup and Installation
This shower system utilizes a rough-in valve installation type. Professional installation is recommended.
4.1 Pre-Installation Steps
- Turn off the main water supply to the bathroom.
- Clear the installation area and ensure you have all necessary tools.
- Review the product dimensions to ensure proper placement within your shower space.

Figure 2: Product Dimensions
4.2 Rough-in Valve Installation
The pressure balance valve (rough-in valve) is the core component. It connects to your hot and cold water lines and directs water to the shower head and handheld shower.
- Install the rough-in valve body securely within the wall, ensuring it is flush with the finished wall surface.
- Connect the hot water line to the port marked "H" (Female 1/2") and the cold water line to the port marked "C" (Female 1/2").
- Connect the fixed shower head connector (Female 1/2") and the hand shower head connector (Female 1/2") to their respective outlets on the valve.
- Ensure all connections are watertight using plumber's tape or sealant as appropriate.

Figure 3: Brass Pressure Balance Shower Valve
4.3 Shower Head and Handheld Installation
- Attach the shower arm to the fixed shower head outlet from the rough-in valve.
- Secure the 12-inch square rain shower head to the shower arm.
- Install the handheld holder at a convenient height.
- Connect the 59-inch shower hose to the handheld shower spray and then to the handheld shower head connector on the rough-in valve.
- Install the control panel and handle onto the rough-in valve according to the included instructions.
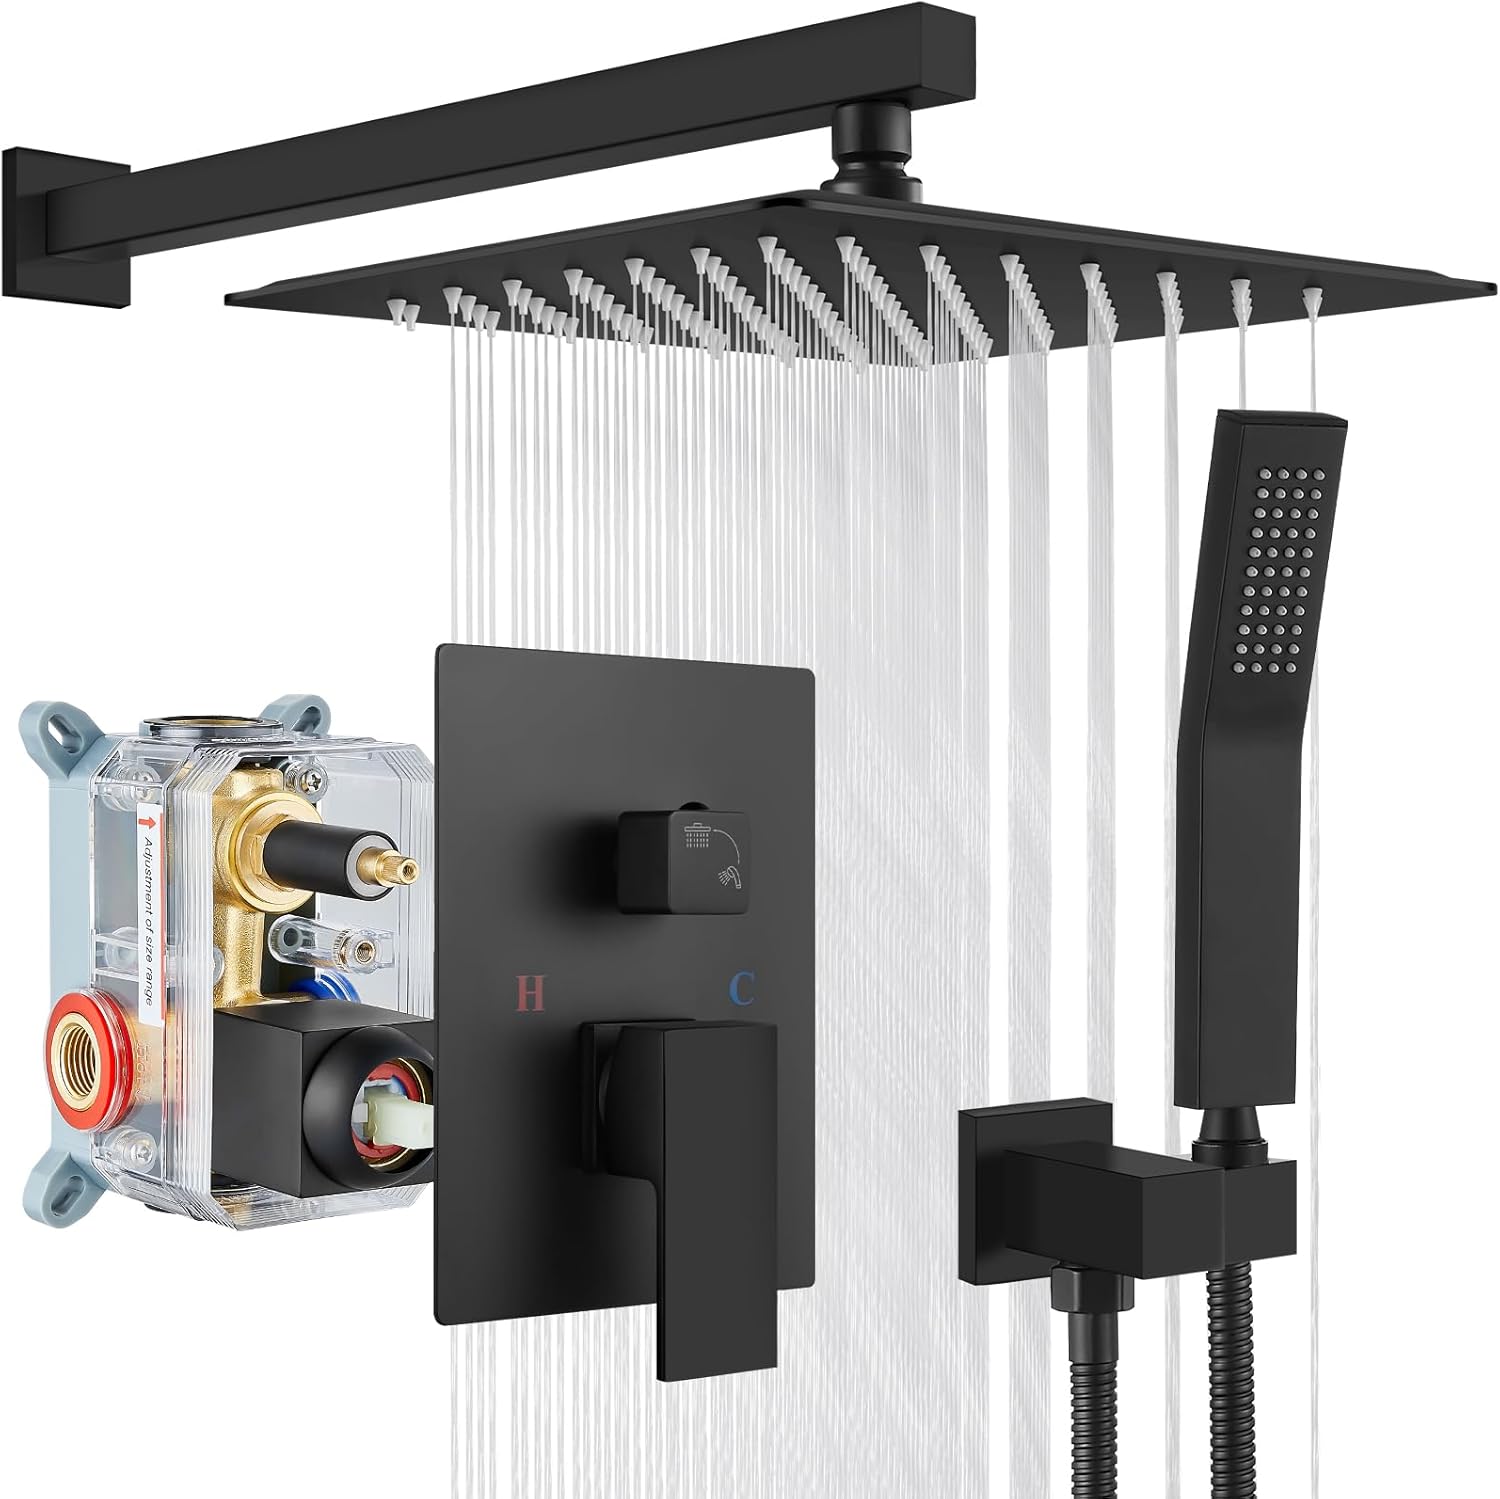
Figure 4: System Components Overview
5. Operating Instructions
The shower system features a single handle for water flow and temperature control, and a diverter knob to switch between the rain shower head and the handheld shower.
5.1 Water Flow and Temperature Control
- To turn on the water, rotate the main handle.
- To increase water flow, rotate the handle further.
- To adjust temperature, rotate the handle towards "H" for hot water or "C" for cold water. The pressure-balancing valve will maintain a consistent temperature.
- To turn off the water, rotate the handle back to the closed position.
5.2 Shower Function Selection
- Use the diverter knob on the control panel to switch between the rain shower head and the handheld shower.
- Rotate the diverter knob to the desired icon (shower head or handheld shower) to select the water outlet.
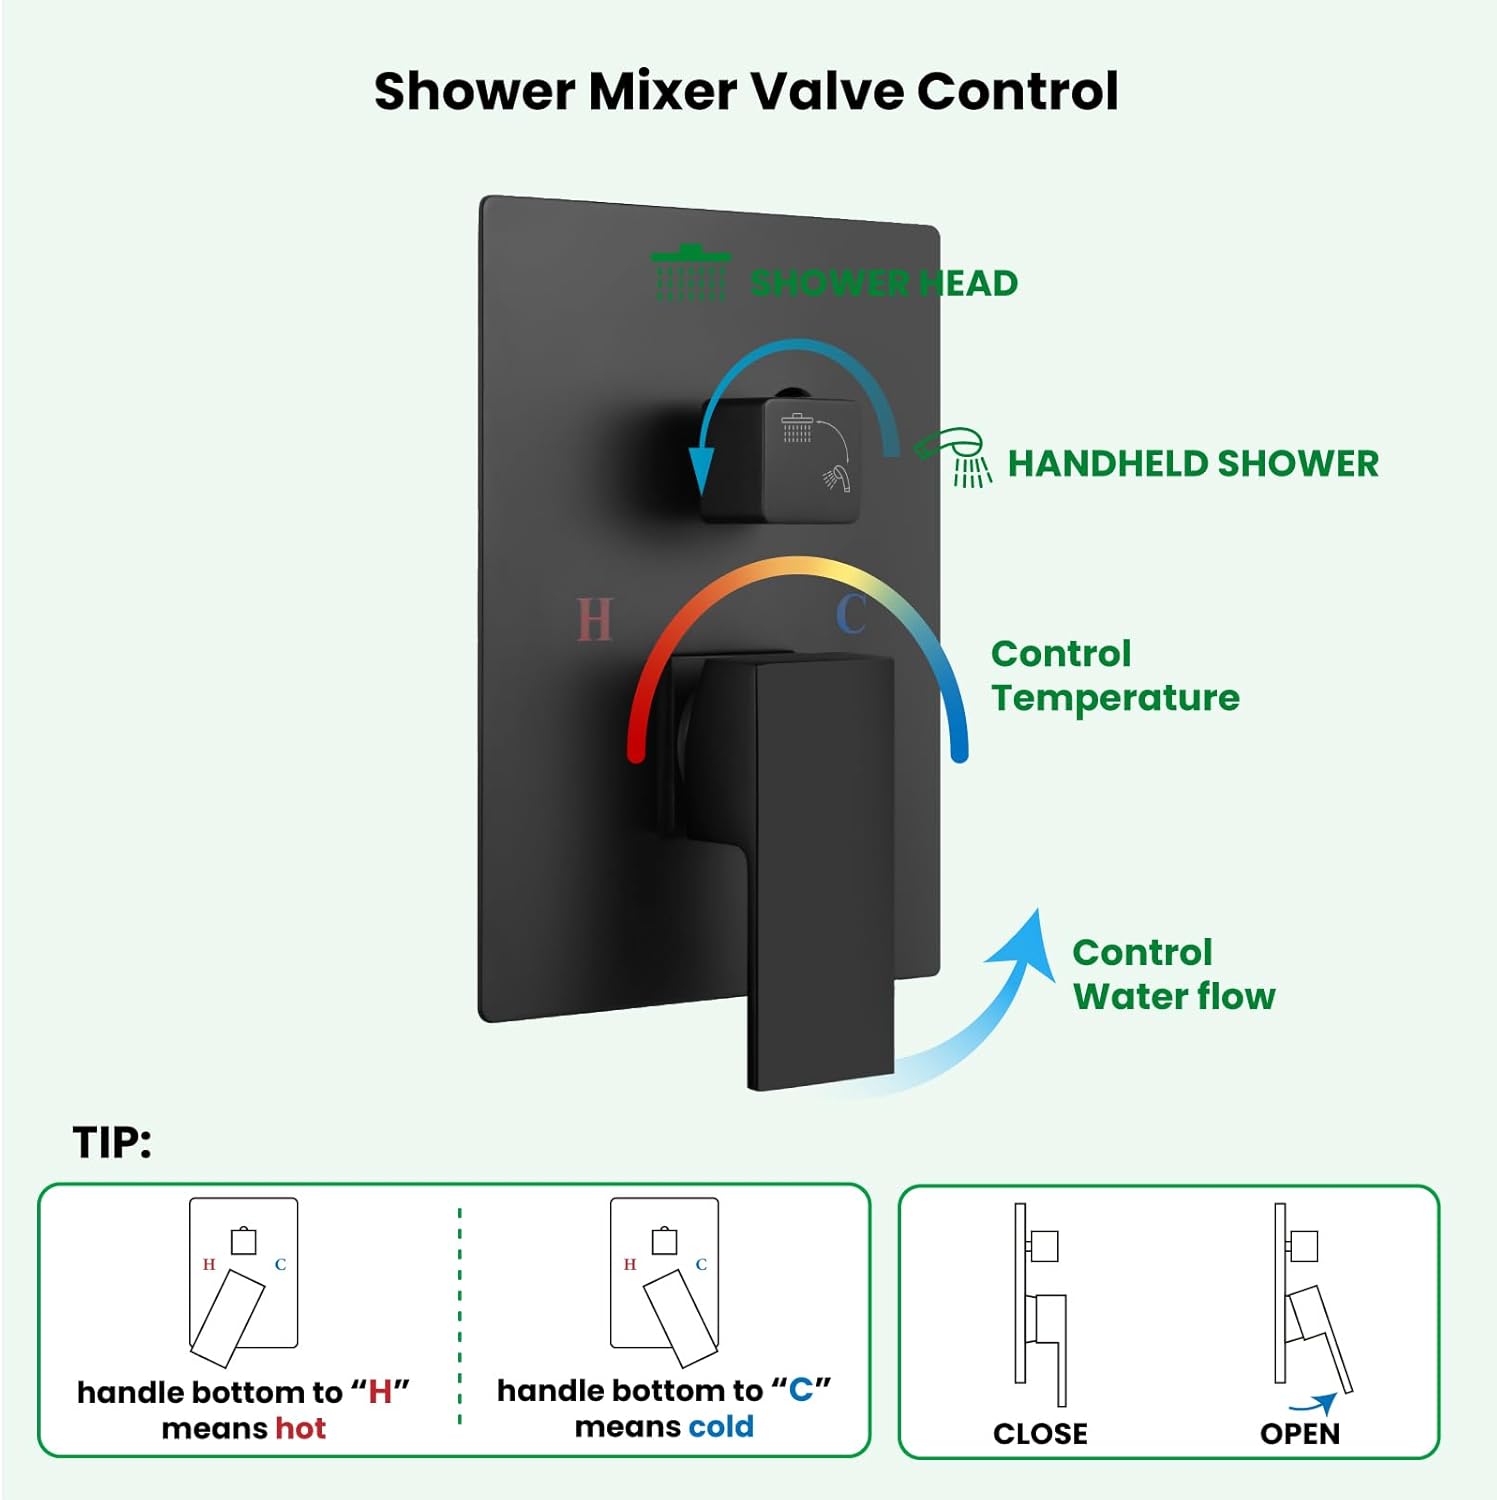
Figure 5: Shower Mixer Valve Control
6. Maintenance
Regular cleaning and maintenance will ensure the longevity and optimal performance of your shower system.
6.1 Cleaning the Finish
- Clean the matte black finish with a soft, damp cloth.
- Avoid abrasive cleaners, harsh chemicals, or scouring pads, as these can damage the finish.
- Wipe dry after cleaning to prevent water spots.

Figure 6: Matte Black Finish
6.2 Cleaning Shower Head Nozzles
- The rain shower head and handheld shower feature easy-clean spray holes (TRP soft rubber nozzles).
- To remove mineral buildup, gently rub the rubber nozzles with your finger or a soft brush.
- For stubborn deposits, a mild vinegar solution can be used, followed by rinsing with water.
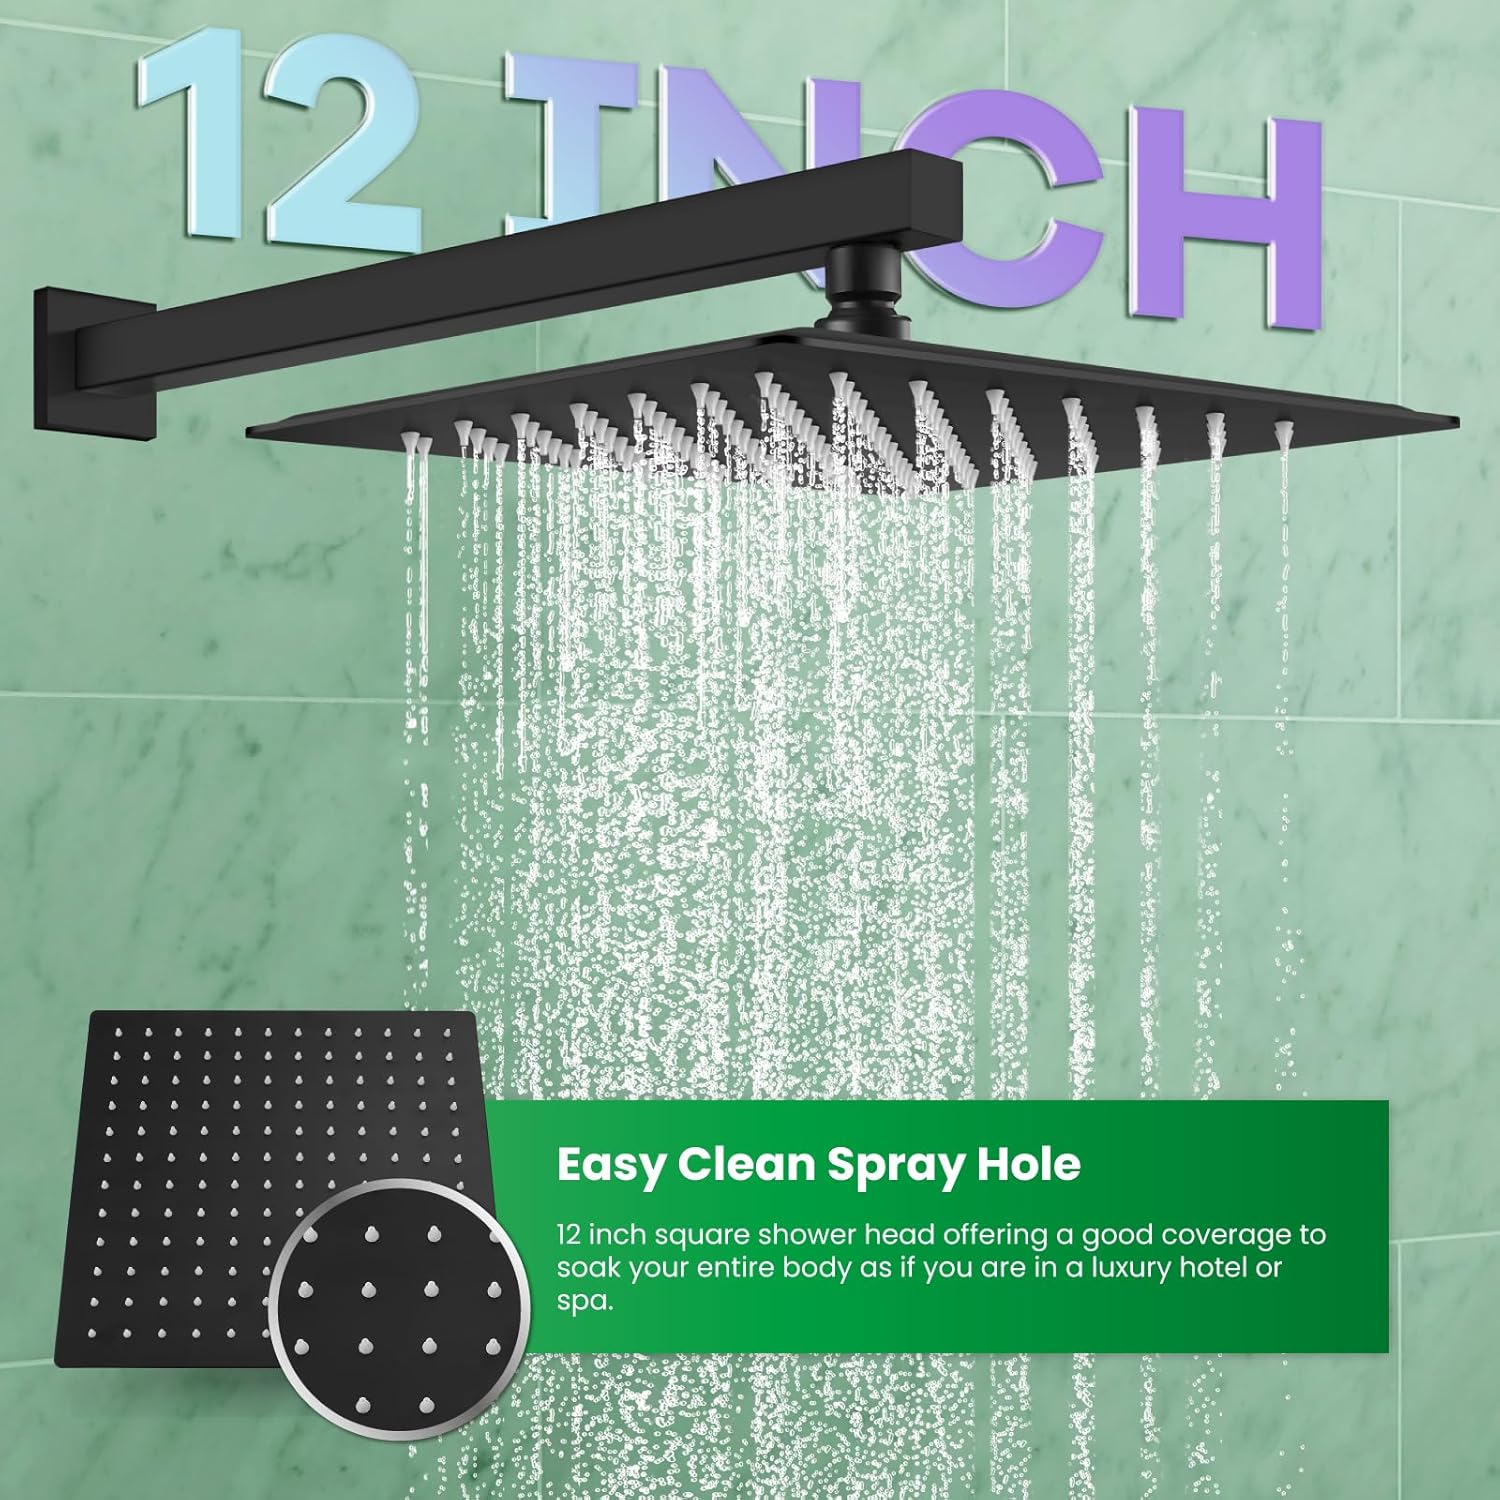
Figure 7: Easy Clean Spray Holes on Rain Shower Head
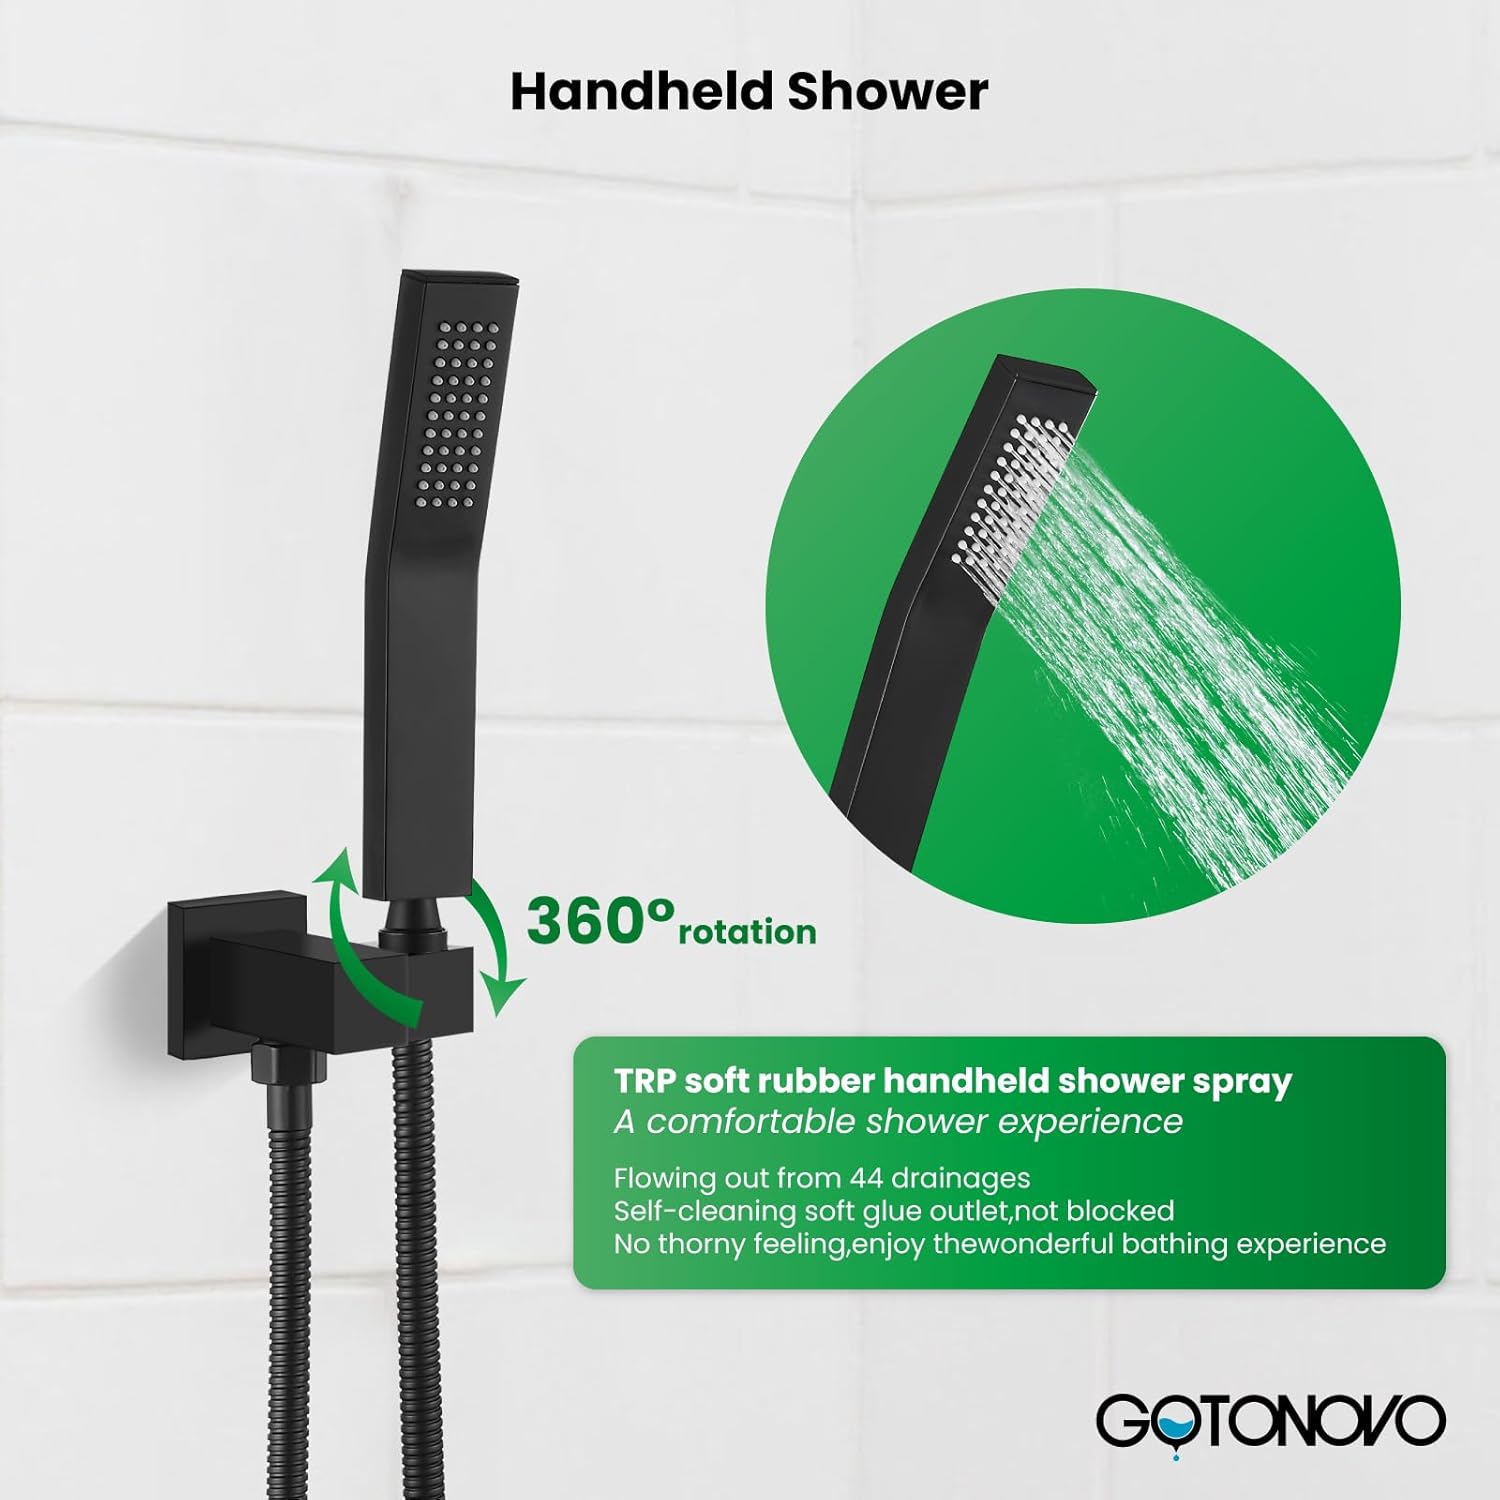
Figure 8: Handheld Shower with Easy Clean Nozzles
7. Troubleshooting
This section addresses common issues you might encounter with your shower system.
| Problem | Possible Cause | Solution |
|---|---|---|
| Low Water Pressure | Clogged shower head nozzles; low household water pressure; partially closed shut-off valve. | Clean shower head nozzles as described in Maintenance section; check main water supply pressure; ensure shut-off valves are fully open. |
| Water Leaks from Connections | Loose connections; insufficient plumber's tape/sealant; damaged O-rings. | Tighten connections; reapply plumber's tape; inspect and replace O-rings if damaged. Turn off water supply before attempting repairs. |
| Inconsistent Water Temperature | Pressure balance valve malfunction; issues with household hot/cold water supply. | Ensure the pressure balance valve is correctly installed and not obstructed. If issues persist, consult a professional plumber. |
| Diverter Not Switching Properly | Obstruction in diverter mechanism; worn diverter cartridge. | Inspect the diverter for any visible obstructions. If the issue continues, contact customer support for a replacement part or professional assistance. |
8. Specifications
| Feature | Detail |
|---|---|
| Brand | gotonovo |
| Model Number | B083TS81GV |
| Color | Matte Black |
| Material | Brass, Stainless Steel |
| Finish Type | Matte Black |
| Number of Handles | 1 |
| Handle Material | Brass, Metal |
| Item Weight | 10.5 Pounds |
| Mounting Type | Wall Mount |
| Included Components | Handheld shower, rough-in valve, shower head |
| Flow Rate Description | 1.46 Gallons Per Minute (5.5 L/min) |
| Head Size | 12 Inch |
| Product Dimensions | 17 x 13 x 6 inches |
| Installation Method | Wall-Mounted |
| UPC | 741376398635 |
9. Warranty and Support
For warranty information or technical support, please contact gotonovo customer service. Refer to your purchase documentation for specific warranty terms and contact details.
You can visit the official gotonovo store for more information: gotonovo Store
Ask a question about this manual
Ask about setup, troubleshooting, compatibility, parts, safety, or missing instructions. Manuals+ will review the question and use this page’s manual context to help answer it.