
Introduction
This manual provides detailed instructions for the setup, operation, and maintenance of your MUSETEX ATX Mid Tower Gaming Computer Case, model 903N4. Please read this guide thoroughly before beginning installation to ensure proper assembly and functionality. This case is designed to accommodate a variety of PC components, offering both aesthetic appeal and efficient cooling.

Image: The MUSETEX 903N4 ATX Mid Tower Gaming Computer Case, showcasing its design with RGB fans and tempered glass panels.
Setup and Installation
Follow these steps for assembling your computer components within the MUSETEX 903N4 case.
1. Case Overview and Component Identification
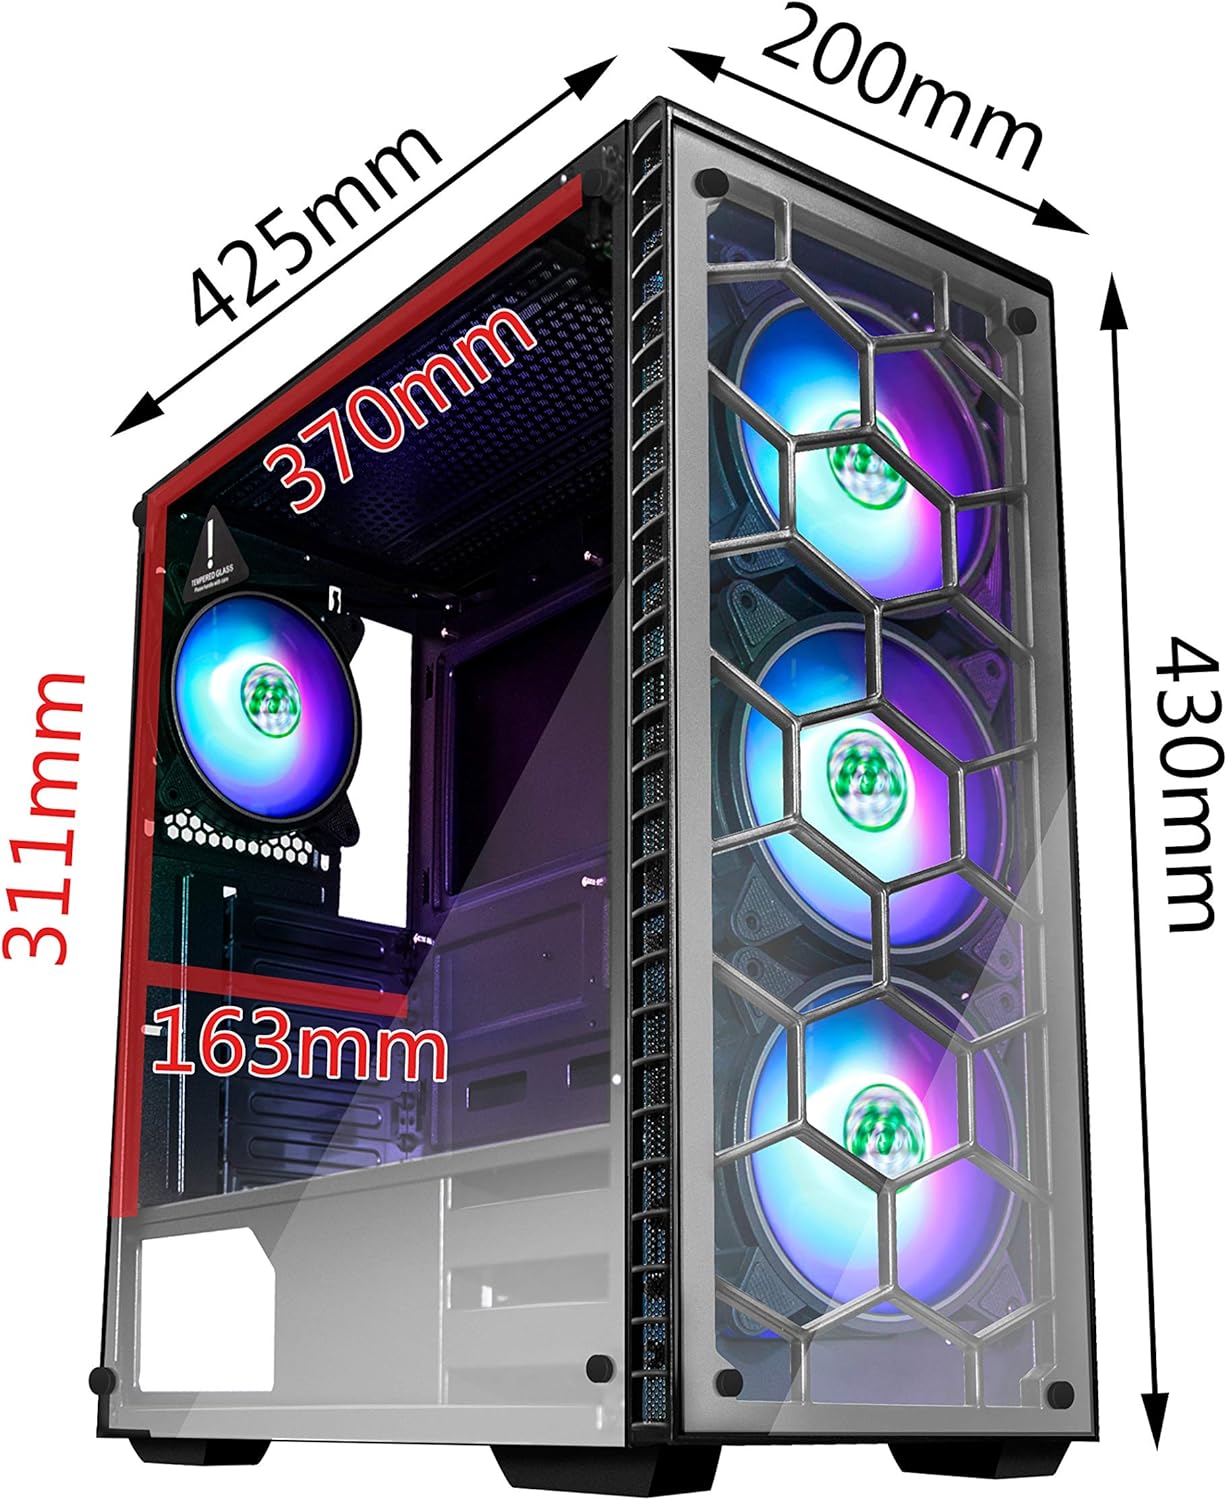
Image: Exploded view of the MUSETEX 903N4 case, illustrating its various components such as the main frame, front and side tempered glass panels, pre-installed fans, and removable dust filters.
Familiarize yourself with the case structure and included accessories. The case features two translucent tempered glass panels (front and left side) and pre-installed RGB fans.
2. Motherboard Installation
The 903N4 case supports E-ATX, ATX, Micro-ATX, and Mini-ITX motherboards. Ensure the standoffs are correctly aligned for your motherboard size before securing it with screws.

Image: Internal layout of the MUSETEX 903N4 case, indicating compatible motherboard sizes (Mini ITX, M-ATX, ATX, E-ATX) and locations for SSDs (3x 2.5") and HDDs (3x 3.5"). Also shows PSU placement.
3. Storage Drive Installation
The case provides bays for 3 x 3.5" HDDs and 3 x 2.5" SSDs. Install your drives into the designated slots, typically located behind the motherboard tray or in the PSU shroud area. Secure them with the provided screws.
4. Power Supply Unit (PSU) Installation
Install your PSU into the bottom mount compartment. Ensure proper orientation for airflow and secure it with screws from the rear of the case.
5. Graphics Card and Expansion Card Installation
Install your graphics card and any other expansion cards into the appropriate PCIe slots on your motherboard. The case features 7 expansion slots.
6. Cooling System Connections
The case comes with 4 pre-installed 120mm RGB LED fans (3 front, 1 rear). Connect these fans to your motherboard's fan headers or the included fan controller for power and RGB control. The case supports up to a 360mm liquid-cooling radiator at the front (optional).
7. Cable Management
Utilize the cable routing cutouts and tie-down points behind the motherboard tray to manage cables. This improves airflow and maintains a clean internal appearance.
Operating Instructions
Front I/O Panel Functions
The top I/O panel provides convenient access to essential ports and controls:

Image: Detailed view of the MUSETEX 903N4 top I/O panel, labeling each port and button: 1&2: HD Audio (microphone and headphone jacks), 3&4: 2x USB 2.0 Ports, 5: Power Button, 6: USB 3.0 Port, 7: RGB Light Button, 8: Reset Button.
- HD Audio (1 & 2): Connect your headphones and microphone.
- USB 2.0 Ports (3 & 4): Connect USB 2.0 compatible devices.
- Power Button (5): Press to power on or off your computer.
- USB 3.0 Port (6): Connect USB 3.0 compatible devices for faster data transfer.
- RGB Light Button (7): Press this button to cycle through various RGB lighting modes and colors for the pre-installed fans.
- Reset Button (8): Press to restart your computer.
RGB Lighting Control
The pre-installed RGB fans can be controlled via the dedicated RGB button on the top I/O panel. Pressing this button will cycle through different lighting effects and static colors. If your motherboard has a compatible 3-pin 5V ARGB header, you may also connect the fan controller to the motherboard for software-based RGB control, depending on the controller's capabilities.
Video: This video demonstrates the RGB lighting effects of the MUSETEX 903N4 case fans and how to cycle through them using the RGB button on the top panel.
Maintenance
Regular maintenance helps ensure optimal performance and longevity of your computer case and components.
Dust Filter Cleaning
The MUSETEX 903N4 case includes dust filters on the top and bottom. These filters prevent dust from entering the computer case, maintaining clean components and efficient cooling. Periodically remove and clean these filters using compressed air or by rinsing them with water (ensure they are completely dry before reinstallation).
Tempered Glass Cleaning
The tempered glass panels can attract fingerprints and smudges. Clean them gently with a microfiber cloth and a glass cleaner specifically designed for electronics or a mild, non-abrasive cleaning solution. Avoid harsh chemicals that could damage the glass or coatings.
Internal Cleaning
Occasionally, use compressed air to remove dust buildup from internal components such as fans, heatsinks, and circuit boards. Ensure the system is powered off and unplugged before performing any internal cleaning.
Troubleshooting
This section addresses common issues you might encounter during setup or operation.
Fans Not Lighting Up or Controllable
- Check Connections: Ensure all fan power cables and RGB cables are securely connected to the fan controller or motherboard headers.
- RGB Button: If using the case's RGB button, ensure it is functioning by pressing it to cycle through modes.
- Motherboard ARGB Header: If attempting motherboard software control, verify that the fan controller is connected to a compatible 3-pin 5V ARGB header on your motherboard (not a 4-pin 12V RGB header, which is incompatible).
- Power Supply: Confirm the fan controller is receiving power from the PSU.
Hard Drive Not Detected
- Secure Installation: Ensure the HDD/SSD is properly seated in its bay and secured with screws.
- Cabling: Verify that both the SATA data cable (connected to the motherboard) and the SATA power cable (connected to the PSU) are firmly attached to the drive.
Components Not Fitting
- Verify Dimensions: Before purchasing, always check the dimensions of large components like GPUs, CPU coolers (especially liquid coolers), and PSUs against the case's specifications to ensure compatibility.
- Radiator Clearance: If installing a liquid cooler, pay close attention to radiator and fan thickness, especially when mounting in the front or top, to avoid interference with other components like RAM modules.
Specifications
| Brand | MUSETEX |
| Model Name | 903N4 |
| Case Type | Mid Tower |
| Motherboard Compatibility | E-ATX, ATX, Micro-ATX, Mini-ITX |
| Internal Drive Bays | 3 x 3.5" HDD, 3 x 2.5" SSD |
| Pre-installed Fans | 4 x 120mm RGB LED Fans (3 Front, 1 Rear) |
| Radiator Support | Up to 360mm (Front) |
| Tempered Glass | 4mm thickness (Front & Side) |
| Front I/O Ports | 1 x USB 3.0, 2 x USB 2.0, HD Audio (Mic/Headphone), RGB Button, Power, Reset |
| Expansion Slots | 7 |
| Cooling Method | Air |
| Material | Tempered Glass |
| Dimensions (H x W x D) | 430mm x 200mm x 425mm |

Image: Diagram illustrating the external dimensions of the MUSETEX 903N4 case: Height 430mm, Width 200mm, Depth 425mm. Internal clearances are also shown.
Warranty Information
Specific warranty details for the MUSETEX 903N4 ATX Mid Tower Gaming Computer Case are typically provided with the product packaging or can be found on the official MUSETEX website. Please refer to these resources for information regarding warranty duration, coverage, and claims procedures.
Support
For further assistance, technical support, or inquiries regarding your MUSETEX 903N4 computer case, please visit the official MUSETEX website or contact their customer service department. Contact information can usually be found on the manufacturer's website or in the product documentation.


