VIVO STAND-V002W
VIVO STAND-V002W Dual Monitor Desk Mount Instruction Manual
Model: STAND-V002W | Brand: VIVO
1. Introduction
This manual provides comprehensive instructions for the assembly, installation, operation, and maintenance of your VIVO STAND-V002W Dual Monitor Desk Mount. Please read this manual thoroughly before installation to ensure correct setup and safe usage. Retain this manual for future reference.
Package Contents
Verify that all components listed below are present and undamaged. If any parts are missing or damaged, please contact VIVO customer support.
- Main Pole with C-clamp base
- Dual Monitor Arms
- VESA Plates (2x)
- Grommet Mount Option
- Hardware Kit (screws, washers, Allen wrenches)
- Cable Management Clips
2. Safety Information
WARNING: Failure to understand and follow the instructions in this manual can result in serious personal injury, damage to the product, or property damage. Ensure all warnings and precautions are strictly observed.
- Do not exceed the weight capacity of 22 lbs (10 kg) per screen.
- Ensure your desk surface can support the combined weight of the mount and monitors.
- Only use this product on flat, straight-edge desktops. Lipped or beveled edges are not compatible.
- Keep small parts away from children.
- Tighten all screws firmly but do not overtighten. Overtightening can damage components.
- Always use an assistant when lifting or positioning heavy equipment.
3. Product Features
- Dual Monitor Support: Accommodates two screens ranging from 13 to 30 inches.
- Weight Capacity: Supports up to 22 lbs (10 kg) per monitor.
- VESA Compatibility: Supports 75x75mm and 100x100mm VESA patterns.
- Mounting Options: Includes both heavy-duty C-clamp and bolt-through grommet options for desks up to 3.25 inches thick.
- Full Articulation: Offers +90° to -90° tilt, 180° swivel, and 360° rotation for flexible screen positioning.
- Height Adjustment: Monitors can be adjusted along the central pole.
- Cable Management: Integrated clips help organize and conceal cables.
4. Specifications
| Feature | Detail |
|---|---|
| Model Number | STAND-V002W |
| Screen Size Compatibility | 13" to 30" (per screen) |
| Weight Capacity | 22 lbs (10 kg) per screen |
| VESA Compatibility | 75x75mm, 100x100mm |
| Desk Thickness (C-clamp/Grommet) | Up to 3.25 inches |
| Tilt Range | +90° to -90° |
| Swivel Range | 180° |
| Rotation Range | 360° |
| Material | Alloy Steel, Aluminum |
| Color | White |
5. Compatibility
Monitor Compatibility
This mount is designed for monitors with VESA mounting patterns of 75x75mm or 100x100mm. Ensure your monitor's VESA pattern matches one of these standards. The mount supports monitors between 13 and 30 inches in size, with a maximum weight of 22 lbs (10 kg) per screen.
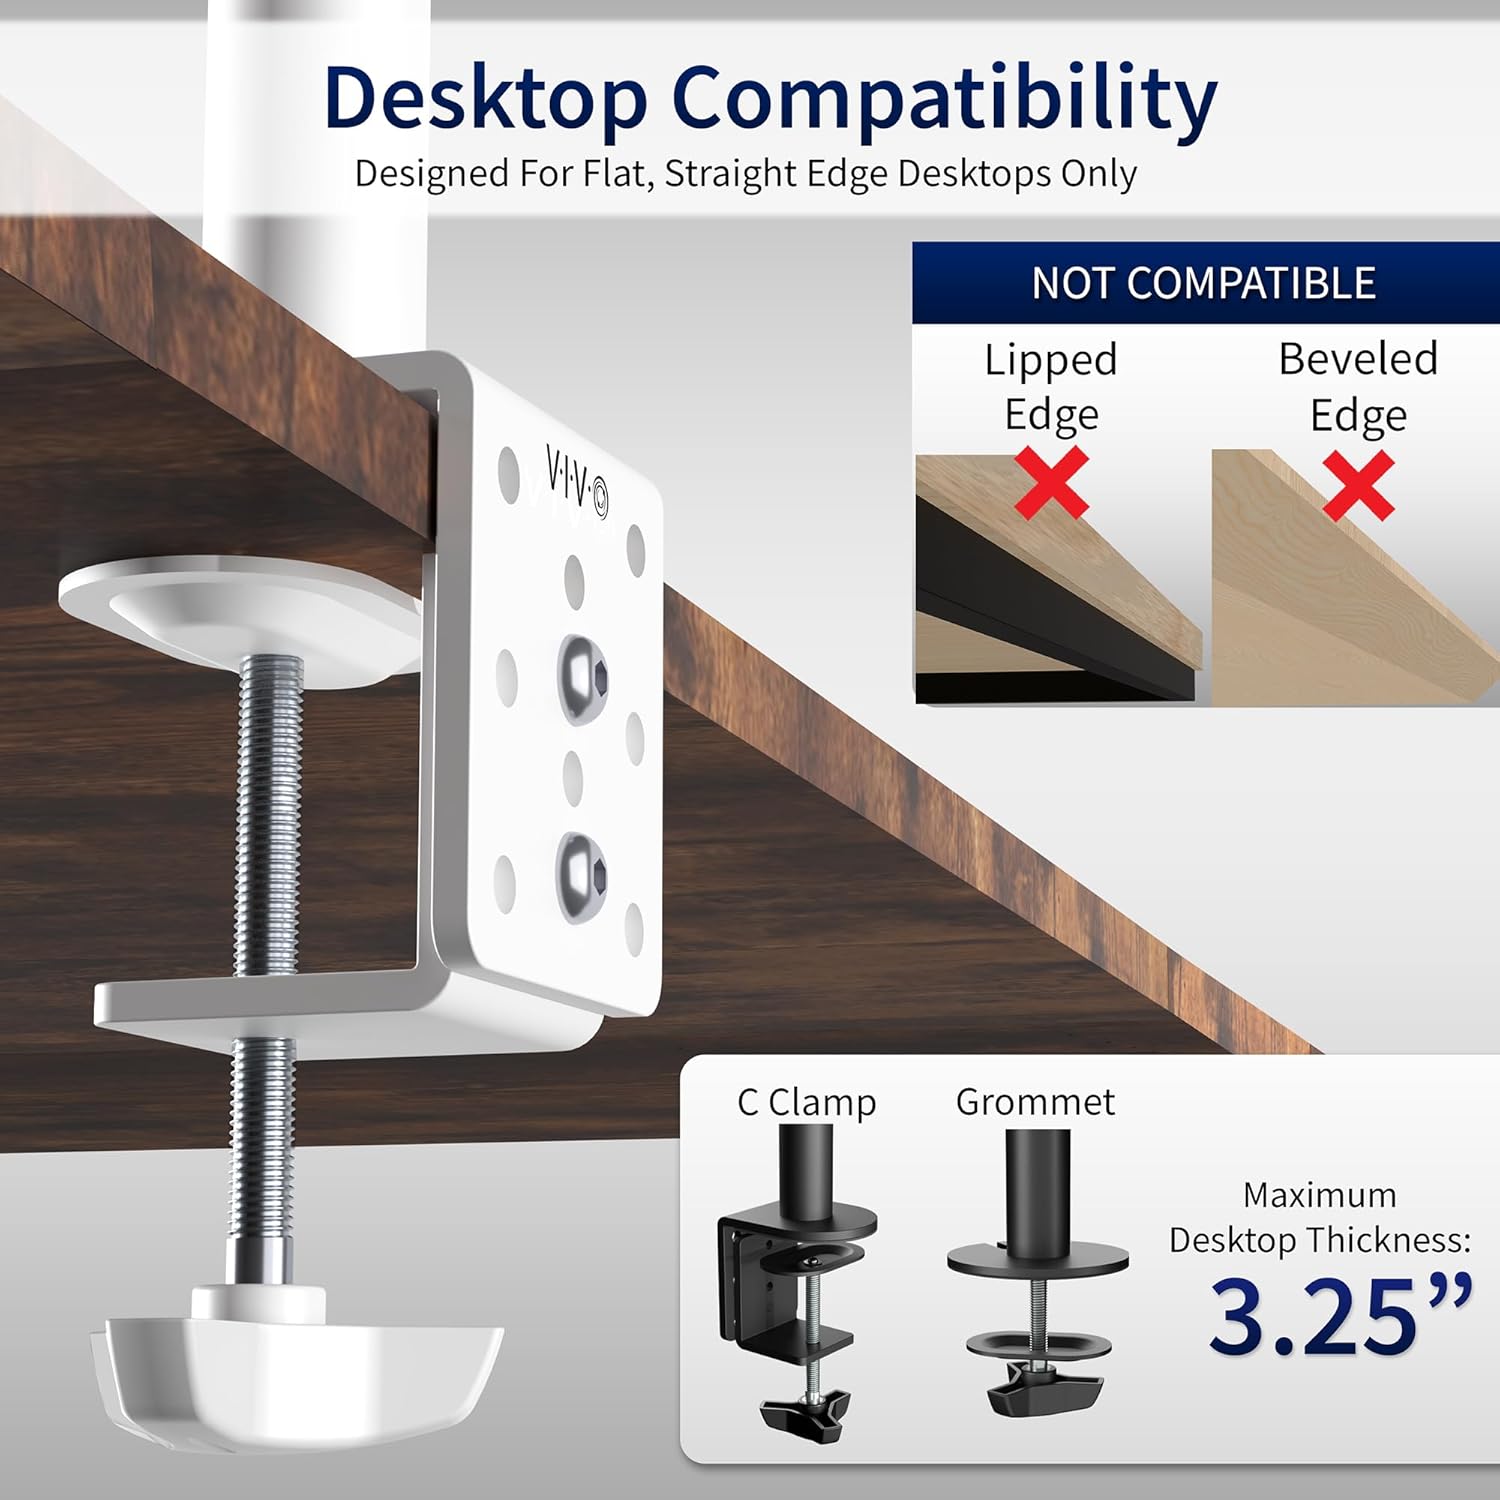
Figure 5.1: VESA and Screen Compatibility. This image illustrates the compatible VESA mounting patterns (75x75mm and 100x100mm) and the supported screen sizes (13-30 inches) and weight capacity (22 lbs per screen).
Desktop Compatibility
The C-clamp and grommet mounting options are compatible with desktops up to 3.25 inches (8.25 cm) thick. This mount is designed for flat, straight-edge desktops only. It is not compatible with lipped or beveled edge desks.

Figure 5.2: Desktop Compatibility. This image details the C-clamp and grommet mounting options, showing a maximum desktop thickness of 3.25 inches. It also explicitly states that lipped or beveled edge desktops are not compatible.
6. Setup and Installation
Follow these steps carefully for proper installation. It is recommended to have an assistant for monitor attachment.
Step 6.1: Choose Mounting Method
Decide whether to use the C-clamp or the grommet mount. The C-clamp attaches to the edge of your desk, while the grommet mount requires a pre-existing hole or drilling a new one (ensure no structural damage or wires are present before drilling).

Figure 6.1: Mounting Options. This image displays the complete dual monitor mount assembly, with the C-clamp attached to the main pole and the separate grommet mounting hardware shown to the side.
Step 6.2: Assemble the Base (C-clamp or Grommet)
For C-clamp: Attach the C-clamp to the main pole and secure it to your desk edge. Tighten the clamp screw until the mount is stable.
For Grommet Mount: If using a grommet hole, feed the pole through the hole and secure it from underneath the desk using the provided plate and nut.
Step 6.3: Attach Monitor Arms to Pole
Slide the dual monitor arm assembly onto the main pole. Adjust the height to your desired position and tighten the locking collar.
Step 6.4: Attach VESA Plates to Monitors
Remove the VESA plates from the monitor arms. Attach each VESA plate to the back of your monitors using the appropriate screws from the hardware kit. Ensure the screws are securely tightened.
Step 6.5: Mount Monitors to Arms
Carefully slide the monitors (with attached VESA plates) onto the monitor arms. Ensure they click into place. Secure them with the safety screws if provided.

Figure 6.2: Mounted Monitors. This image shows two monitors successfully installed on the VIVO dual monitor desk mount, demonstrating a typical setup on a desk.
7. Operating and Adjustments
The VIVO STAND-V002W offers various adjustment options to optimize your viewing experience.
7.1 Height Adjustment
To adjust the height of both monitors, loosen the locking collar on the main pole, slide the arm assembly to the desired height, and re-tighten the collar. Note that individual monitor height adjustment is limited to a small range via a screw on each VESA plate.
7.2 Tilt Adjustment
Monitors can be tilted +90° to -90°. Loosen the tilt knob or screw behind the VESA plate, adjust the monitor to the desired angle, and re-tighten.
7.3 Swivel Adjustment
The monitor arms can swivel 180° at the pole connection and at the monitor plate connection, allowing you to position your screens as needed.
7.4 Rotation Adjustment
Monitors can be rotated 360° from landscape to portrait orientation. Simply rotate the monitor to achieve the desired orientation.

Figure 7.1: Articulation and Adjustments. This image demonstrates the full range of motion for the monitor arms, including tilt, swivel, and rotation, highlighting the flexibility for screen placement. An inset shows how to tighten a joint with an Allen wrench.
7.5 Cable Management
Utilize the integrated cable management clips along the arms and central pole to route and conceal your monitor cables for a tidy workspace.
8. Maintenance
- Periodically check all screws and connections to ensure they remain tight. Re-tighten if necessary.
- Clean the mount with a soft, damp cloth. Avoid abrasive cleaners or solvents.
- Do not lubricate any parts of the mount unless specifically instructed by VIVO support.
9. Troubleshooting
| Problem | Possible Cause | Solution |
|---|---|---|
| Monitors are not level. | Arms or VESA plates are not perfectly aligned. | Adjust the small leveling screw on the VESA plate. Ensure the main arm assembly is level on the pole. |
| Mount is unstable or wobbles. | C-clamp or grommet mount is not sufficiently tightened. | Re-tighten the C-clamp screw or grommet nut securely. Ensure desk thickness is within limits. |
| Monitor sags or does not hold position. | Tilt or swivel joints are too loose. Monitor weight exceeds capacity. | Tighten the tilt/swivel adjustment screws on the arms. Verify monitor weight is within 22 lbs. |
| Cannot adjust monitor height easily. | Locking collar on the main pole is too tight. | Loosen the locking collar on the main pole before attempting to adjust height. |
10. Warranty and Support
This VIVO product is backed by a 3-Year Manufacturer Warranty. For technical support, missing parts, or any questions or concerns, please contact VIVO customer support. Our U.S.-based support team is available to assist you.
For more information, visit the official VIVO store: VIVO Store on Amazon
Ask a question about this manual
Ask about setup, troubleshooting, compatibility, parts, safety, or missing instructions. Manuals+ will review the question and use this page’s manual context to help answer it.