1. Product Overview
The TUXING TXET061-1 is a portable high-pressure air compressor designed for filling PCP (Pre-Charged Pneumatic) air rifles, pistols, and paintball tanks. It is capable of reaching a maximum pressure of 4500 psi (300 bar/30 MPa). This compressor features a built-in fan cooling system and an oil-water separator, eliminating the need for external water or oil cooling. It offers versatile power options, operating from a 12V DC car battery or a 110V/220V AC home outlet via a power converter.

Image 1.1: Front view of the TUXING TXET061-1 Portable PCP Air Compressor.
2. Safety Information
Read and understand all safety warnings and instructions before operating this compressor. Failure to follow these instructions may result in serious injury or property damage.
- High Pressure Hazard: This compressor generates extremely high pressures. Always ensure all connections are secure and rated for the intended pressure.
- Manual Operation: This is a manual shut-off compressor. DO NOT LEAVE THE COMPRESSOR UNATTENDED DURING OPERATION. Continuously monitor the pressure gauge and manually turn off the compressor once the desired pressure is reached.
- Ventilation: Operate the compressor in a well-ventilated area to prevent overheating and ensure proper cooling.
- Power Source: Use only the specified power sources (12V DC or 110V/220V AC with appropriate converter). Ensure correct polarity when connecting to a car battery.
- Tank Capacity: Do not exceed the maximum recommended tank capacity of 0.4 Gallons (1.5 Liters) for inflation.
- Bleed Screw: Always open the bleed screw to release pressure before disconnecting the fill whip.
- Children and Pets: Keep children and pets away from the compressor during operation.
- Maintenance: Perform regular maintenance as described in this manual. Do not operate a damaged compressor.
3. Components and Controls
Familiarize yourself with the various parts of your TUXING TXET061-1 compressor.

Image 3.1: Labeled diagram of the compressor showing High-speed cooling fan, Air outlet 8mm male connector, Burst disc, Release valve, Thermometer, Pressure gauge, Motor switch, Cooling fan switch, and 110V/220V AC to 12V DC Converter.
- High-speed Cooling Fan: Dissipates heat during operation.
- Air Outlet (8mm Male Connector): Connection point for the fill whip.
- Burst Disc: A safety feature designed to rupture and release pressure if it exceeds a safe limit.
- Release Valve (Bleed Screw): Used to release air pressure from the system.
- Thermometer: Displays the internal temperature of the compressor.
- Pressure Gauge: Displays the current air pressure.
- Motor Switch: Turns the compressor motor ON/OFF.
- Cooling Fan Switch: Turns the cooling fan ON/OFF.
- 110V/220V AC to 12V DC Converter: For home power supply.
4. Setup Instructions
Follow these steps for initial setup before first use.
4.1 Unpacking and Inspection
- Carefully remove all components from the packaging.
- Inspect the compressor and all accessories for any signs of damage. Do not use if damaged.
- Ensure all included components are present: compressor unit, fill whip, power cord (AC), car battery clamps (DC), and spare parts kit (O-rings, filters, fuse).

Image 4.1: The TUXING TXET061-1 compressor with all included accessories, including the fill whip, power cables, and spare parts.
4.2 Power Connection
The compressor can be powered by either a 12V DC car battery or a 110V/220V AC home outlet.
4.2.1 12V DC Car Battery Connection
- Ensure the vehicle engine is running to provide stable power.
- Connect the red clamp of the car battery cable to the positive (+) terminal of the car battery.
- Connect the black clamp of the car battery cable to the negative (-) terminal of the car battery.
- Plug the other end of the car battery cable into the DC input port on the compressor.
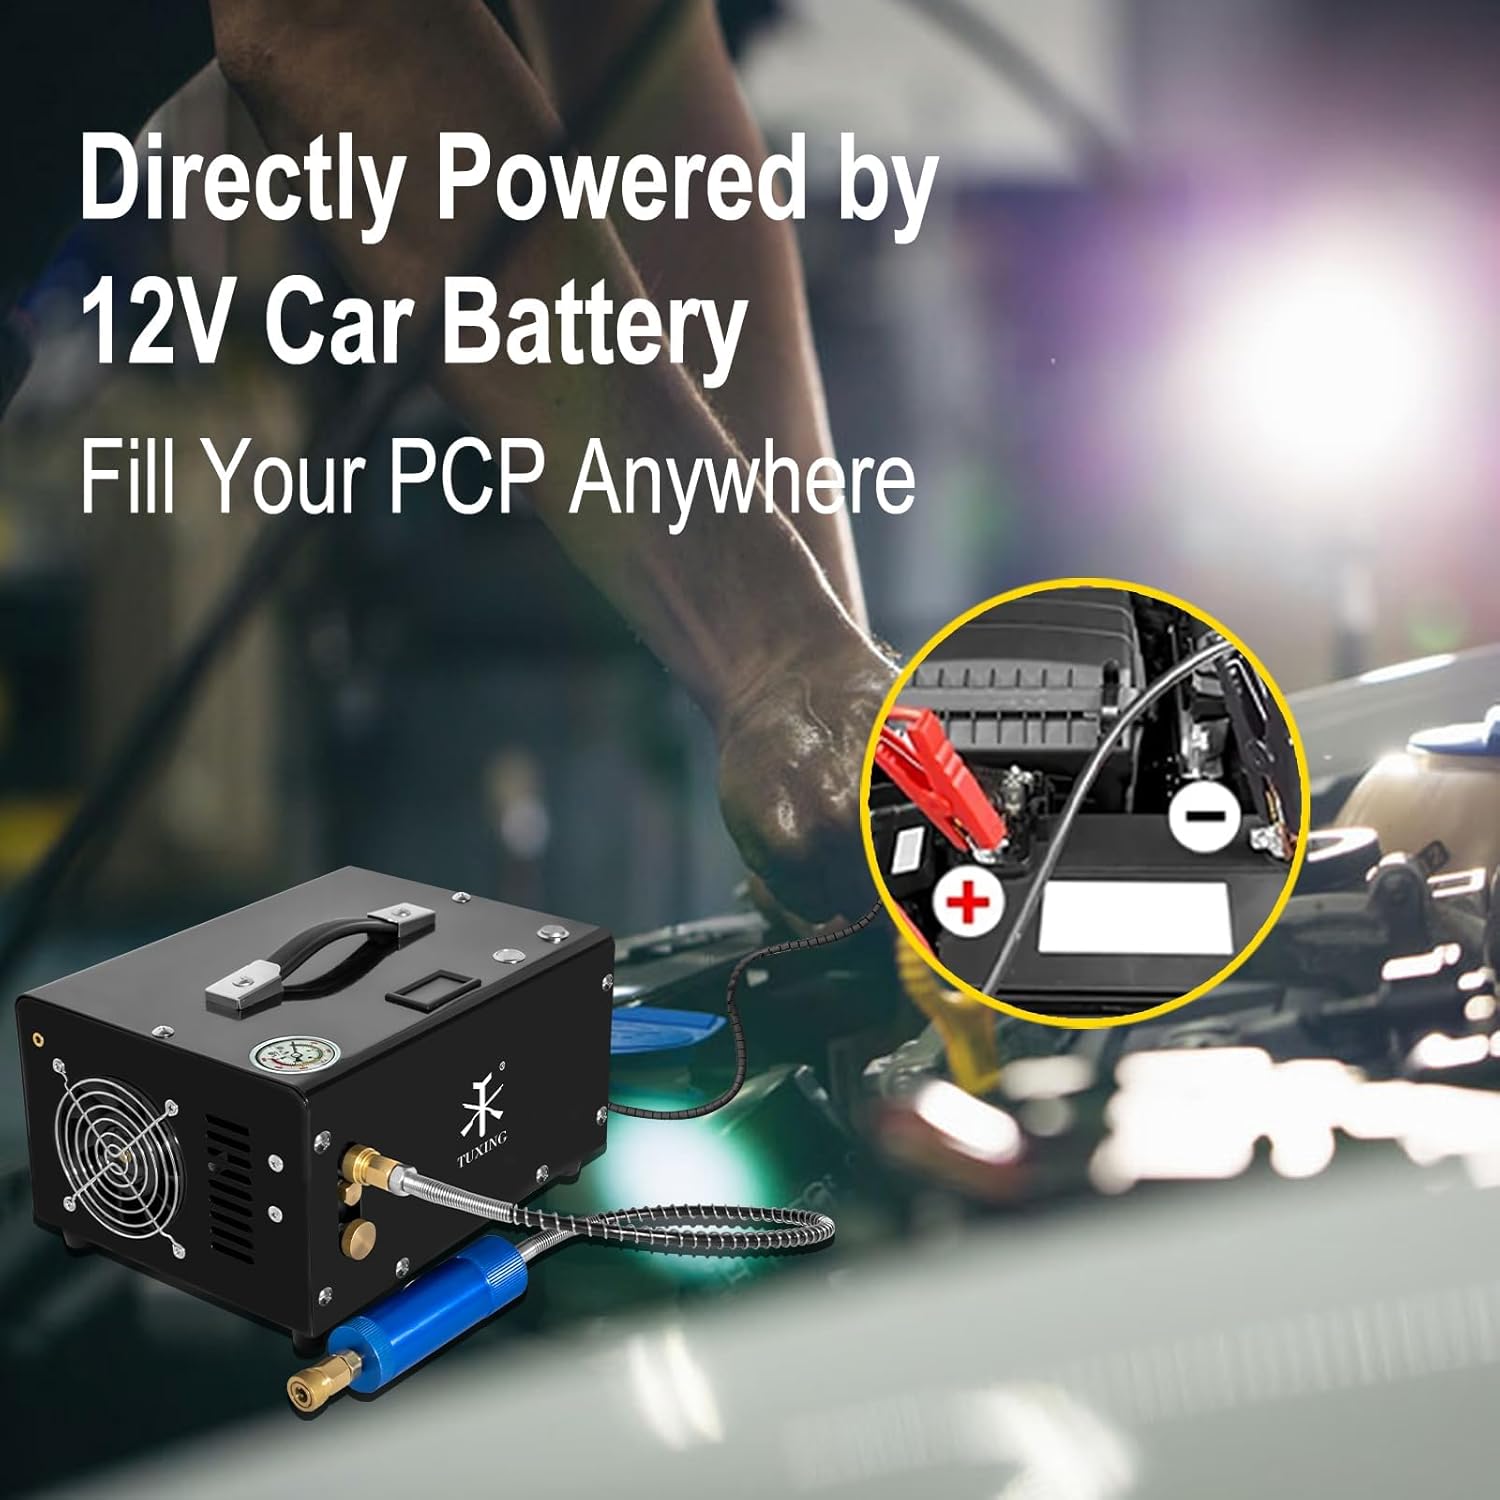
Image 4.2: The compressor connected to a 12V car battery for portable use.
4.2.2 110V/220V AC Home Outlet Connection
- Connect the AC power cord to the 110V/220V AC to 12V DC converter.
- Plug the converter's DC output into the DC input port on the compressor.
- Plug the AC power cord into a standard 110V/220V wall outlet.

Image 4.3: The compressor connected to a home AC wall outlet using the power converter.
4.3 Connecting the Fill Whip
- Attach the fill whip to the 8mm male connector on the compressor's air outlet. Ensure it is securely tightened.
- Connect the other end of the fill whip to the fill port of your PCP air gun, paintball tank, or other high-pressure device.

Image 4.4: The compressor connected to a PCP air rifle for filling.
5. Operating Instructions
Follow these steps to safely operate your TUXING TXET061-1 compressor.
- Prepare for Filling: Ensure the compressor is on a stable surface in a well-ventilated area. Verify all connections are secure.
- Open Bleed Screw: Fully open the release valve (bleed screw) to ensure no pressure is trapped in the system before starting.
- Turn on Fan: Flip the Cooling Fan Switch to the ON position. The fan must run throughout the entire filling process to prevent overheating.
- Start Compressor: Flip the Motor Switch to the ON position. The compressor will begin to operate.
- Close Bleed Screw: Once the compressor starts, immediately close the release valve (bleed screw).
- Monitor Pressure: Continuously monitor the pressure gauge on the compressor and the pressure gauge on your device. Fill the equipment to its recommended pressure. DO NOT EXCEED THE MAXIMUM RATED PRESSURE OF YOUR DEVICE OR THE COMPRESSOR (4500 psi / 300 bar).
- Stop Compressor: Once the desired pressure is reached, immediately flip the Motor Switch to the OFF position.
- Open Bleed Screw: Fully open the release valve (bleed screw) to release any remaining pressure in the fill whip. You will hear air escaping.
- Disconnect: Once all pressure is released, disconnect the fill whip from your equipment and then from the compressor.
- Turn off Fan: Flip the Cooling Fan Switch to the OFF position.
Note: For a 0.5 L tank, filling from 0 to 300 bar typically takes about 18 minutes, and from 200 to 300 bar takes approximately 5 minutes.
6. Maintenance
Regular maintenance ensures optimal performance and longevity of your compressor.
- Oil-Water Separator: The compressor features a built-in oil-water separator. Regularly check and drain any accumulated moisture from the separator to ensure clean, dry air output.
- Filter Replacement: The spare parts kit includes extra filter cartridges. Replace filters periodically or if you notice reduced performance or moisture in the air output. Refer to the diagram for filter location.
- General Cleaning: Keep the exterior of the compressor clean and free from dust and debris. Ensure the cooling fan vents are unobstructed.
- Storage: Store the compressor in a dry, cool place away from direct sunlight and extreme temperatures.
7. Troubleshooting
This section addresses common issues you might encounter.
| Problem | Possible Cause | Solution |
|---|---|---|
| Compressor does not start | No power supply; Blown fuse; Loose connection | Check power connections; Replace fuse (spare included); Secure all cables. |
| Slow inflation or low pressure output | Bleed screw open; Leaks in connections; Clogged filter; Tank capacity too large | Ensure bleed screw is closed; Check all connections for leaks and tighten; Replace filter; Ensure tank is within recommended capacity (max 1.5L). |
| Compressor overheats | Fan not running; Poor ventilation; Continuous operation for too long | Ensure fan switch is ON; Operate in a well-ventilated area; Allow compressor to cool down between long filling sessions. |
| Excessive noise or vibration | Loose components; Unstable surface | Check for and tighten any loose screws; Place compressor on a firm, level surface. |
8. Specifications
Key technical specifications for the TUXING TXET061-1 compressor.
| Feature | Specification |
|---|---|
| Model Name | TXET061-1 |
| Maximum Operating Pressure | 4500 psi (300 bar / 30 MPa) |
| Power Source | 12V DC (Car Battery) / 110V-220V AC (Home Outlet) |
| Voltage | 110 Volts (AC) |
| Maximum Power | 300 Watts (Motor Horsepower) / 600 Watts (Wattage) |
| Cooling System | Built-in Fan Cooling |
| Oil/Water Separation | Built-in Oil Water Separator |
| Noise Level | 75 Decibels |
| Item Weight | 7 Kilograms (15.4 pounds) |
| Product Dimensions | 10.24"L x 7.87"W x 6.3"H |
| Material | Iron |
| Hose Length | 0.5 Meters |
| UPC | 787477955766 |
9. Warranty and Support
The main part of the TUXING TXET061-1 compressor comes with a 1-year warranty from the date of purchase.
For technical assistance, warranty claims, or any questions regarding the use and maintenance of your TUXING compressor, please contact TUXING customer support. Refer to the contact information provided with your purchase or visit the official TUXING website for support details.