Important Safety Information
Please read all instructions carefully before assembly and use. Keep this manual for future reference. Failure to follow these instructions may result in serious injury.
- Adult Assembly Required: This product contains small parts and requires adult assembly.
- Supervision: Always supervise children when they are using the trike. Never leave a child unattended.
- Age and Weight Limits: Suitable for children aged 24 months to 4 years. Do not exceed the recommended age or weight limits.
- Protective Gear: Ensure the child wears appropriate safety gear, such as a helmet, knee pads, and elbow pads, especially when riding outdoors.
- Riding Environment: Use the trike on flat, level surfaces away from stairs, hills, roads, and swimming pools. Avoid riding in traffic.
- Braking: This trike does not have a hand brake. The child stops by ceasing to pedal or by adult intervention using the parent handle.
- Seatbelt: Always secure the child with the provided seatbelt and safety rail.
- Maintenance: Regularly inspect the trike for loose parts, damage, or wear before each use. Do not use if damaged.
Product Overview
The Kiddieland Frozen Deluxe Trike is designed to provide an engaging and safe riding experience for young children. It features interactive electronic activities, a snow globe with lights and sounds, a parent-controlled handle, a safety rail, and a storage bin.
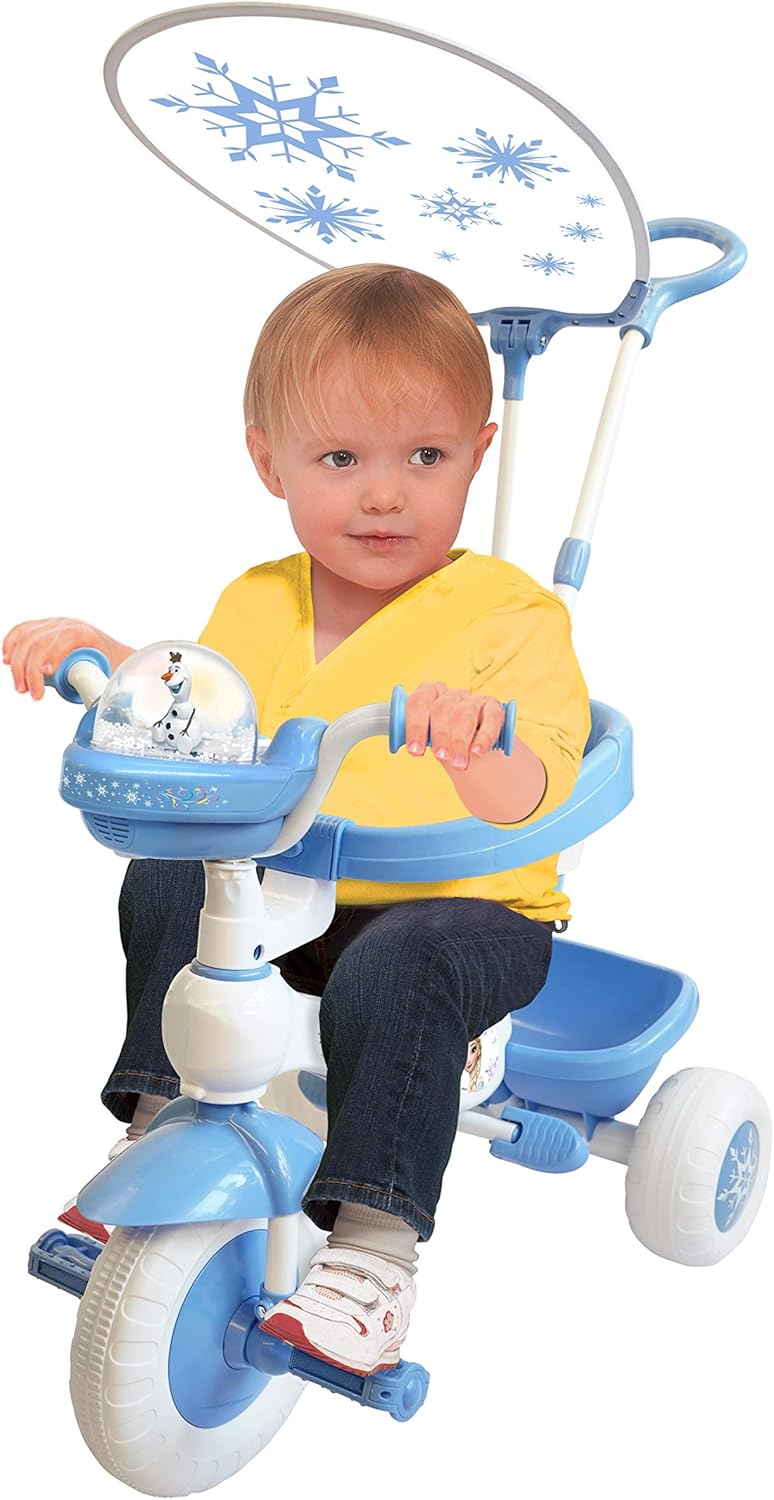
Image: The Kiddieland Frozen Deluxe Trike in full view, featuring a child seated, the parent handle extended, and the canopy overhead. This image illustrates the overall design and key components of the trike.
Key features include:
- Interactive dashboard with sounds and flashing lights.
- Snow globe with internal snow-like particles, colorful lights, and sounds.
- Removable canopy for sun protection.
- Safety rail and seatbelt for child security.
- Parent-controlled push and steer handle.
- Rear storage bin.
Setup and Assembly
Assembly of the Kiddieland Frozen Deluxe Trike requires adult supervision and tools (not included, typically a screwdriver and wrench). Follow these general steps:
- Unpack Components: Carefully remove all parts from the packaging and verify against the parts list (refer to the included diagram in your product box).
- Attach Front Wheel and Fork: Secure the front wheel to the fork assembly. Ensure all bolts are tightened securely.
- Install Handlebars: Insert the handlebars into the fork stem and tighten the locking mechanism.
- Assemble Rear Wheels: Attach the rear wheels to the main frame axle. Ensure they are firmly in place and secured with the provided fasteners.
- Mount Seat and Safety Rail: Secure the seat to the trike frame. Attach the safety rail around the seat, ensuring it latches correctly.
- Install Parent Handle: Insert the parent-controlled handle into the designated slot at the rear of the trike. Ensure it clicks into place or is secured with a locking pin/screw.
- Attach Canopy: Mount the canopy supports to the trike frame, then attach the canopy fabric.
- Install Storage Bin: Secure the rear storage bin to the back of the trike.
- Battery Installation: Locate the battery compartment for the electronic dashboard (usually on the underside or rear of the dashboard). Insert the required batteries (e.g., AA or AAA, not included) following polarity indicators. Close the compartment securely.
- Final Check: Before first use, double-check all connections, bolts, and fasteners to ensure they are tight and secure.
Operating Instructions
Using the Interactive Dashboard

Image: A detailed view of the trike's dashboard, showing the various interactive buttons and the central snow globe feature. Each button activates different sounds and lights.
The dashboard features multiple buttons that activate sounds and flashing lights. Press each button to hear different sounds and see corresponding light effects. The central button often controls the snow globe feature.
Snow Globe Operation

Image: A close-up of the snow globe feature, highlighting the Olaf character inside and the sparkling effects that simulate falling snow when activated. This shows the visual detail of the interactive element.
To activate the snow globe, press the designated button on the dashboard (typically the central snowflake button). This will initiate the internal snow-like particles to fly, accompanied by colorful lights and sounds.
Parent-Controlled Handle
The parent handle allows an adult to push and steer the trike. To steer, gently guide the handle in the desired direction. The handle can be removed as the child grows and becomes capable of independent riding.
Safety Rail and Seatbelt
Always ensure the child is securely fastened with the seatbelt and the safety rail is closed before riding. The safety rail provides additional security and comfort for younger riders.
Maintenance
- Cleaning: Wipe the trike with a damp cloth and mild soap. Do not use abrasive cleaners or solvents. Avoid submerging electronic components in water.
- Storage: Store the trike in a dry, cool place away from direct sunlight and extreme temperatures to prevent material degradation.
- Battery Replacement: When electronic features diminish or stop working, replace the batteries in the dashboard compartment. Ensure correct battery type and polarity. Dispose of old batteries responsibly.
- Regular Inspection: Periodically check all nuts, bolts, and fasteners for tightness. Inspect wheels, pedals, and the frame for any signs of wear or damage.
Troubleshooting
- Electronics Not Working: Check if batteries are correctly installed and not depleted. Replace batteries if necessary. Ensure the battery compartment is securely closed.
- Difficulty Steering with Parent Handle: Ensure the parent handle is fully inserted and locked into place. Check for any obstructions or damage to the steering mechanism.
- Trike Feels Unstable: Verify that all wheels are securely attached and all frame connections are tight. Ensure the child is seated correctly and within the recommended age/weight limits.
- Canopy Falls Down: Check that the canopy supports are firmly attached and the canopy is properly tensioned.
- Parts Do Not Fit During Assembly: Re-read the assembly instructions carefully. Ensure you are using the correct parts for each step. If parts are bent or damaged, contact customer support.
Specifications
| Feature | Detail |
|---|---|
| Product Dimensions | 35.43 x 17.32 x 34.84 inches |
| Item Weight | 10 pounds |
| Model Number | B083FD6WD9 |
| Recommended Age | 24 months - 4 years |
| Manufacturer | Disney (Kiddieland licensed product) |
Warranty Information
For specific warranty details, please refer to the warranty card included with your product or contact Kiddieland customer support directly. Keep your proof of purchase for any warranty claims.
Customer Support
If you have any questions, require assistance with assembly, or need to report a missing/damaged part, please contact Kiddieland customer support. Contact information can typically be found on the product packaging or the official Kiddieland website.