Important Safety Instructions
Please read and understand all instructions before beginning installation. Failure to do so may result in electric shock, fire, or other injuries that could be fatal or cause property damage. All electrical connections must be in accordance with local codes, ordinances, or the National Electric Code (NEC). Consult a qualified electrician or inspector if you are unfamiliar with proper electrical wiring connections.
- WARNING: To avoid electric shock, disconnect power at the main circuit breaker or fuse box before installation.
- CAUTION: This fixture is designed for indoor use in damp locations only.
- Ensure all components are securely fastened before use.
- Do not exceed the maximum wattage specified for the bulbs.
What's in the Box
Verify that all parts are included before proceeding with installation:
- 1 x Hinkley Fletcher Three Light Bath Vanity Fixture (Model 5173PN)
Note: Light bulbs are not included and must be purchased separately.
Specifications
- Brand:
- Hinkley
- Model Name:
- Fletcher - Three Light Bath Vanity, Polished Nickel/Heritage Brass Finish with Clear Seedy Glass
- Part Number:
- 5173PN
- Color:
- Polished Nickel
- Material:
- Alloy Steel, Glass
- Style:
- 3 Light
- Product Dimensions:
- 7.5"L x 25"W x 8.75"H
- Item Weight:
- 4.7 pounds
- Light Source Type:
- LED (recommended)
- Bulb Base:
- E26
- Number of Light Sources:
- 3
- Max Wattage:
- 100 Watts per bulb
- Voltage:
- 120 Volts
- Special Feature:
- Dimmable, Hardwired
- Installation Type:
- Protruding Mount (Adjustable Orientation)
- Indoor/Outdoor Usage:
- Indoor (Damp Location Rated)
Setup and Installation
Professional installation is recommended for this hardwired fixture. Always ensure power is disconnected at the circuit breaker before beginning any electrical work.
- Prepare for Installation: Turn off power at the main electrical panel. Clear the work area.
- Mount the Mounting Plate: Secure the fixture's mounting plate to the junction box in the wall using the provided screws. Ensure it is firmly attached.
- Wire the Fixture: Connect the fixture's wires to the corresponding household wires (black to black, white to white, ground to ground) using wire nuts. Ensure all connections are secure and insulated.
- Attach the Fixture: Carefully align the fixture body with the mounting plate and secure it with the provided screws or decorative nuts.
- Install Glass Shades: The fixture features clear seedy glass dome shades. Secure these in place using the cast knobs.
- Install Bulbs: Insert three E26 base LED bulbs (not included) into the sockets. Do not exceed 100 watts per bulb.
- Restore Power: Once installation is complete and all components are secure, restore power at the main electrical panel.
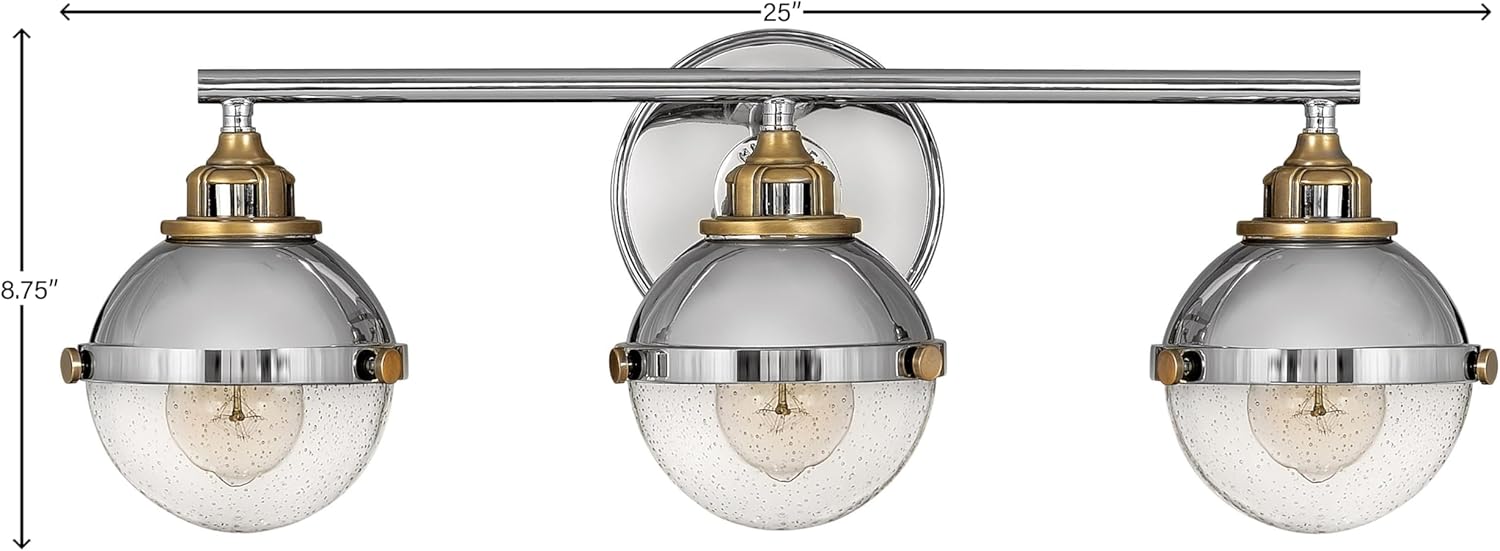
Figure 1: Product dimensions for the Hinkley Fletcher 3-light vanity fixture.

Figure 2: Detail of the dome shade and clear seedy glass with brass accents.
Video 1: General overview of Hinkley bath lighting fixtures, demonstrating style and application.
Operating Instructions
This fixture operates like a standard wall-mounted light. Once installed and power is restored, use the wall switch to turn the light on or off.
- On/Off Function: Toggle the wall switch to control the light.
- Dimming: If connected to a compatible dimmer switch and using dimmable LED bulbs, you can adjust the light intensity.
- Adjustable Orientation: The fixture can be mounted in either an up or down position to achieve different lighting effects.
Maintenance
Regular maintenance will help preserve the appearance and functionality of your fixture.
- Cleaning: Turn off power before cleaning. Wipe the fixture with a soft, dry cloth. Do not use abrasive cleaners or solvents as they may damage the finish or glass.
- Bulb Replacement: Ensure power is off and bulbs have cooled before replacing. Unscrew old bulbs and screw in new E26 base LED bulbs, ensuring they do not exceed the maximum wattage.
Troubleshooting
| Problem | Possible Cause | Solution |
|---|---|---|
| Light does not turn on. | No power to the fixture; loose wiring; faulty bulb. | Check circuit breaker; verify wire connections; replace bulb. |
| Light flickers. | Loose bulb; incompatible dimmer switch; faulty wiring. | Tighten bulb; ensure dimmer is LED compatible; check wiring connections. |
| Glass shade is loose. | Retaining knobs are not tightened. | Gently tighten the cast knobs to secure the glass shade. |
Warranty Information
This Hinkley fixture comes with a limited warranty. For specific details regarding coverage and duration, please refer to the warranty documentation included with your purchase or visit the official Hinkley website.
Customer Support
For further assistance, technical support, or to inquire about replacement parts, please contact Hinkley customer service. Contact information can typically be found on the Hinkley website or on the product packaging.


