1. Product Overview
The Acxico Solar Charge Controller Board is designed for DIY street lights and garden lights, providing automatic ON/OFF light control. This compact board efficiently manages the charging of lithium and LiFePO4 batteries using solar power, ensuring your lights operate reliably from dusk till dawn.

Image 1.1: Three Acxico Solar Charge Controller Boards. These compact green circuit boards feature multiple connection points for solar panels, batteries, and LED outputs.
2. Key Features
- Automatic Light Control: Charges during the day, automatically turns on lights in the evening, and turns off lights at dawn.
- Voltage Detection: Controls output by detecting changes in solar panel voltage, eliminating the need for separate photosensitive elements.
- Wide Application: Suitable for solar lawn lights, landscape lights, garden lights, corridor lights, and DIY street lights.
- Broad Input Voltage Range: Accepts solar input from 4.5V to 28V DC.
- Battery Compatibility: Supports 1-4 string Lithium and LiFePO4 batteries.
- Protection Features: Includes anti-reverse charging, over-charge, and over-discharge protection (requires protected batteries).
3. Specifications
| Specification | Value |
|---|---|
| Input Voltage (Solar) | 4.5V-28V DC |
| Stable Working Output Current | ≤ 600mA |
| Operation Mode | Automatically ON/OFF |
| Current Rating | 0.5 Amps |
| Operating Voltage | 5 Volts (Nominal) |
| Max Wattage (LEDs) | 12 watts (4S battery) |
| Item Weight | 0.176 ounces |
| Package Dimensions | 5 x 3.2 x 0.16 inches |
| Model Number | LB183 |
| UPC | 797806002856 |
Battery Charge Voltage Requirements:
- Lithium Battery: 3.6V-16.8V (1-4 String)
- Input 22-28V (≤20W, ≤2A) for 4S Lithium
- Input 18-22V (≤18W, ≤2A) for 3S Lithium
- Input 10-14V (≤15W, ≤2A) for 2S Lithium
- Input 5-7V (≤12W, ≤2A) for 1S Lithium
- LiFePO4 Battery: 3.2V-12.8V (1-4 String)
- Input 18-22V (≤20W, ≤2A) for 4S LiFePO4
- Input 12-14V (≤18W, ≤2A) for 3S LiFePO4
- Input 9-12V (≤15W, ≤2A) for 2S LiFePO4
- Input 4.5-7V (≤12W, ≤2A) for 1S LiFePO4
LED Lights Wattage Requirements:
- 4S battery: Cannot exceed 12W
- 3S battery: Cannot exceed 9W
- 2S battery: Cannot exceed 5W
- 1S battery: Cannot exceed 3W
4. Setup and Installation
Proper connection of the solar panel, battery, and LED lights is crucial for optimal performance. Refer to the diagram below for connection points.
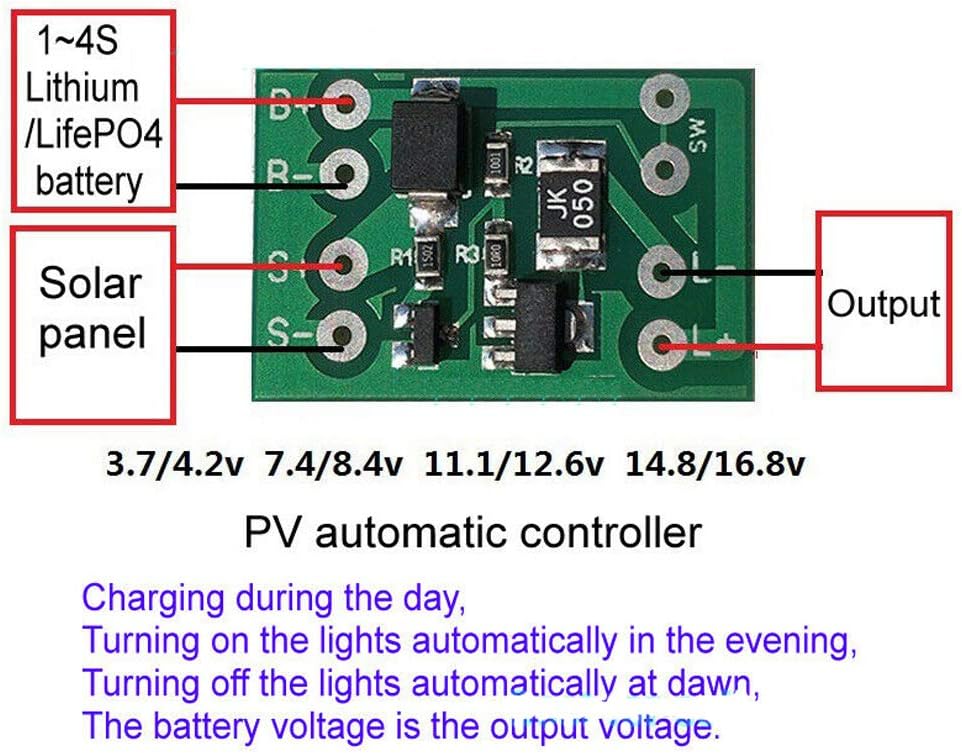
Image 4.1: Wiring diagram showing connections for Lithium/LiFePO4 battery (B+/B-), Solar panel (S+/S-), and LED Output (L+/L-).

Image 4.2: Detailed circuit board layout with labeled connection points (B+, B-, S+, S-, L+, L-, SW) and components.
- Battery Connection: Connect your Lithium or LiFePO4 battery to the B+ and B- terminals. Ensure the battery has a protective plate to prevent over-charge and over-discharge. The battery voltage must match the intended LED operating voltage.
- Solar Panel Connection: Connect your solar panel to the S+ and S- terminals. The solar panel voltage and power must be compatible with the battery string configuration (refer to specifications).
- LED Light Connection: Connect your LED lights to the L+ and L- terminals. The LED operating voltage and power must match the battery voltage. Important: LED lamp beads cannot be used directly; they require a step-down drive or a series current limiting resistor. Do not use a step-up driver for the LED lamps.
- SW Switch (Optional): The SW interface is reserved for an optional switch. If you need to manually close the circuit at night or for transport/storage, a switch can be installed by cutting the designated trace.
Note: The control board needs to be protected from water and properly insulated during installation.
5. Operating Instructions
The Acxico Solar Charge Controller Board operates automatically based on ambient light conditions detected by the solar panel.
- Daytime Operation (Charging): When the solar panel receives sufficient sunlight, the board will detect the voltage change. During this period, the board will charge the connected battery, and the LED lights will remain off.
- Nighttime Operation (Lighting): As ambient light diminishes (e.g., at dusk), the solar panel's voltage will drop. The controller board will detect this change and automatically turn on the connected LED lights. The battery voltage will be the output voltage for the LEDs.
- Dawn Operation (Lights Off): When sunlight returns in the morning, the solar panel's voltage will increase again. The controller board will detect this and automatically turn off the LED lights, resuming the charging cycle.

Image 5.1: An example setup showing the solar panel connected to the board and battery. With light shining on the solar panel, the LEDs are turned off, indicating charging mode.

Image 5.2: An example setup demonstrating nighttime operation. When the solar panel is covered (simulating darkness), the LED lights automatically turn on.

Image 5.3: A close-up of the board connected to a lithium battery and an LED light array. This image shows the LED lights illuminated, indicating the output is active.
6. Important Notes and Warnings
- Always ensure batteries are used with protective plates to prevent over-charge and over-discharge.
- Verify that the battery voltage, solar panel voltage, and power are compatible with each other and with the LED lights. Mismatched components can lead to malfunction or damage.
- The control board is sensitive to moisture. Ensure it is properly waterproofed and insulated during installation, especially for outdoor applications.
- LED lamp beads cannot be connected directly to the output. They require a step-down drive or a series current limiting resistor. Do not use a step-up driver for the LED lamps.
- The controller's battery voltage is the output voltage; there is no current limit on the output voltage.
7. Troubleshooting
If you encounter issues with your Acxico Solar Charge Controller Board, consider the following common troubleshooting steps:
- Lights not turning on at night:
- Check all wiring connections for proper polarity and secure contact.
- Ensure the solar panel is not receiving any light (e.g., streetlights, indoor lights) that might prevent it from detecting darkness.
- Verify the battery is charged and functioning correctly.
- Confirm the LED lights are working and their voltage/wattage matches the battery.
- Lights not turning off during the day:
- Ensure the solar panel is exposed to sufficient direct sunlight.
- Check for any obstructions blocking light from reaching the solar panel.
- Battery not charging:
- Confirm the solar panel is connected correctly and is generating voltage.
- Verify the battery is connected with correct polarity and is not faulty.
- Ensure the solar panel's voltage and current output are sufficient for the battery type and string configuration.
- Intermittent operation:
- Check for loose connections or poor soldering.
- Ensure the board is protected from moisture and extreme temperatures.
- Verify that the battery has adequate capacity for the LED load and operating duration.
If problems persist after following these steps, please contact customer support.
8. Warranty and Support
Acxico is committed to providing high-quality products. While specific warranty details are not provided in this manual, we value your feedback and are here to assist with any concerns.
If you have any questions, require assistance with installation, or encounter issues with your product, please do not hesitate to contact us. Your satisfaction is important, and we strive to provide the best possible solution.
For support, please refer to the contact information provided with your purchase or on the official Acxico website.