Thermaltake Level 20 RS
Thermaltake Level 20 RS ARGB ATX Mid Tower Gaming Computer Case Instruction Manual
Model: Level 20 RS (CA-1P8-00M1WN-00)
1. Introduction
This manual provides comprehensive instructions for the setup, operation, and maintenance of your Thermaltake Level 20 RS ARGB ATX Mid Tower Gaming Computer Case. Please read this manual thoroughly before beginning installation to ensure proper assembly and functionality.

Figure 1: Thermaltake Level 20 RS ARGB ATX Mid Tower Gaming Computer Case (Front-left view).
2. Key Features
- Integrated ARGB Lighting: Two pre-installed 200mm 5V Motherboard Sync ARGB fans and an ARGB light bar on the front panel, compatible with ASUS Aura Sync, Gigabyte RGB Fusion, MSI Mystic Light Sync, and ASRock Polychrome via 5V addressable RGB header.
- Dual Mode 5V ARGB Switch Board: Control LED colors and lighting modes (27 modes/7 colors) via the I/O port button or motherboard RGB software.
- Patented Rotational PCI-E 8 Slots: Offers flexibility to display graphics cards vertically or horizontally.
- Window PSU Cover: Ventilated design for enhanced airflow and cable concealment.
- Versatile Drive Bays: Features a 2.5"/3.5" x 2 HDD Rack, 2.5" x 2 HDD Bracket, and 2.5"/3.5" x 1 behind the MB Tray.
- Extensive Motherboard Support: Compatible with Mini ITX, Micro ATX, and ATX motherboards.
- Convenient I/O Ports: Includes USB 3.0 x 2, USB 2.0 x 2, HD Audio x 1, and an RGB Button x 1.
- Optimized Expansion: Supports CPU coolers up to 172mm, VGA cards up to 282mm (with HDD Rack) or 400mm (without HDD Rack), and PSUs up to 220mm.
- Tempered Glass Side Panels: Two 4mm tempered glass panels provide a clear view of internal components.
3. Setup Guide
3.1. Component Overview & Dimensions
Familiarize yourself with the case layout and dimensions before installation.

Figure 2: Case dimensions and various views (Front, Back, Left, Right).
- Dimensions (H x W x D): 524 x 240.8 x 553 mm (20.62 x 9.4 x 21.77 inch)
- Net Weight: 12.23 kg / 26.96 lbs
- I/O Ports: USB 3.0 x 2, USB 2.0 x 2, HD Audio x 1, RGB Button x 1
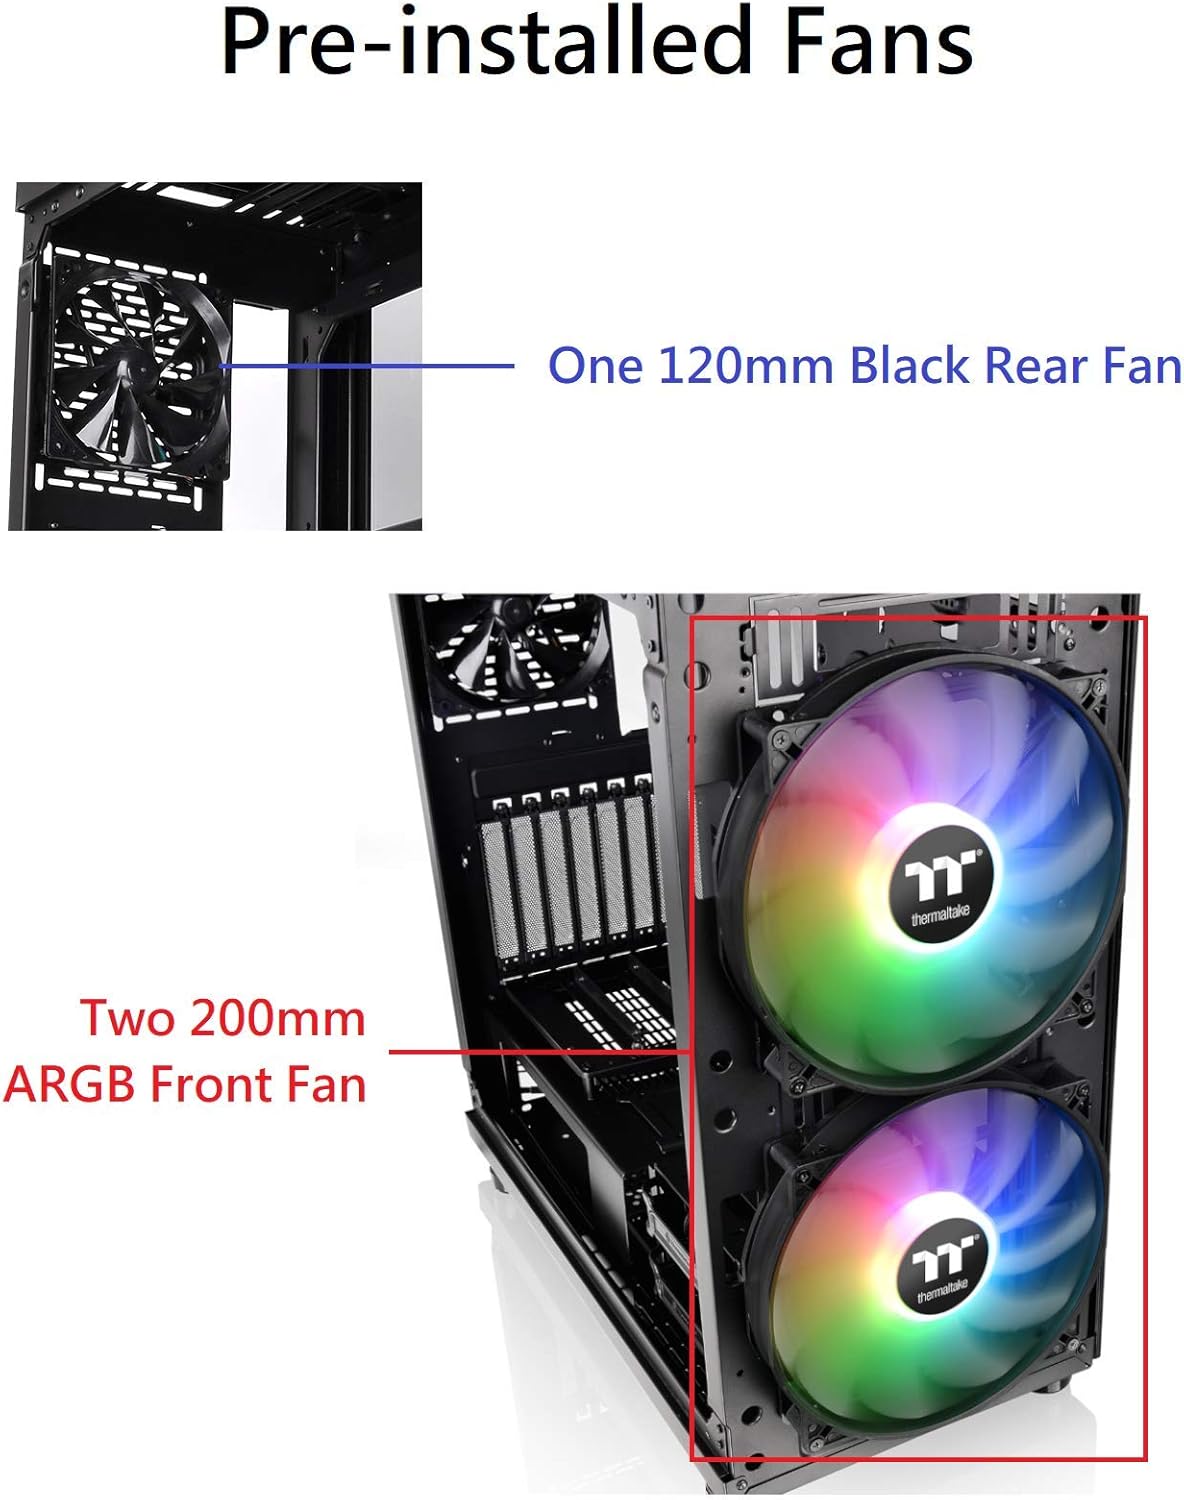
Figure 3: Top I/O panel with HD Audio, RGB Button, and Power button.
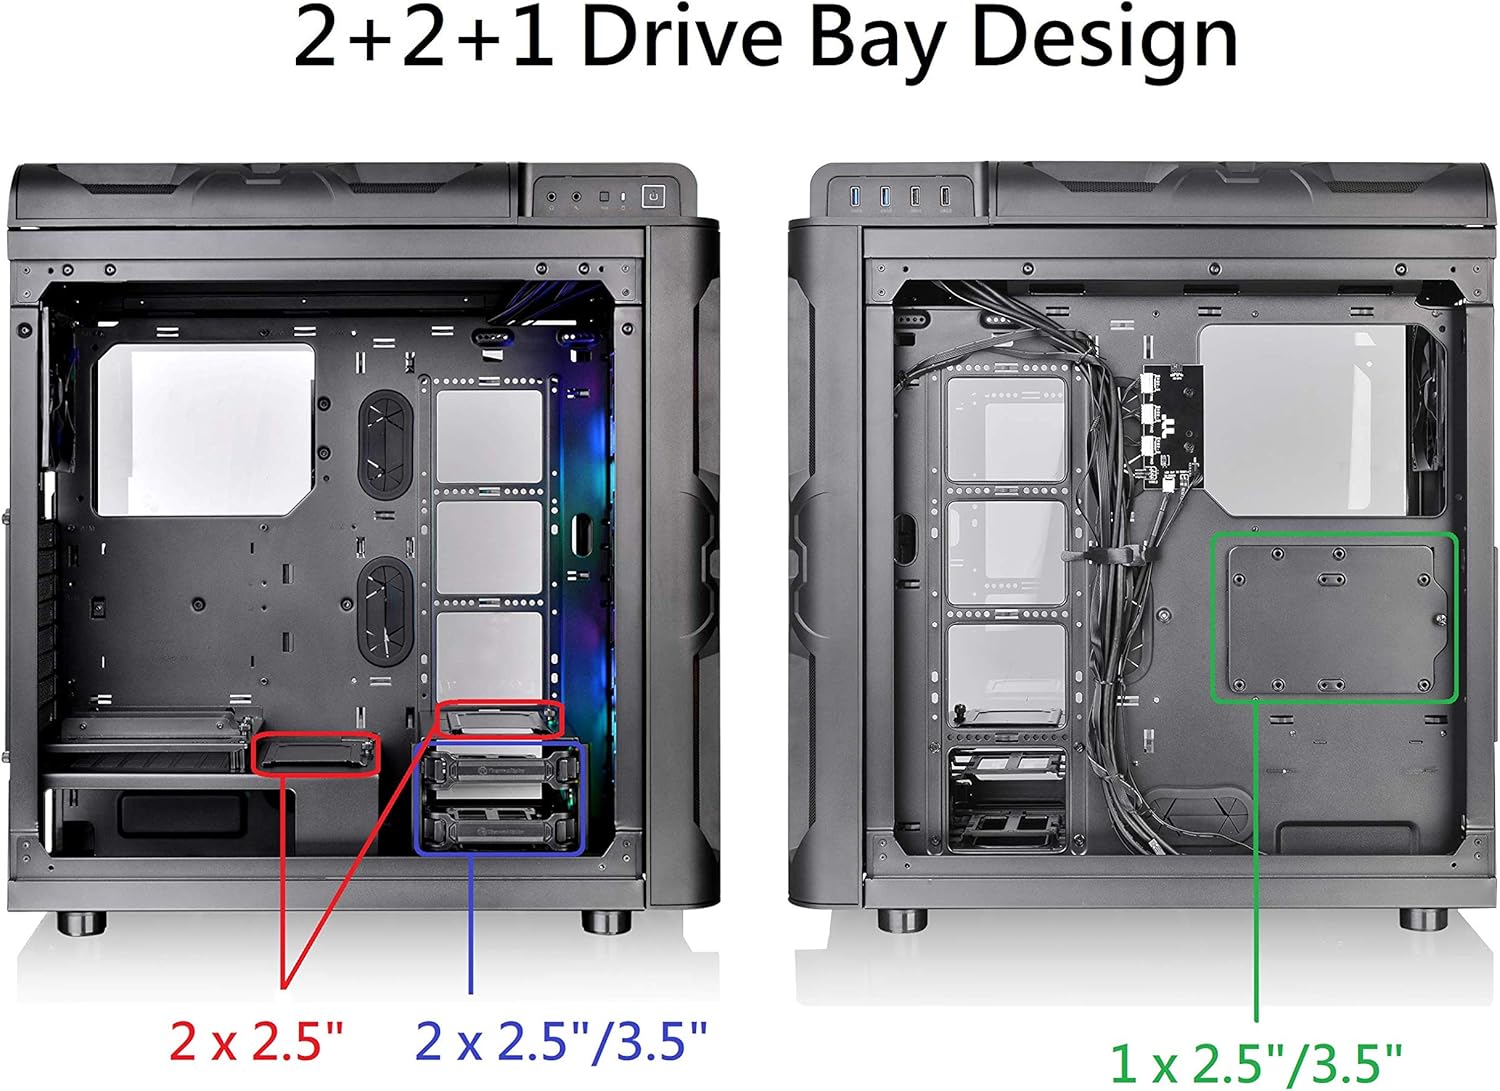
Figure 4: Top I/O panel with USB 3.0 and USB 2.0 ports.
3.2. Power Supply Unit (PSU) Installation
Install the standard PS2 PSU (optional) into the designated compartment. Ensure proper cable routing for optimal airflow and aesthetics.
3.3. Motherboard Installation
Install your Mini ITX, Micro ATX, or ATX motherboard. Connect the necessary power cables, ensuring they are not overly taut.
3.4. Graphics Card (VGA) Installation
The case features patented rotational PCI-E 8 slots, allowing for vertical or horizontal GPU mounting. This provides flexibility for displaying your graphics card and optimizing airflow.

Figure 5: Patented Rotational PCI-E 8 Slot Design for vertical or horizontal GPU placement.
3.5. Drive Bay Installation
Utilize the accessible 2.5"/3.5" x 2 HDD Rack, 2.5" x 2 HDD Bracket, and 2.5"/3.5" x 1 hidden behind the MB Tray for your storage devices.

Figure 6: Overview of the 2+2+1 drive bay design, showing locations for 2.5" and 3.5" drives.
3.6. Fan and Radiator Installation
The case comes with two pre-installed 200mm ARGB front fans and one 120mm black rear fan. Additional fan and radiator support is available as detailed in the specifications.

Figure 7: Location of the two 200mm ARGB front fans and one 120mm black rear fan.

Figure 8: Diagrams illustrating various air and liquid cooling installation options for the case.
3.7. Cable Management
Utilize the spacious rear section and cable tie points for neat cable routing. The PSU shroud also helps conceal cables.

Figure 9: Rear view of the case showing cable routing options and mounting points.
3.8. RGB Lighting Setup
The case features a built-in dual-mode 5V ARGB switch board. Connect the ARGB cables from the fans and light bar to this board or directly to a compatible 5V ARGB motherboard header.

Figure 10: Built-in RGB Switch Board and a list of 27 lighting modes controllable via the I/O port RGB Light Button or motherboard sync.
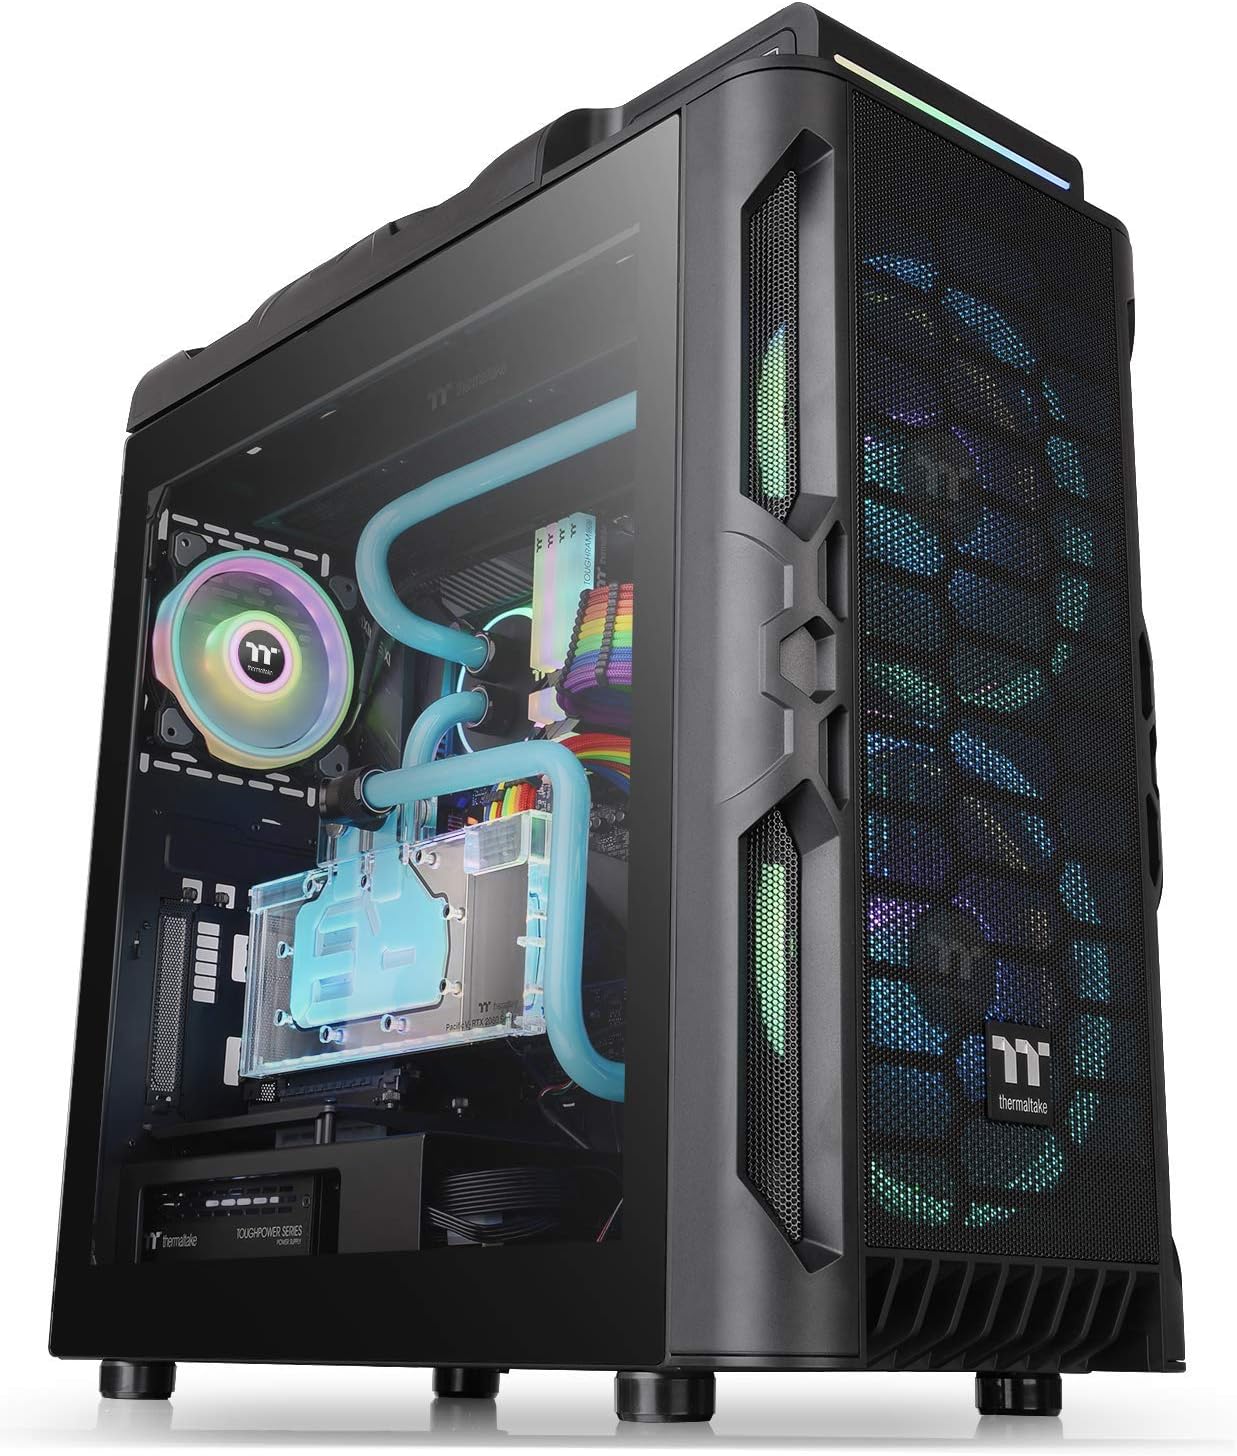
Figure 11: Close-up of the ARGB front light bar.
4. Operating Instructions
4.1. Power On/Off
Press the power button located on the top I/O panel to turn the system on or off.
4.2. RGB Lighting Control
Use the dedicated RGB button on the top I/O panel to cycle through the 27 pre-set LED modes and 7 colors. Alternatively, if connected to a compatible motherboard, use the motherboard's RGB software for advanced customization.
5. Maintenance
5.1. Cleaning Dust Filters
The Level 20 RS includes multiple dust filters for easy maintenance. Regularly clean these filters to ensure optimal airflow and prevent dust buildup inside the case.

Figure 12: Locations of the top, front, and bottom dust filters.
5.2. Side Panel Removal/Installation
The tempered glass side panels are secured with easy-access screws. Carefully remove them for internal access and re-install securely after maintenance or component changes.

Figure 13: The two tempered glass side panels of the case.
6. Troubleshooting
If you encounter issues, please check the following common points:
- No Power: Ensure all power cables (PSU to wall, PSU to motherboard, CPU, GPU) are securely connected. Check the PSU's on/off switch.
- RGB Not Working: Verify ARGB connections to the switch board or motherboard. Ensure motherboard software is correctly configured if using software control.
- Overheating: Clean dust filters. Ensure fans are correctly oriented for optimal airflow (intake/exhaust). Verify CPU cooler and GPU fans are functioning.
- Component Fit Issues: Refer to the specifications section for clearance limits for CPU coolers, VGA cards, and PSUs.
For further assistance, please refer to the Thermaltake official support channels.
7. Specifications
| Feature | Detail |
|---|---|
| Brand | Thermaltake |
| Series | Level 20 |
| Model Name | Level 20 RS ARGB |
| Part Number | CA-1P8-00M1WN-00 |
| Case Type | Mid Tower |
| Dimensions (H x W x D) | 524 x 240.8 x 553 mm (20.62 x 9.4 x 21.77 inch) |
| Net Weight | 12.23 kg / 26.96 lbs |
| Side Panel | 4mm Tempered Glass x 2 |
| Color | Exterior & Interior: Black |
| Material | SPCC, Tempered Glass |
| Cooling System (Pre-installed) | Front: 2 x 200x200x30mm Addressable RGB fan (Fixed 600rpm, 29.2dBA) Rear: 1 x 120x120x25mm fan (Fixed 1000rpm, 16dBA) |
| Drive Bays | Accessible: 2.5” x 2 or 3.5” x 2 (HDD Rack) Hidden: 2.5” x 1 (HDD Bracket); 2.5” x 2 or 3.5” x 1 (HDD Bracket) |
| Expansion Slots | 8 |
| Motherboard Compatibility | 6.7” x 6.7” (Mini ITX), 9.6” x 9.6” (Micro ATX), 12” x 9.6” (ATX) |
| I/O Port | USB 3.0 x 2, USB 2.0 x 2, HD Audio x 1, RGB Button x 1 |
| PSU Type | Standard PS2 PSU (optional) |
| Fan Support | Front: 3 x 120mm, 3 x 140mm, 2 x 200mm Top: 3 x 120mm, 2 x 140mm, 1 x 200mm Rear: 1 x 120mm |
| Radiator Support | Front: 1 x 280mm, 1 x 360mm Top: 1 x 280mm, 1 x 360mm Rear: 1 x 120mm Right: 1 x 360mm (Without HDD Rack) |
| Clearance (CPU Cooler Height) | 172mm |
| Clearance (VGA Length) | 282mm (With HDD Rack), 400mm (Without HDD Rack) |
| Clearance (PSU Length) | 220mm |
8. Warranty and Support
This product is covered by a 3-year warranty. For detailed warranty information, technical support, or service inquiries, please visit the official Thermaltake website or contact their customer service department.
Official Thermaltake Website: www.thermaltake.com