1. Product Overview
This document provides essential information for the installation, operation, and maintenance of the Fricgore Replacement Clutch Assembly, designed for use with Robin NB351 and NB411 Trimmer Brushcutter Gas Engine Motor Parts.
The clutch assembly is a critical component responsible for transmitting power from the engine to the cutting attachment, allowing for smooth engagement and disengagement of the tool.

Figure 1: Fricgore Clutch Assembly (Top View). This image shows the main view of the clutch assembly, highlighting its three clutch shoes and the central keyed bore for shaft connection.
Key Features:
- Designed for Robin NB351 and NB411 engine parts.
- Outer Diameter (OD): Approximately 75mm.
- Height (H): Approximately 8mm.
- Features a 3-shoe design for efficient power transfer.
- Equipped with a keyed taper bore for secure shaft mounting.
2. Installation (Setup)
Proper installation is crucial for the safe and effective operation of your trimmer or brushcutter. If you are unsure about any step, it is recommended to consult a qualified technician.
2.1 Safety Precautions
- Always ensure the engine is turned off and cool before beginning any work.
- Disconnect the spark plug wire to prevent accidental starting.
- Wear appropriate personal protective equipment (PPE), including gloves and eye protection.
- Work in a well-ventilated area.
2.2 Installation Steps
- Access the Clutch Housing: Depending on your specific trimmer/brushcutter model, you may need to remove covers or other components to gain access to the clutch housing.
- Remove the Old Clutch:
- Carefully inspect how the old clutch is mounted. Note the orientation and any washers or spacers.
- Use appropriate tools to unbolt or unscrew the old clutch assembly from the engine shaft. Be mindful of any retaining clips or nuts.
- Remove the old clutch.
- Inspect the Engine Shaft: Clean the engine shaft and inspect it for any damage or debris. Ensure the keyway is clear.
- Install the New Clutch:
- Align the keyed taper bore of the new Fricgore clutch assembly with the key on the engine shaft.
- Slide the clutch onto the shaft, ensuring it seats properly.
- Secure the clutch with the appropriate bolts, nuts, or retaining clips. Tighten fasteners to the manufacturer's recommended torque specifications, if available. Do not overtighten.
- Reassemble: Reattach any covers or components that were removed to access the clutch.
- Test: Before full operation, perform a brief test run to ensure the clutch engages and disengages smoothly and that there are no unusual noises or vibrations.
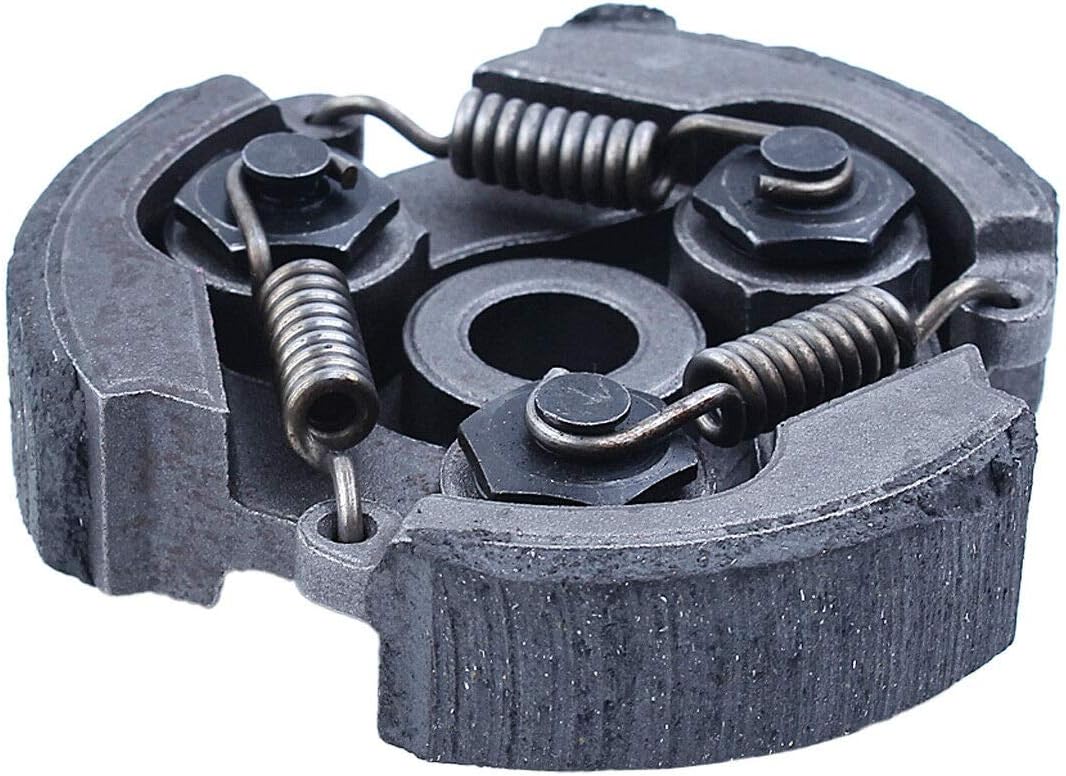
Figure 2: Clutch Assembly Underside. This image displays the reverse side of the clutch, revealing the springs that control the engagement of the clutch shoes and the mounting points.
3. Operating Principles
The clutch assembly operates on centrifugal force. As the engine speed increases, the three clutch shoes are forced outwards by centrifugal force, overcoming the tension of their springs. These shoes then make contact with the inner drum of the clutch housing, transferring rotational power to the trimmer or brushcutter's drive shaft.
When the engine speed decreases (e.g., at idle), the springs pull the clutch shoes back, disengaging them from the drum and stopping the cutting attachment from spinning.
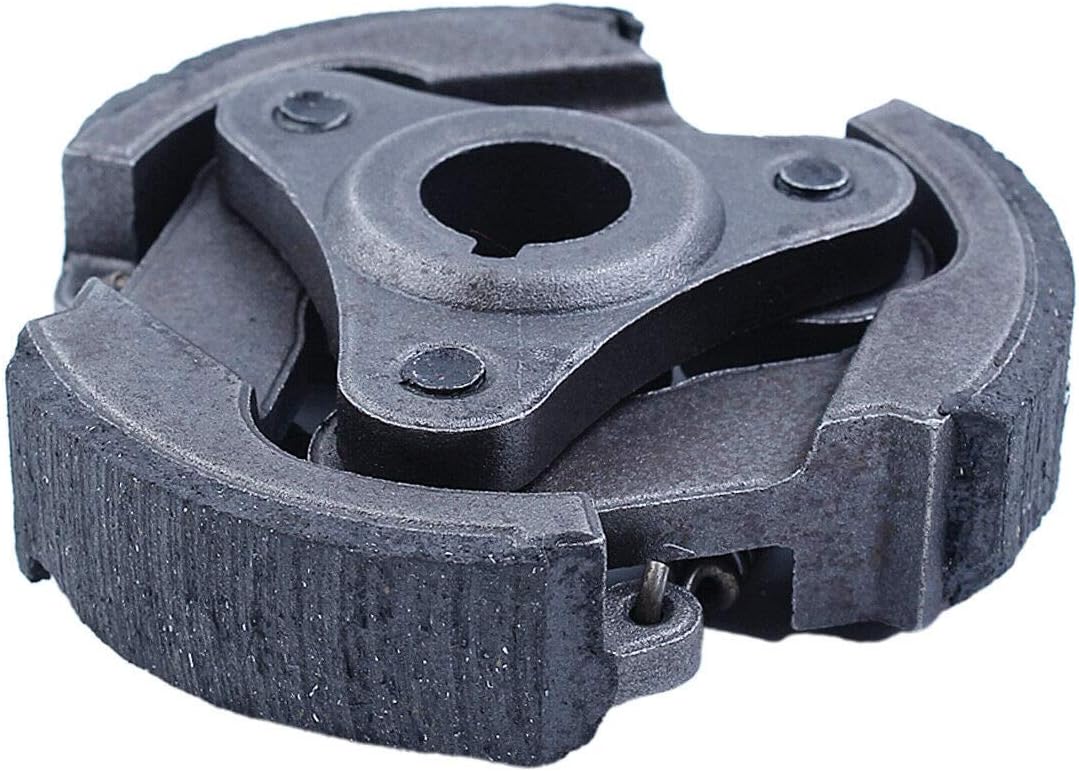
Figure 3: Clutch Assembly Angled View. This perspective highlights the profile and material of the clutch shoes, which are crucial for friction and power transfer.
4. Maintenance
Regular inspection and maintenance can extend the lifespan of your clutch assembly and ensure optimal performance of your equipment.
- Inspection: Periodically inspect the clutch shoes for wear. If the friction material is significantly worn down or glazed, the clutch may need replacement.
- Cleaning: Keep the clutch assembly and housing free from dirt, dust, and debris. Accumulation can hinder proper engagement and cause premature wear. Use compressed air or a brush to clean.
- Springs: Check the clutch springs for any signs of stretching, damage, or breakage. Damaged springs can lead to improper clutch engagement or disengagement.
- Lubrication: The clutch shoes themselves should not be lubricated. However, ensure any bearings or bushings associated with the clutch mechanism are properly lubricated according to your engine's service manual.

Figure 4: Clutch Springs Detail. This image provides a closer look at the springs that retract the clutch shoes, essential for proper clutch function.
5. Troubleshooting
If you experience issues with your trimmer or brushcutter that you suspect are related to the clutch, refer to the common problems and solutions below:
| Problem | Possible Cause | Solution |
|---|---|---|
| Cutting attachment spins at idle. |
|
|
| Engine revs but cutting attachment does not engage or slips. |
|
|
| Excessive vibration or noise from clutch area. |
|
|
6. Specifications
| Attribute | Detail |
|---|---|
| Product Name | Clutch Assembly |
| Brand | Fricgore |
| Compatibility | Robin NB351, NB411 Trimmer Brushcutter Gas Engine Motor Parts |
| Outer Diameter (OD) | Approx. 75mm |
| Height (H) | Approx. 8mm |
| Clutch Type | 3-shoe centrifugal clutch |
| Bore Type | Keyed taper bore |
| Item Package Quantity | 1 |
| ASIN | B08373C71P |
| Date First Available | December 30, 2019 |
7. Warranty and Support
For information regarding warranty coverage or technical support for your Fricgore Clutch Assembly, please refer to the seller's or manufacturer's official website or contact their customer service directly. Keep your purchase receipt as proof of purchase.
For general inquiries or further assistance, you may contact the seller, Fricgore, through the platform where the purchase was made.