Fricgore Carburetor Kit for Weedeater Featherlite Fl25C Fx26Sc xt260 Fl20 Fl26 Gas Trimmer
Instruction Manual
Fricgore Carburetor Kit for Weedeater Featherlite Trimmers
Introduction
This manual provides detailed instructions for the installation, operation, maintenance, and troubleshooting of your new Fricgore Carburetor Kit. This kit is designed as a replacement part for various Poulan, Craftsman, and Weed Eater gas trimmers, including models such as FL25C, FX26SC, XT260, FL20, and FL26. Please read this manual thoroughly before attempting any installation or maintenance to ensure proper function and safety.
Important Note: Always compare the appearance of the replacement parts with your original product to ensure compatibility before installation. If the item does not look like your original parts, do not proceed with the order or installation.
Package Contents
Your Fricgore Carburetor Kit package should contain the following components:
- 1 x Carburetor
- 1 x Fuel Line
- 1 x Spark Plug
- 1 x Adjustment Tool
- 2 x Fuel Filters
- 2 x Primer Bulbs
- 2 x Carburetor Gaskets
- 2 x Check Valves

Figure 1: Overview of the Fricgore Carburetor Kit components, including the carburetor, fuel line, spark plug, adjustment tool, fuel filters, primer bulbs, carburetor gaskets, and check valves.
Compatibility
This carburetor kit is designed to replace OEM parts 530071752, 530071822, 545081808, and 530071750, and specifically replaces C1U-W18 carburetors. It is compatible with a wide range of gas trimmers from Poulan, Craftsman, Weed Eater, AYP, and Electrolux. Specific compatible models include, but are not limited to:
- FL25C Gas Trimmer
- FL20C Gas Trimmer
- FX26SC Gas Trimmer
- XT260 (Type 2) String Trimmer
- FL20 Gas Trimmer (Type 1 & 2)
- Featherlite SST 25 Gas Trimmer
- FL23 Gas Trimmer
- FL26 Gas Trimmer (Type 1 & 2)
- FX26 Gas Trimmer (Type 1 & 2)
- FX26S Gas Trimmer (Type 1 & 2)
- MX550 Gas Trimmer
- TE475Y Gas Trimmer
- XT260 Gas Trimmer (Type 1 & 2)
- XT700 Gas Trimmer
- MX557 Gas Trimmer
- SST25C Gas Trimmer
- TE475 Gas Trimmer
- P1500, P2500, P3500 Gas Trimmers
Setup and Installation
Before beginning installation, ensure your trimmer is turned off and cooled down. Disconnect the spark plug wire to prevent accidental starting. It is recommended to wear appropriate safety gear, such as gloves and eye protection.
Step-by-Step Installation:
- Prepare the Trimmer: Drain any remaining fuel from the fuel tank. Place the trimmer on a stable, flat surface.
- Remove Air Filter Cover: Locate and remove the air filter cover and air filter element. This will expose the carburetor.
- Disconnect Fuel Lines: Carefully disconnect the fuel lines from the existing carburetor. Note which line goes to the primer bulb and which goes to the fuel tank.
- Remove Throttle Linkage: Disconnect the throttle linkage from the carburetor.
- Unmount Old Carburetor: Remove the mounting bolts or nuts that secure the carburetor to the engine. Carefully pull the old carburetor away from the engine.
- Replace Gaskets: Remove and discard the old carburetor gaskets. Install the new gaskets provided in the kit. Ensure they are correctly oriented.
- Install New Carburetor: Mount the new Fricgore carburetor onto the engine, aligning it with the mounting studs. Secure it with the original bolts/nuts.
- Reconnect Throttle Linkage: Reattach the throttle linkage to the new carburetor. Ensure it moves freely.
- Connect Fuel Lines: Reconnect the fuel lines to the new carburetor. If replacing fuel lines or fuel filters, do so now. The kit includes new fuel lines and filters for this purpose.
- Replace Primer Bulb (if necessary): If your old primer bulb is cracked or hardened, replace it with one of the new primer bulbs from the kit.
- Replace Spark Plug: Using a spark plug wrench, remove the old spark plug. Install the new spark plug provided in the kit. Do not overtighten.
- Reassemble: Reinstall the air filter element and air filter cover.
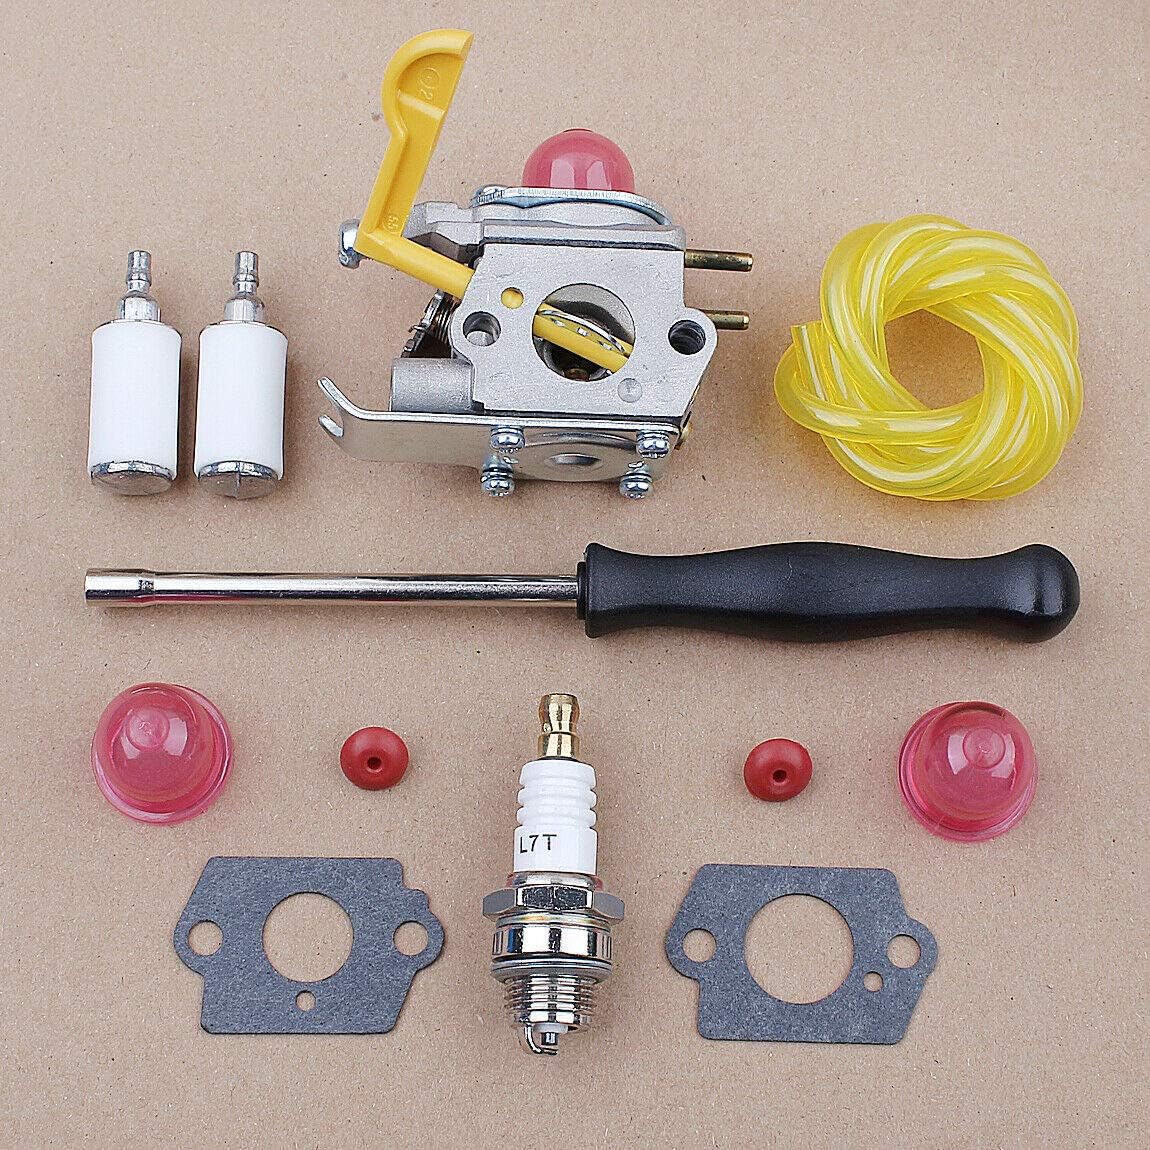
Figure 2: Detailed view of the carburetor, showing connections for fuel lines and the primer bulb, crucial for correct installation.
Operating Instructions (After Carburetor Replacement)
After installing the new carburetor, follow these steps to start and operate your trimmer:
- Refuel: Fill the fuel tank with the appropriate fuel mixture (gasoline and 2-stroke oil, as specified by your trimmer's manufacturer).
- Prime the Carburetor: Press the primer bulb repeatedly (usually 7-10 times) until fuel is visible in the bulb and flows freely through the fuel lines.
- Choke Setting: Set the choke lever to the "Full Choke" position (cold start).
- Starting: Pull the starter rope firmly and steadily until the engine "pops" or attempts to start.
- Partial Choke/Run: Once the engine pops, move the choke lever to the "Half Choke" or "Run" position (depending on your trimmer model).
- Restart: Pull the starter rope again until the engine starts and runs smoothly.
- Warm-up: Allow the engine to warm up for a minute or two before engaging the throttle fully.
Carburetor Adjustment:
Your new carburetor is typically pre-set for optimal performance. However, minor adjustments may be necessary for specific environmental conditions or if the engine is not running smoothly. Use the provided adjustment tool for this purpose.
- Idle Speed (T screw): Adjusts the engine's idle speed. Turn clockwise to increase, counter-clockwise to decrease.
- Low Speed (L screw): Controls the fuel mixture at low RPMs. Affects acceleration and idle quality.
- High Speed (H screw): Controls the fuel mixture at high RPMs. Affects maximum power and engine temperature.
Caution: Carburetor adjustments should be done carefully. Incorrect adjustments can lead to engine damage. If unsure, consult a qualified technician.
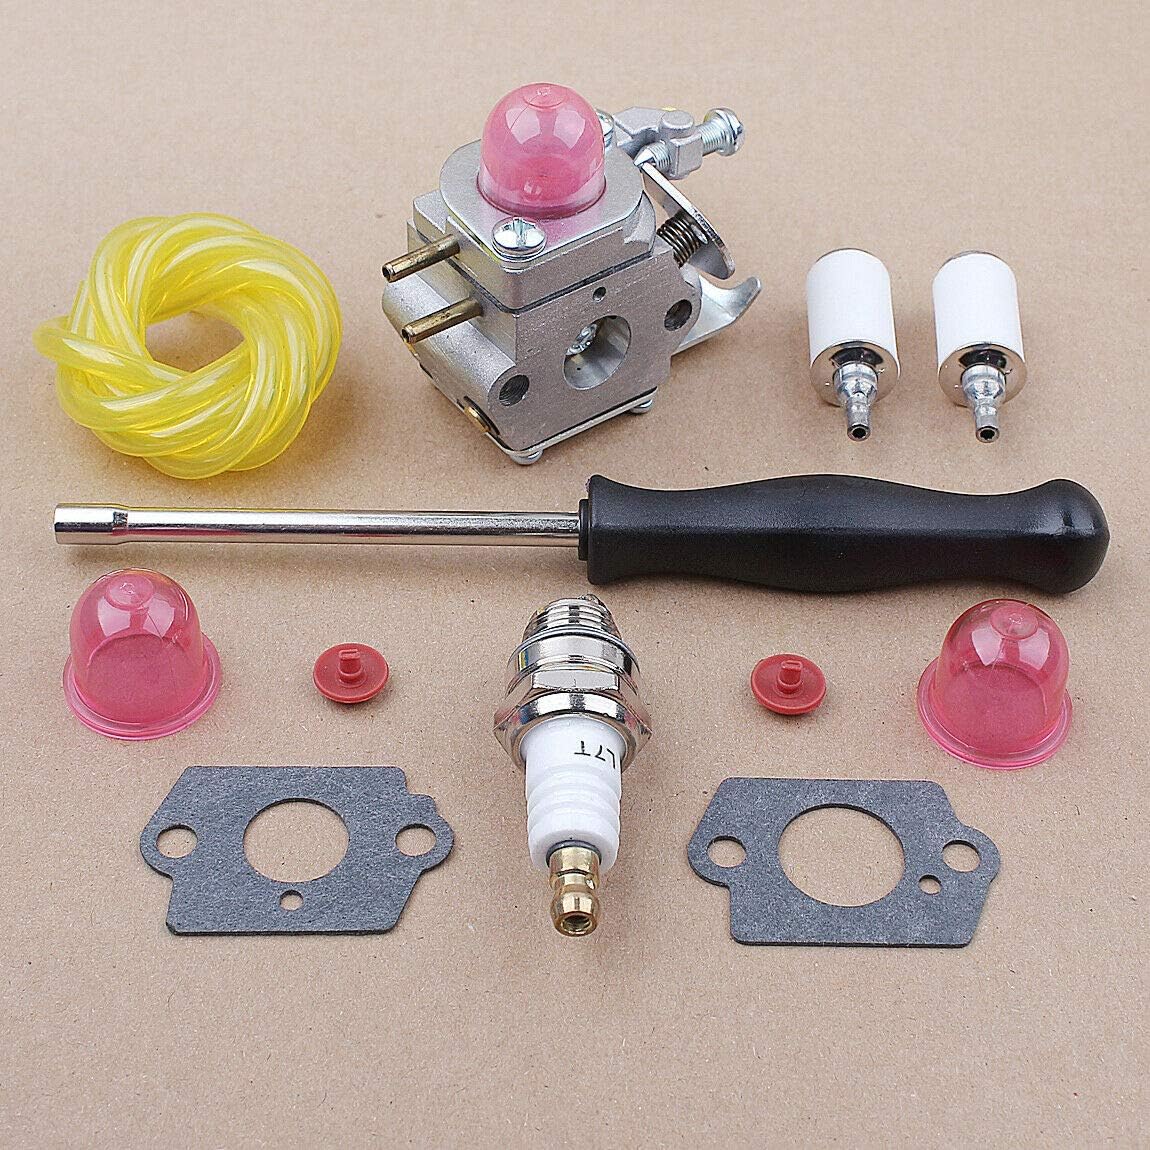
Figure 3: The carburetor showing the location of the adjustment screws (typically L, H, and T) and fuel line inlets.
Maintenance
Regular maintenance ensures the longevity and optimal performance of your carburetor and trimmer.
- Fuel Filters: Replace fuel filters periodically (e.g., annually or every 50 hours of operation) to prevent contaminants from reaching the carburetor. The kit includes two fuel filters for future replacements.
- Air Filter: Clean or replace the air filter regularly. A dirty air filter can restrict airflow and affect carburetor performance.
- Spark Plug: Inspect the spark plug for wear or fouling. Replace if necessary. The included spark plug is a new replacement.
- Fuel Quality: Always use fresh, clean fuel mixed with the correct ratio of 2-stroke oil. Stale fuel or incorrect mixtures can cause carburetor issues.
- Storage: Before long-term storage, drain the fuel tank and run the engine until it runs out of fuel to clear the carburetor. Alternatively, use a fuel stabilizer.

Figure 4: The included fuel filters and primer bulbs, essential components for routine maintenance and replacement.
Troubleshooting
If you encounter issues after installing the new carburetor, refer to the table below for common problems and solutions.
| Problem | Possible Cause | Solution |
|---|---|---|
| Engine won't start | No fuel, clogged fuel filter, spark plug issue, incorrect choke setting, air leak. | Check fuel level. Replace fuel filter. Inspect/replace spark plug. Adjust choke. Check for loose connections/gaskets. |
| Engine starts then dies | Improper fuel mixture, clogged fuel filter, carburetor needs adjustment. | Ensure correct fuel mix. Replace fuel filter. Adjust L (low speed) screw slightly. |
| Engine runs rough/lacks power | Dirty air filter, incorrect carburetor adjustment (H screw), old fuel. | Clean/replace air filter. Adjust H (high speed) screw. Use fresh fuel. |
| Fuel leaks | Loose fuel line connections, damaged primer bulb, improperly seated gaskets. | Tighten fuel line clamps. Replace primer bulb. Re-seat or replace gaskets. |
If problems persist after attempting these solutions, it is recommended to consult a professional small engine mechanic.
Specifications
- Product Type: Replacement Carburetor Kit
- Brand: Fricgore
- OEM Replacement For: 530071752, 530071822, 545081808, 530071750
- Carburetor Model Replaced: C1U-W18
- Power Source: Gasoline
- Recommended Use: String Trimmers (Poulan, Craftsman, Weed Eater, etc.)
- Included Components: Carburetor, Fuel Line, Spark Plug, Adjustment Tool, Fuel Filters (x2), Primer Bulbs (x2), Carb Gaskets (x2), Check Valves (x2)
Warranty and Support
For information regarding warranty coverage or technical support, please refer to the seller's policies or contact the Fricgore customer service directly. Always retain your proof of purchase for any warranty claims.
Important: Please allow 7-15 business days for item in transit if ordering replacement parts.