Andoer HDV-201LM
Andoer HDV-201LM 1080p Digital Video Camera User Manual
Model: HDV-201LM
1. Introduction
This manual provides detailed instructions for the safe and effective use of your Andoer HDV-201LM Digital Video Camera. Please read this manual thoroughly before operating the device and retain it for future reference.
The Andoer HDV-201LM is a 1080p Full HD digital video camera featuring a 5-megapixel CMOS sensor, capable of capturing video at 1920x1080p at 30 frames per second and still images up to 24 megapixels (interpolated). It includes a 16X digital zoom, a 3.0-inch TFT-LCD screen with 270-degree rotation, and supports external accessories via a hot shoe mount.
2. Package Contents
Verify that all items listed below are included in your package. If any items are missing or damaged, please contact your retailer.
- 1 x Andoer HDV-201LM Digital Video Camera
- 1 x Camera Bag
- 2 x Rechargeable 3.7V 800mAh Batteries (one pre-installed)
- 1 x USB Cable
- 1 x AV Cable
- 1 x Remote Control
- 1 x Camera User Manual (English)
- 1 x 0.39X Wide-Angle Lens
- 1 x External Microphone
- 1 x Microphone Connection Cable
- 1 x Microphone User Manual (Chinese)
Note: A memory card is not included. A Class 10 or higher SD card (up to 32GB) is strongly recommended for optimal performance.
3. Parts Identification
Familiarize yourself with the various components of your digital video camera.

Figure 3.1: Front view of the Andoer HDV-201LM camera with attached wide-angle lens and external microphone.

Figure 3.2: Detailed views highlighting the hot shoe mount, control buttons, battery compartment, and 1/4-inch tripod thread.
- Lens: Main optical component for capturing images and videos.
- LCD Screen: 3.0-inch TFT-LCD display for viewing and menu navigation. Rotates 270 degrees.
- Power Button: Turns the camera on or off.
- Record/Stop Button: Initiates or stops video recording.
- Photo Button: Captures still images.
- Zoom Lever (W/T): Adjusts digital zoom (Wide/Telephoto).
- Menu Button: Accesses camera settings.
- Navigation Buttons: Used for menu navigation and selection.
- Hot Shoe Mount: For attaching external accessories like microphones or LED lights.
- Tripod Thread: 1/4-inch thread for mounting the camera on a tripod.
- Battery Compartment: Houses the rechargeable battery.
- SD Card Slot: For inserting a memory card.
- USB Port: For connecting to a computer or charging.
- AV Output: For connecting to a television.
- LED Fill Light: Provides additional illumination in low-light conditions.
4. Setup
4.1. Charging the Battery
- Open the battery compartment cover.
- Insert the provided 3.7V 800mAh battery, ensuring correct polarity. If an insulator tab is present, remove it before insertion.
- Close the battery compartment cover.
- Connect the camera to a power source using the USB cable. The charging indicator will illuminate.
- Once fully charged, the indicator light will change or turn off.
4.2. Inserting a Memory Card
- Ensure the camera is powered off.
- Locate the SD card slot.
- Insert a Class 10 or higher SD card (up to 32GB) into the slot until it clicks into place.
- To remove, gently press the card until it springs out.
4.3. Attaching the Wide-Angle Lens
- Remove the protective cap from the camera lens.
- Carefully screw the 0.39X wide-angle lens onto the camera's main lens thread until secure.

Figure 4.1: The camera with the 0.39X super wide-angle lens attached, demonstrating its expanded field of view.
4.4. Attaching the External Microphone
- Slide the external microphone into the hot shoe mount on top of the camera.
- Connect the microphone cable to the camera's external microphone input port.
5. Operating the Camera
5.1. Powering On/Off
- To power on, open the LCD screen or press the Power button.
- To power off, close the LCD screen or press and hold the Power button.
5.2. Recording Videos
- Ensure the camera is in video mode (indicated on the LCD screen). If not, press the Mode button to switch.
- Press the Record/Stop button to start recording. A red indicator will typically flash.
- Press the Record/Stop button again to stop recording.
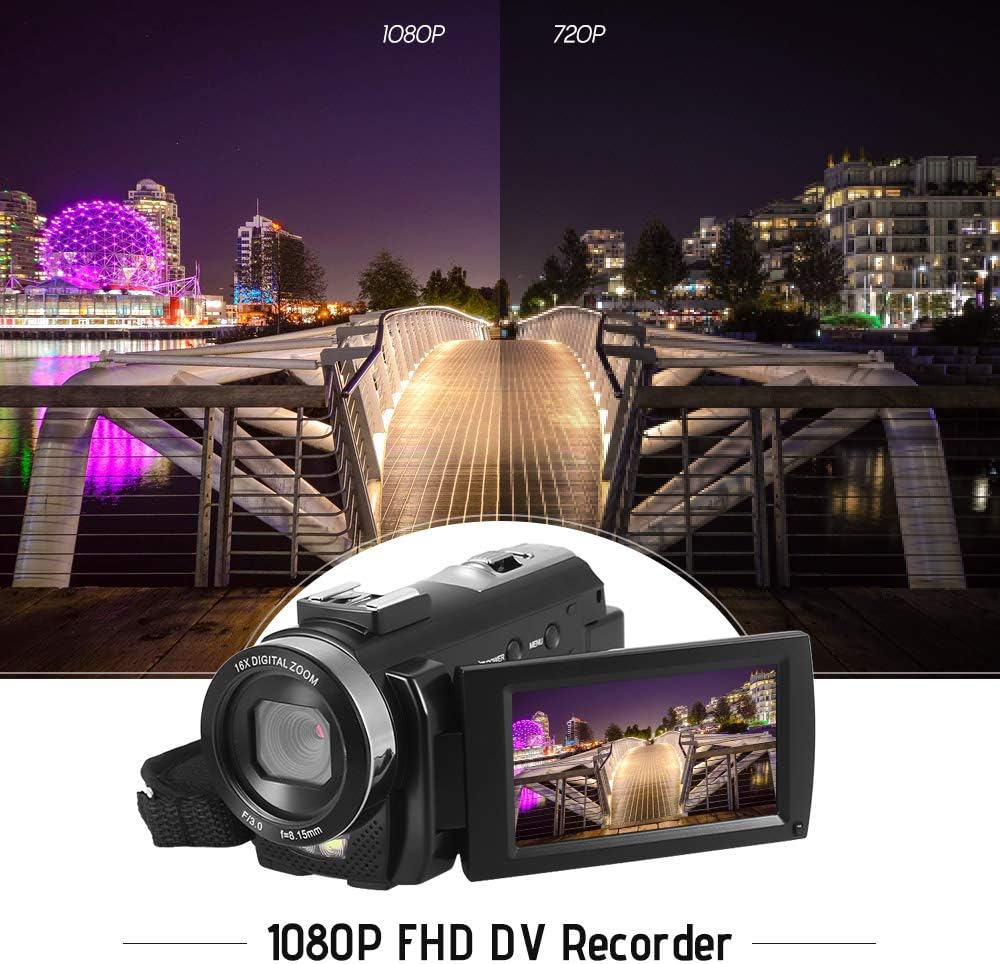
Figure 5.1: The camera is capable of recording in 1080p Full HD and 720p HD resolutions.
5.3. Taking Photos
- Ensure the camera is in photo mode. If not, press the Mode button to switch.
- Frame your shot using the LCD screen.
- Press the Photo button to capture an image.
5.4. Using Digital Zoom
- Use the W (Wide) and T (Telephoto) lever to adjust the 16X digital zoom.

Figure 5.2: The camera's 16X digital zoom allows for closer views of subjects.
5.5. Menu Settings
- Press the Menu button to access settings.
- Use the navigation buttons to scroll through options such as:
- White Balance: Auto, Daylight, Cloudy, Fluorescent, Tungsten.
- Scene Mode: Auto, Night, Portrait, Landscape, Backlight, Sport, Party, Beach, High Sensitivity.
- Shooting Mode: Single, Continuous.
- Exposure: Adjust ±3.0EV.
- Self-Timer: Off, 2s, 5s, 10s.
- Auto Power Off: Off, 1min, 3min, 5min.
- Language: English, German, French, Spanish, Italian, Turkish, Russian, Portuguese, Dutch, Simplified Chinese, Traditional Chinese, Japanese, Polish.
- Other Functions: Face Detection, Smile Capture, Beauty Face, Anti-Shake.
- Press the OK or Record/Stop button to confirm selections.
- Press the Menu button again to exit.
5.6. Connecting to a TV
- Use the provided AV cable to connect the camera's AV output to your television's AV input.
- Select the correct AV input channel on your TV to view camera content.
6. Maintenance
6.1. Cleaning the Camera
- Use a soft, dry cloth to clean the camera body.
- For the lens and LCD screen, use a specialized lens cleaning cloth and solution. Avoid harsh chemicals.
6.2. Storage
- Store the camera in a cool, dry place away from direct sunlight and extreme temperatures.
- Remove the battery if the camera will not be used for an extended period.
7. Troubleshooting
| Problem | Possible Cause | Solution |
|---|---|---|
| Camera does not power on. | Battery is depleted or not inserted correctly. | Charge the battery fully. Ensure the battery is inserted with correct polarity and the insulator tab is removed. |
| Cannot record video or take photos. | Memory card is full, not inserted, or corrupted. | Insert a memory card. Delete unnecessary files or format the card (this will erase all data). Replace the card if corrupted. |
| Poor video/image quality. | Insufficient lighting, dirty lens, or incorrect settings. | Ensure adequate lighting. Use the LED fill light if necessary. Clean the lens. Adjust white balance and scene mode settings. |
| Camera freezes or becomes unresponsive. | Software glitch or low battery. | Remove and reinsert the battery to reset the camera. Ensure the battery is charged. |
8. Specifications
| Feature | Specification |
|---|---|
| Brand | Andoer |
| Model | HDV-201LM |
| Image Sensor | 5 Megapixel CMOS Sensor |
| Video Resolution | 1920x1080P (FHD 30fps), 1280x720 (HD 30fps), 640x480 (VGA 30fps), 320x240 (VGA 30fps) |
| Video Format | AVI |
| Image Resolution | 24MP (Interpolated), 20MP (Interpolated), 16MP (Interpolated), 12MP (Interpolated), 10MP (Interpolated), 7M Wide (Interpolated), 5MP, 3MP, 2M Wide, VGA |
| Image Format | JPG |
| Digital Zoom | 16X |
| Lens | ff (F/3.0 f=8.15mm) |
| Max Aperture | 8.15 F |
| LCD Screen | 3.0-inch TFT-LCD (16:9), 270-degree rotation |
| Storage | SD Card (up to 32GB, Class 10 recommended) |
| Connectivity | USB 2.0, AV Output (NTSC/PAL) |
| Power Supply | 1 x 3.7V 800mAh Rechargeable Battery |
| Remote Control Battery | 1 x 3V CR2025 Battery |
| Operating System Support | Windows XP/Vista/7/8/10 |
| Special Features | Anti-shake, Face Detection, Smile Capture, Beauty Face, Self-Timer, LED Fill Light, Hot Shoe Mount |
| Dimensions | 13.5 x 5.5 x 6.5 cm (5.3 x 2.2 x 2.6 in) |
| Weight | 273g (9.6oz) with battery |
| Color | Black |
9. Warranty and Support
For warranty information and technical support, please refer to the documentation provided with your purchase or contact your retailer. Keep your proof of purchase for any warranty claims.
Related Documents - HDV-201LM
 |
15.6 Inch Smart Digital Calendar: User Manual and Setup Guide User manual for the 15.6-inch Smart Digital Calendar, a 1080P touchscreen WiFi interactive display with Fotocube APP. Learn about setup, operation, safety, and maintenance for family scheduling and photo display. |
 |
Andoer 10.1 Inch WiFi Smart Digital Photo Frame Overview Discover the features and specifications of the Andoer 10.1-inch WiFi smart digital photo frame, featuring HD IPS touchscreen, 16GB storage, and easy photo sharing. |
 |
Andoer Professional Studio Photography Light Kit User Guide Detailed specifications and features of the Andoer Professional Studio Photography Light Kit, including 85W LED lighting, adjustable softbox, and remote control operation. |
 |
Andoer Q30 Tripod Ball Head Product Manual Product manual and specifications for the Andoer Q30 Tripod Ball Head, featuring aluminum alloy construction, 5KG max load, and 1/4 inch screw compatibility. |
 |
Andoer Multi-functional Phone Holder Clamp User Manual User manual and specifications for the Andoer multi-functional phone holder clamp, featuring dual cold shoe mounts and universal compatibility for smartphones. |
 |
Andoer Studio Photography Light Kit Product Manual This product manual provides detailed specifications and package contents for the Andoer Studio Photography Light Kit, featuring 85W LED lights, adjustable brightness, and softboxes for professional studio portrait, product, and video photography. |
Ask a question about this manual
Ask about setup, troubleshooting, compatibility, parts, safety, or missing instructions. Manuals+ will review the question and use this page’s manual context to help answer it.