1. Introduction
This manual provides detailed instructions for the installation, operation, and maintenance of your YUNTX 10.1 Inch Android 10 Car Stereo. This unit is designed to be compatible with Mitsubishi Lancer models from 2010 to 2017, offering advanced features such as GPS navigation, Bluetooth connectivity, split-screen functionality, and steering wheel control support. Please read this manual thoroughly before installation and use to ensure proper functionality and safety.
2. What's in the Box
Verify that all components listed below are included in your package:
- 1 x ISO Wiring Harness
- 1 x GPS Antenna
- 1 x Metal Frame
- 2 x RCA Cables
- 2 x USB Cables
- 1 x External MIC Adaptor
- 1 x User Manual
Video: Overview of included components (starts at 2:34).
3. Installation Guide
Professional installation is recommended. Ensure the vehicle's power is disconnected before beginning installation.
3.1 Wiring Diagram
Refer to the diagram below for proper connection of the power socket, RCA outputs, USB cables, GPS antenna, and radio antenna.
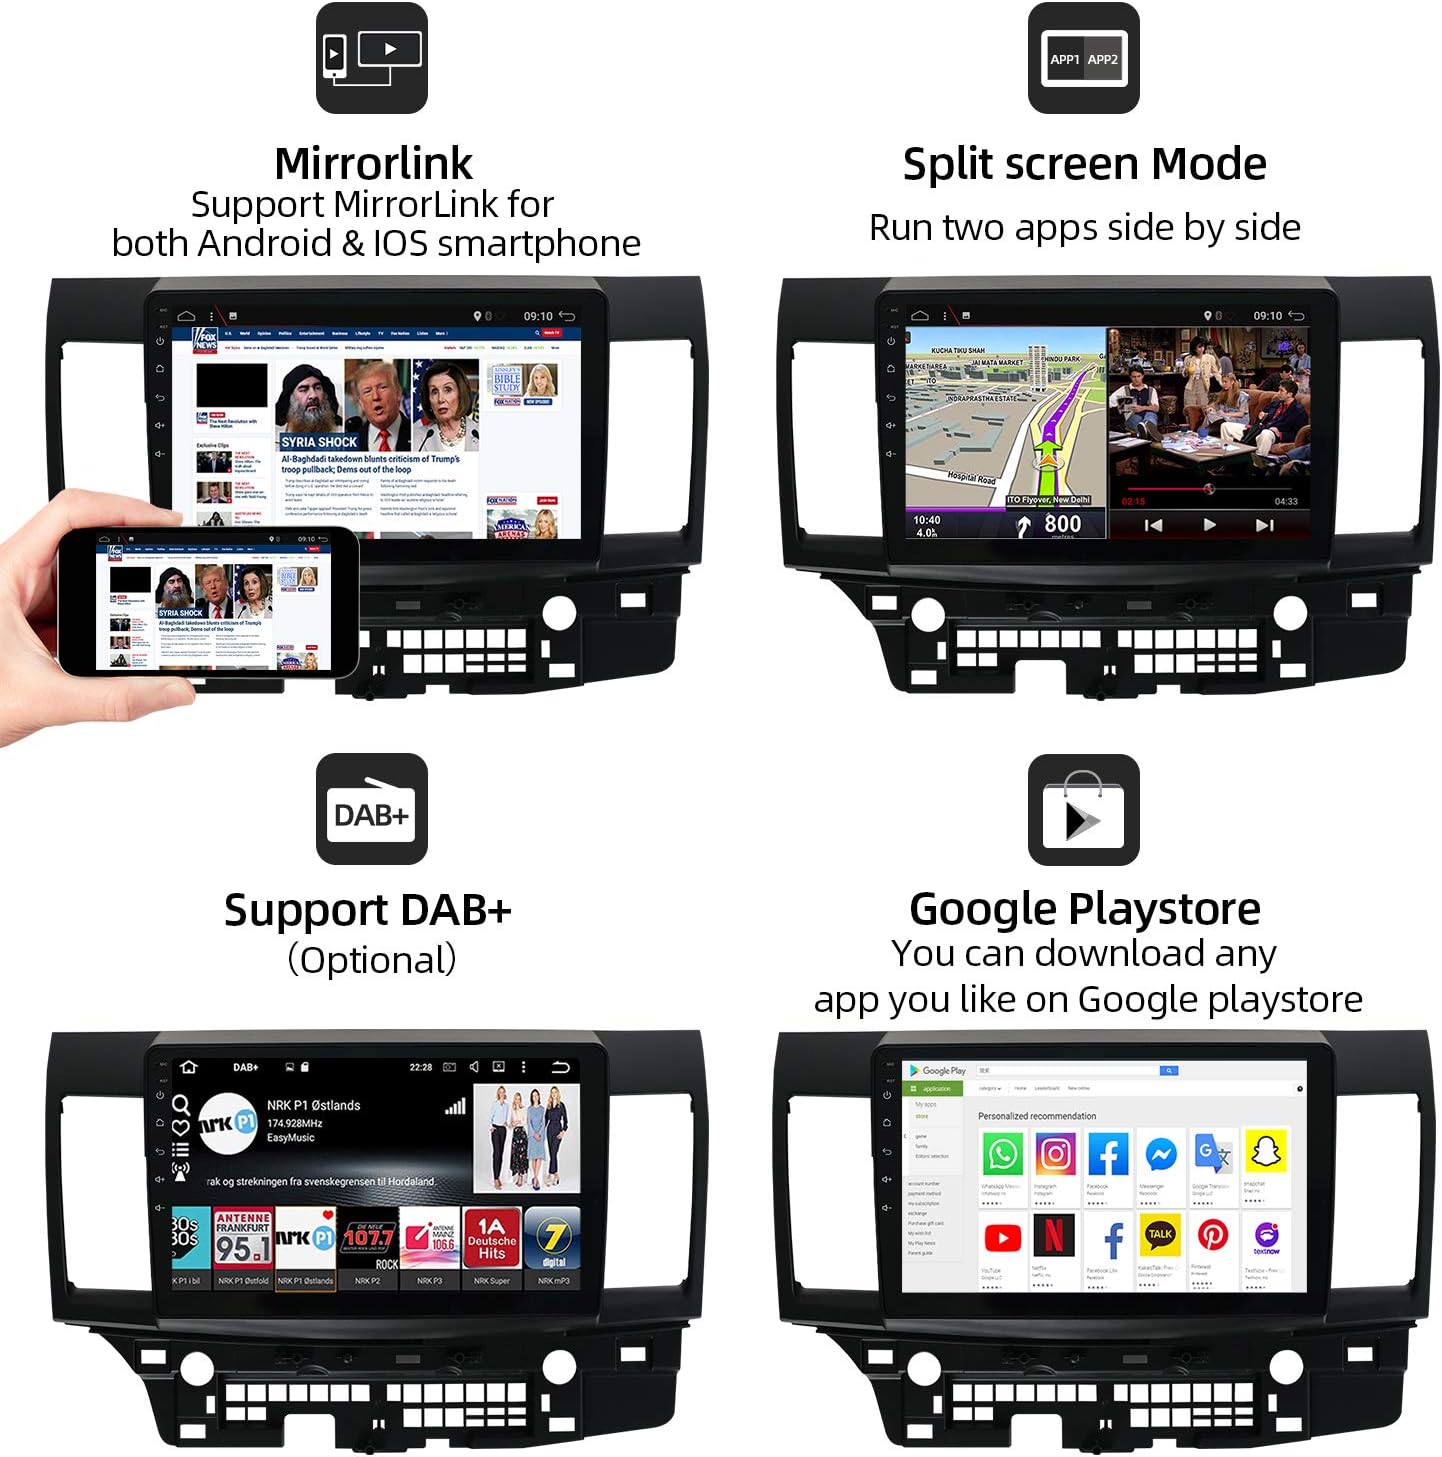
Image: Rear view of the car stereo with labeled connection points for various cables.
3.2 Vehicle Fitment
This unit is designed to integrate seamlessly into Mitsubishi Lancer models from 2010 to 2017. The image below illustrates the appearance before and after installation.

Image: Comparison of the car's dashboard with the original radio versus the YUNTX Android 10 Car Stereo installed.
4. Operating Instructions
This section details the primary functions and how to operate your YUNTX Android 10 Car Stereo.
4.1 GPS Navigation
The unit features built-in GPS navigation with support for offline maps and real-time traffic updates. You can use pre-installed maps or download your preferred navigation apps from the Google Play Store.

Image: Display showing GPS navigation with a route on a map.
Video: Demonstrating GPS navigation functionality (starts at 2:15).
4.2 Bluetooth Connectivity
Connect your smartphone via Bluetooth for hands-free calling and audio streaming. The unit supports phone's Bluetooth tethering for internet access and file transfer.
Video: Demonstrating Bluetooth phone call functionality (starts at 2:25).
4.3 Split Screen Mode
Utilize the split-screen feature to run two applications simultaneously, such as navigation and music playback.

Image: Display showing navigation on one side and a media player on the other.
Video: Demonstration of activating and using split screen mode (starts at 0:21).
4.4 Steering Wheel Control (SWC)
Configure your steering wheel buttons to control the car stereo functions for convenience and safety.

Image: Interface for programming steering wheel controls.
Video: Guide on setting up steering wheel controls (starts at 1:23).
4.5 Rear Camera Input
The unit supports rear camera input, providing a clear view of the area behind your vehicle when reversing. A free rear camera is included with your purchase.

Image: Rear camera display with dynamic parking lines.
Video: Demonstration of rear camera input (starts at 1:14).
4.6 Wi-Fi & 4G Connectivity
Connect to the internet via Wi-Fi hotspot from your smartphone or by purchasing a 4G dongle. This enables online movies, web browsing, and app downloads.
Video: Setting up Wi-Fi connection (starts at 0:48).
4.7 EasyConnection (Mirror Link)
The EasyConnection feature allows you to mirror your smartphone's screen to the car stereo display via USB or Wi-Fi, supporting both Android and iOS devices.

Image: Mirror Link functionality displaying a phone screen on the head unit.
Video: Guide on using EasyConnection for screen mirroring (starts at 0:34).
4.8 FM/AM Tuner with RDS
Access your favorite radio stations with the built-in FM/AM tuner, featuring RDS (Radio Data System) for enhanced information display.
Video: Demonstrating FM/AM radio tuning (starts at 0:58).
4.9 Equalizer (EQ) Settings
Customize your audio experience with the integrated equalizer, offering various presets (Flat, Pop, Easy, Rock, Classic, Jazz, User) and manual adjustments for frequency levels.
Video: Adjusting equalizer settings (starts at 1:56).
4.10 Customizable Interface
Personalize your stereo with multi-color button lighting and custom wallpapers.
Video: Customizing button colors (starts at 1:00).
Video: Changing wallpapers (starts at 1:36).
4.11 Car Performance Monitoring
The unit supports real-time car performance monitoring through compatible OBD2 devices (sold separately) and the 'Torque' app.
Video: Displaying car performance data using the Torque app (starts at 1:10).
5. Specifications
| Feature | Detail |
|---|---|
| Operating System | Android 10 |
| RAM | 2 GB (as per product title, JSON spec says 1GB, using title for clarity) |
| ROM | 32 GB (as per product title) |
| Screen Size | 10.1 Inches |
| Resolution | 1024 x 600 |
| Wireless Communication | AM/FM, RDS, Bluetooth, Wi-Fi |
| Connectivity Technologies | Bluetooth, Cellular (via dongle), Wi-Fi |
| Special Features | Bluetooth, Touchscreen, GPS, Split Screen, SWC Support, Rear Camera Input |
| Map Type | Supports both online and offline maps |
| Mounting Type | Panel Mount |
| Item Weight | 4.59 pounds |
| Package Dimensions | 18.7 x 14.6 x 7 inches |
6. Troubleshooting
If you encounter issues with your car stereo, refer to the following common troubleshooting steps:
- No Power: Check all power connections and fuses. Ensure the ignition wire is correctly connected.
- No Sound: Verify speaker wiring connections. Check the audio settings (volume, balance, fader, EQ). Ensure the amplifier (if external) is powered on.
- GPS Signal Lost: Ensure the GPS antenna is properly installed and has a clear view of the sky. Check antenna connection to the unit.
- Bluetooth Connection Issues: Ensure Bluetooth is enabled on both the stereo and your mobile device. Delete previous pairings and try reconnecting.
- Touchscreen Unresponsive: Try restarting the unit. If the issue persists, a factory reset may be necessary (note: this will erase all user data).
- Unit Freezes/Crashes: Perform a soft reset by pressing the RST button (if available) or by disconnecting and reconnecting the power.
For persistent issues, please contact customer support.
7. Maintenance
To ensure the longevity and optimal performance of your YUNTX car stereo, follow these maintenance guidelines:
- Cleaning: Use a soft, dry cloth to clean the screen and exterior. Avoid abrasive cleaners or solvents.
- Software Updates: Periodically check for available software updates to improve performance and add new features. Follow the instructions provided with the update package carefully.
- Environmental Conditions: Avoid exposing the unit to extreme temperatures, direct sunlight for prolonged periods, or excessive moisture.
8. Warranty and Support
Your YUNTX car stereo comes with a manufacturer's warranty. Please refer to the warranty card included in your package for specific terms and conditions. For technical support, troubleshooting assistance, or warranty claims, please contact YUNTX customer service through the retailer where the product was purchased or visit the official YUNTX website.