Keurig K-SLIM K901
Keurig K-Slim + ICED Single Serve Coffee Maker Instruction Manual
Model: K-SLIM K901
Product Overview
The Keurig K-Slim + ICED Single Serve Coffee Maker is designed for convenience and versatility, allowing you to brew both hot and delicious iced coffee. Its slim profile makes it ideal for smaller spaces, while offering multiple brew sizes to suit your preference.

Image: The Keurig K-Slim + ICED Coffee Maker, showcasing its ability to brew both hot and iced beverages. The machine is blue with silver accents, brewing into a white mug, with a tall glass of iced coffee beside it.
Setup
Initial Setup
- Unpack: Carefully remove all packaging materials from the coffee maker.
- Placement: Place the coffee maker on a stable, level surface. Ensure there is adequate space around the unit for proper ventilation.
- Rinse Water Reservoir: Remove the water reservoir from the back of the unit. Wash it with warm, soapy water and rinse thoroughly.
- Fill Water Reservoir: Fill the reservoir with fresh, filtered water up to the MAX fill line. The reservoir holds up to 46 oz of water.
- First Brew (Cleansing Brew): Place a large mug on the drip tray. Do not insert a K-Cup pod. Close the handle. Select the 12 oz brew size. Press the brew button. Discard the hot water. This process cleanses the system.

Image: Side view of the Keurig K-Slim + ICED Coffee Maker, highlighting its clear water reservoir located at the back of the unit.
Operating Instructions
Brewing Hot Coffee
- Power On: Ensure the coffee maker is plugged in and the power button is illuminated.
- Add Water: Verify that the water reservoir has sufficient water. If the 'Add Water' light is on, refill the reservoir.
- Insert K-Cup Pod: Lift the handle and place a K-Cup pod into the K-Cup pod holder. Lower the handle completely to pierce the pod.
- Place Mug: Place a mug on the drip tray. For larger mugs or travel mugs (up to 7.0 inches tall), the drip tray can be removed.
- Select Brew Size: Choose your desired brew size: 8 oz, 10 oz, or 12 oz. The selected button will illuminate.
- Brew: The brewing process will begin automatically. Once complete, the selected brew size button will turn off.
- Remove Pod: Carefully lift the handle and remove the used K-Cup pod.

Image: A close-up of the Keurig K-Slim + ICED Coffee Maker's control panel, showing the 'Add Water', 'Descale', and brew size buttons (8oz, 10oz, 12oz).
Brewing Iced Coffee
The K-Slim + ICED brewer features a dedicated 'Brew Over Ice' setting that automatically adjusts the brew temperature. It starts hotter to extract full flavor, then cools down to minimize ice melt, ensuring a strong, flavorful iced beverage.
- Fill with Ice: Fill a large, ice-filled tumbler (do not use glass) with ice.
- Insert K-Cup Pod: Insert your preferred K-Cup pod.
- Select 12 oz: Choose the 12 oz brew size. The machine will automatically adjust for iced brewing.
- Brew: Press the 12 oz button to begin brewing.

Image: Visual representation of the Keurig K-Slim + ICED Coffee Maker's dual capability, showing a hot coffee mug and an iced coffee glass with the text 'HOT & ICED'.
Travel Mug Compatibility
The drip tray is removable to accommodate travel mugs up to 7.0 inches tall.

Image: The Keurig K-Slim + ICED Coffee Maker with its removable drip tray, demonstrating its compatibility with travel mugs up to 7.0 inches in height.
Maintenance and Care
Cleaning the Drip Tray
The drip tray collects overflow and drips, keeping your counter clean. It should be emptied and cleaned regularly.
- Remove: Slide the drip tray assembly towards you to remove it.
- Empty and Clean: Empty any accumulated liquid. Wash the drip tray and drip tray plate with warm, soapy water. Rinse thoroughly.
- Replace: Slide the drip tray assembly back onto the base, ensuring it clicks into place.
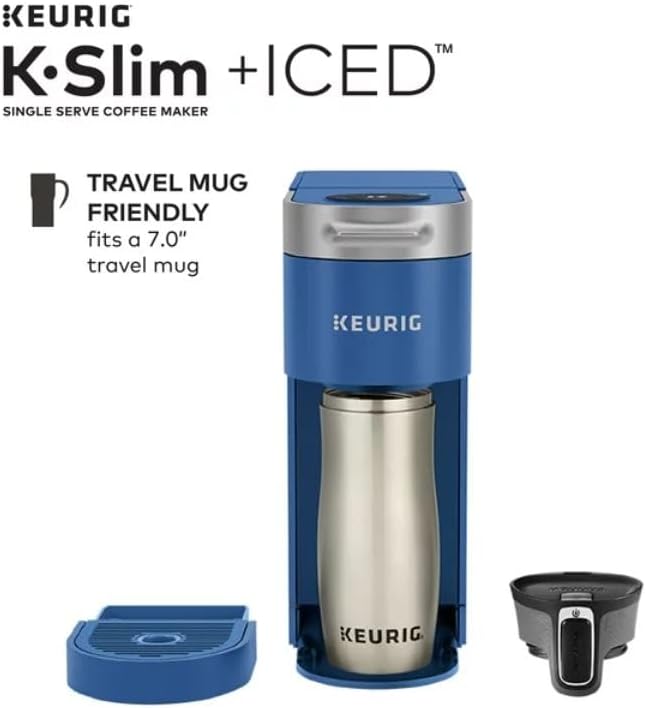
Image: A detailed view of the Keurig K-Slim + ICED Coffee Maker's removable drip tray, designed to catch spills and drips.
Descaling Your Brewer
Mineral deposits can build up in your coffee maker over time, affecting performance. The 'Descale' indicator light will illuminate when descaling is recommended. Follow the descaling instructions provided in the full user manual or on the Keurig website.
General Cleaning
Wipe down the exterior of the brewer with a damp, non-abrasive cloth. Do not immerse the brewer in water or other liquids.
Troubleshooting
- Brewer Not Powering On: Ensure the power cord is securely plugged into a grounded outlet.
- 'Add Water' Light Stays On: Check that the water reservoir is filled to the MAX fill line and properly seated.
- 'Descale' Light Stays On After Descaling: Ensure the descaling process was completed according to the full instructions. Sometimes, a second descaling cycle may be necessary for stubborn mineral buildup.
- Coffee Not Brewing: Verify a K-Cup pod is properly inserted and the handle is fully lowered. Check water level.
- Weak Coffee: Ensure you are using fresh K-Cup pods. Consider a smaller brew size for a stronger cup.
Specifications
| Feature | Detail |
|---|---|
| Brand | Keurig |
| Model Number | K-SLIM K901 |
| Product Dimensions | 12.5 x 4.76 x 14.75 inches |
| Item Weight | 8.58 pounds |
| Coffee Maker Type | Drip Coffee Machine |
| Filter Type | Built-in K-Cup Filter |
| Operation Mode | Fully Automatic |
| Human Interface Input | Buttons |
| Unit Count | 1.0 Count |
| Coffee Input Type | pods |
| UPC | 611247397688 |
Warranty and Support
For detailed warranty information and customer support, please refer to the official Keurig website or contact Keurig customer service directly. Keep your proof of purchase for warranty claims.
Online Support: www.keurig.com/support
Phone Support: Refer to your product packaging or the official website for the most current contact numbers.