
1. Introduction
This manual provides essential information for the installation, operation, and maintenance of your caSino187 Front Bumper IR Sensor, designed for Roomba e Series robotic vacuum cleaners. This sensor is a critical component that enables your Roomba to detect virtual walls, locate its charging dock, and respond to remote control signals.
Compatibility: This sensor is specifically designed for Roomba e Series models, including e5 and e6. It is not compatible with older Roomba 500, 600, 700, 800, or 900 series models.

Figure 1: caSino187 Front Bumper IR Sensor. This image shows the complete sensor unit with its attached wiring harness and connector.
2. Safety Information
Please read and understand all safety instructions before attempting installation or maintenance. Failure to follow these instructions may result in damage to the product or your Roomba device.
- Always disconnect your Roomba from its power source and remove the battery before performing any maintenance or part replacement.
- Use appropriate tools for disassembly and reassembly.
- Handle electronic components with care to avoid static discharge damage.
- Keep small parts away from children and pets.
- If you are unsure about any step, consult a qualified technician or refer to official Roomba service guides.
3. Package Contents
Verify that your package contains the following item:
- 1 x caSino187 Front Bumper IR Sensor (with integrated wiring harness)
4. Installation Guide
This section outlines the general steps for replacing the front bumper IR sensor in compatible Roomba e Series models. Specific disassembly steps may vary slightly by model. Refer to your Roomba's official service manual for detailed disassembly instructions if needed.
Required Tools:
- Small Phillips head screwdriver
- Pry tool (optional, for plastic panels)
Installation Steps:
- Prepare the Roomba:
Place your Roomba upside down on a clean, flat surface. Remove the side brush, bottom plate, and battery according to your Roomba's service instructions. This ensures the device is powered off and safe to work on.
- Access the Bumper Assembly:
Carefully remove the screws securing the main chassis or bumper assembly. You may need to detach the bumper from the main body to access the internal components. Be gentle to avoid damaging plastic clips or wires.
- Locate the Old Sensor:
Identify the existing IR sensor within the front bumper. It will typically be a small, circular component with wires leading to a connector on the main circuit board.

Figure 2: View of the sensor component with its wiring. The sensor is typically mounted within the bumper housing.
- Disconnect the Old Sensor:
Gently disconnect the wiring harness of the old sensor from its port on the Roomba's circuit board. Note the routing of the wires to ensure proper reinstallation.

Figure 3: Close-up of the sensor's wiring connector. Ensure proper alignment when connecting.
- Remove the Old Sensor:
Unscrew or unclip the old sensor from its mounting position within the bumper. Keep any screws or mounting hardware for reuse.
- Install the New Sensor:
Position the new caSino187 IR sensor in the same location as the old one. Secure it using the original screws or clips. Ensure the sensor is oriented correctly.
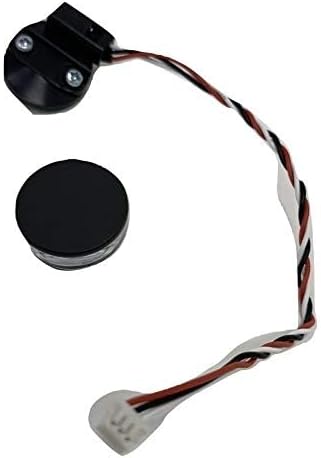
Figure 4: The new sensor component ready for installation. Note the clear lens for infrared signal transmission.
- Connect the New Sensor:
Carefully connect the wiring harness of the new sensor to the appropriate port on the Roomba's circuit board. Ensure the connection is secure and the wires are routed without pinching.
- Reassemble the Roomba:
Reattach the bumper assembly, main chassis, battery, bottom plate, and side brush in reverse order of disassembly. Ensure all screws are tightened appropriately and no wires are caught.
- Test Functionality:
Place the Roomba on its charging dock to confirm it docks correctly. Test its ability to detect virtual walls (if you have them) and respond to remote control commands.
5. Operating Principles
The Front Bumper IR Sensor is an integral part of your Roomba's navigation system. It functions by emitting and detecting infrared signals. These signals allow the Roomba to:
- Detect Virtual Walls: The sensor receives infrared beams from Virtual Wall barriers, preventing the Roomba from entering restricted areas.
- Locate Charging Dock: The sensor detects infrared signals emitted by the Home Base, guiding the Roomba back for recharging.
- Respond to Remote Control: If your Roomba model supports it, the sensor receives commands from a compatible remote control.
Proper functioning of this sensor is crucial for the Roomba's autonomous operation and efficient cleaning.
6. Maintenance
To ensure optimal performance and longevity of your IR sensor, follow these simple maintenance guidelines:
- Keep Clean: Periodically wipe the clear lens of the sensor with a soft, dry, lint-free cloth. Dust or debris on the lens can interfere with signal detection.
- Avoid Obstruction: Ensure that the area around the sensor on the Roomba's bumper is free from obstructions or excessive dirt buildup.
- Gentle Handling: When cleaning or handling your Roomba, avoid applying excessive force directly to the sensor area.
7. Troubleshooting
If you experience issues after replacing the IR sensor, consider the following:
- Roomba cannot find charging dock or virtual walls:
- Verify the sensor's lens is clean and free of obstructions.
- Ensure the sensor's wiring harness is securely connected to the Roomba's circuit board.
- Check that the sensor is correctly seated and oriented within the bumper.
- Confirm that your virtual walls or charging dock are powered on and functioning correctly.
- Roomba drives past the charging dock or "thrashes" around it:
- This symptom may indicate a calibration issue or improper signal reception. Double-check the sensor's connection.
- Ensure the sensor's wiring is not pinched or damaged during reassembly.
- If the issue persists, the sensor may require recalibration (which typically requires specialized tools or service) or could be faulty. Contact customer support for further assistance.
- Roomba does not respond to remote control:
- Ensure the remote control has fresh batteries and is pointed correctly at the Roomba.
- Verify the sensor's lens is clean.
- Confirm your Roomba model supports remote control functionality.
8. Specifications
| Brand | caSino187 |
| Model Number | e5 (compatible with e Series) |
| Compatibility | Roomba e Series (e5, e6) |
| Function | Detects Virtual Walls, Charging Dock, Remote Control Signals |
| Connectivity Technology | Infrared |
| Item Weight | 0.81 ounces |
| Package Dimensions | 3 x 3 x 0.06 inches |
| Material | Plastic |
| Color | Black |
| UPC | 611193248799 |
9. Warranty and Support
For warranty information, technical support, or assistance with installation and troubleshooting, please contact the seller directly through your purchase platform. Provide your order details and a clear description of the issue for prompt assistance.
Seller: caSino187