KETOTEK Programmable Electric Underfloor Heating Thermostat
Model: M9.716 | Brand: KETOTEK
1. Introduction
Thank you for choosing the KETOTEK Programmable Electric Underfloor Heating Thermostat. This device is designed to provide precise and efficient temperature control for your electric underfloor heating system, ensuring comfort and energy savings. Please read this manual carefully before installation and operation to ensure safe and correct use.

Image: Front view of the KETOTEK Programmable Electric Underfloor Heating Thermostat.
2. Key Features
- Easy and Safe to Use: Simple installation and compatibility with electric underfloor heating systems. Features a large, easy-to-read LCD screen with backlight.
- Flexible Weekly Programming: Offers 5/2 days, 6/1 days, and 7-day programming options, allowing individual scheduling with up to 6 period settings per day for optimal energy saving.
- Two Operating Modes: Choose between programmable mode (5+2/6+1/7 days) and manual mode for maintaining a constant room temperature.
- Internal and External Sensor Selection: Equipped with a built-in air sensor and a 3m external temperature sensor probe. You can select to use the integrated sensor, floor sensor, or both.
- Additional Professional Functions: Includes temperature calibration, child safety lock, frost protection, high/low temperature protection, and data storage during power-off.
3. Package Contents
Upon opening your KETOTEK Thermostat package, please verify that all components are present and undamaged:
- 1 x KETOTEK Programmable Thermostat
- 1 x 3-meter External Temperature Sensor Probe
- 1 x User Manual
- Mounting Screws

Image: The thermostat, external sensor, mounting screws, and user manual as included in the package.
4. Product Overview
Familiarize yourself with the thermostat's display and control buttons:

Image: Detailed diagram showing the various buttons and display indicators on the thermostat's screen.
- UP (▲): Increases temperature setting or navigates up in menus.
- DOWN (▼): Decreases temperature setting or navigates down in menus.
- Menu Key (Book Icon): Accesses programming and advanced settings.
- Manual Mode (Hand Icon): Toggles between manual and programmed modes.
- Clock Key (Clock Icon): Sets time and date.
- ON/OFF (Power Icon): Powers the thermostat on or off.
- Room Temperature Display: Shows the current ambient temperature.
- Set Value/Time Display: Shows the target temperature or current time.
- Heating On Indicator: Icon indicating when the heating system is active.
- Sensor: Location of the internal air sensor.
5. Setup and Installation
Installation should be performed by a qualified electrician in accordance with local wiring regulations. Ensure power is disconnected before beginning installation.
Wiring Diagram

Image: Wiring diagrams illustrating both 4-wire and 3-wire connection methods for the thermostat, including connections for the external sensor and heating cable.
The thermostat is designed for recessed mounting. Connect the power supply (AC 230V, 50/60Hz) and the heating load (max 16A) according to the provided wiring diagrams. The external sensor should be connected as shown if a floor temperature reading is desired.
6. Operating Instructions
Power On/Off
Press the Power Icon button to turn the thermostat on or off.
Setting Temperature
In manual mode, use the UP (▲) and DOWN (▼) buttons to adjust the desired temperature. The display will show the set temperature briefly before returning to the current room temperature.
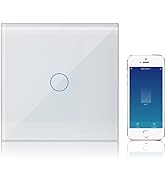
Image: A hand interacting with the thermostat's touch screen to adjust settings.
Mode Selection
Press the Manual Mode (Hand Icon) button to switch between Manual mode and Program mode. In Manual mode, the thermostat maintains a constant temperature. In Program mode, it follows the set weekly schedule.
7. Programming
The thermostat supports 5/2-day, 6/1-day, and 7-day programming, allowing up to 6 time periods and corresponding temperatures per day.
Setting the Program Schedule
Press the Menu Key (Book Icon) to enter programming mode. Use the UP (▲) and DOWN (▼) buttons to navigate through the periods and adjust time and temperature settings for each period. Confirm settings by pressing the Menu Key again or waiting for the display to time out.

Image: A table illustrating a 5+2 day programming schedule with different events, times, and temperatures for weekdays and weekends.
You can customize up to 6 events per day, setting specific times and temperatures to match your daily routine and energy-saving preferences.
8. Sensor Selection
The thermostat offers flexibility in temperature sensing:
- Internal Air Sensor: Measures the ambient room temperature.
- External Floor Sensor: Measures the temperature of the floor, preventing overheating and ensuring floor comfort.
You can configure the thermostat to use the internal sensor, the external sensor, or both (where the external sensor acts as a limit). Refer to the advanced settings in the full manual for detailed configuration steps.

Image: A close-up view of the thermostat highlighting the location of the internal air sensor slot at the bottom.
9. Child Lock Function
To prevent accidental changes to settings, especially by children, the thermostat includes a child lock feature.
Activating/Deactivating Child Lock
Typically, the child lock is activated or deactivated by pressing and holding a combination of buttons (e.g., UP and DOWN buttons simultaneously) for a few seconds. A lock icon will appear on the display when activated. Refer to the full manual for the exact button combination for your model.
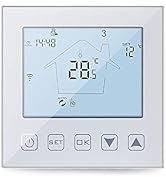
Image: An illustration showing a child reaching towards the thermostat, with a child lock symbol indicating the feature prevents accidental touching.
10. Maintenance
The KETOTEK thermostat requires minimal maintenance. To ensure its longevity and proper functioning:
- Cleaning: Wipe the screen and casing with a soft, dry cloth. Do not use abrasive cleaners, solvents, or chemical sprays, as these can damage the surface.
- Avoid Moisture: Keep the thermostat dry. Exposure to moisture can cause damage.
- Regular Checks: Periodically check the wiring connections to ensure they are secure, especially after initial installation.
11. Troubleshooting
If you encounter issues with your thermostat, refer to the following common problems and solutions:
| Problem | Possible Cause | Solution |
|---|---|---|
| Thermostat not powering on | No power supply; Incorrect wiring | Check circuit breaker; Verify wiring connections (consult an electrician if unsure) |
| Heating not turning on | Temperature setting too low; Thermostat in OFF mode; Wiring issue | Increase set temperature; Ensure thermostat is ON; Check heating load wiring |
| Inaccurate temperature reading | Sensor obstructed; Sensor faulty; Calibration needed | Ensure sensor is clear; Replace sensor if faulty; Perform temperature calibration (refer to manual) |
| Programming not working | Thermostat in Manual mode; Incorrect program settings | Switch to Program mode; Review and correct program schedule settings |
| Child lock engaged | Child lock activated accidentally | Deactivate child lock (refer to manual for specific button combination) |
If the problem persists after attempting these solutions, please contact KETOTEK customer support.
12. Specifications
| Feature | Specification |
|---|---|
| Brand | KETOTEK |
| Model Number | M9.716 (F0088) |
| Color | 16A Electric Underfloor Heating |
| Product Dimensions (L x W x H) | 8.5 x 3 x 9 cm; 300 grams |
| Power | 2300.00 W |
| Voltage | 230 Volts |
| Material | Acrylonitrile Butadiene Styrene (ABS) |
| Special Features | Frost Protection, Programmable |
| Item Weight | 300 g |
| Controller Type | Push Button |
| Specific Uses for Product | Heating |
| Temperature Control Type | Programmable |
| Connectivity Technology | Wi-Fi (Note: Product description states Wi-Fi, but main features do not emphasize it. Confirm model variant for Wi-Fi functionality.) |
| Power Source | Corded Electric |
| Country of Origin | China |

Image: Diagram showing the physical dimensions of the thermostat, including front face measurements and depth for installation.
13. Warranty and Support
KETOTEK stands behind the quality of its products. This thermostat comes with a 2-Year Warranty from the date of purchase.
For any questions, technical assistance, or warranty claims, please contact KETOTEK customer support. We offer 24/7 Services to assist you.
You can find contact information on the KETOTEK official website or through your purchase platform.
Image: KETOTEK brand banner displaying '2 Year Warranty' and '24/7 Services' badges, emphasizing customer commitment.