
1. Introduction
This manual provides essential information for the safe and effective installation, operation, and maintenance of the Carus Tool FUJI SC-N10 220V AC Contactor. Please read this manual thoroughly before using the product and retain it for future reference. This contactor is designed for controlling electrical circuits, typically for motors or other high-power loads.
2. Safety Information
WARNING: Electrical shock hazard. Installation and servicing should only be performed by qualified personnel. Failure to follow these instructions may result in serious injury or death.
- Always disconnect power before installing, servicing, or removing the contactor.
- Ensure all wiring complies with local and national electrical codes.
- Verify the voltage and current ratings of the contactor match the application requirements.
- Do not operate the contactor if it appears damaged.
- Use appropriate personal protective equipment (PPE) when working with electrical systems.
3. Product Overview
The FUJI SC-N10 Contactor is an electromechanical switching device used for making and breaking electrical power circuits. It is rated for 220V AC applications and is designed for reliable performance in industrial and commercial settings.
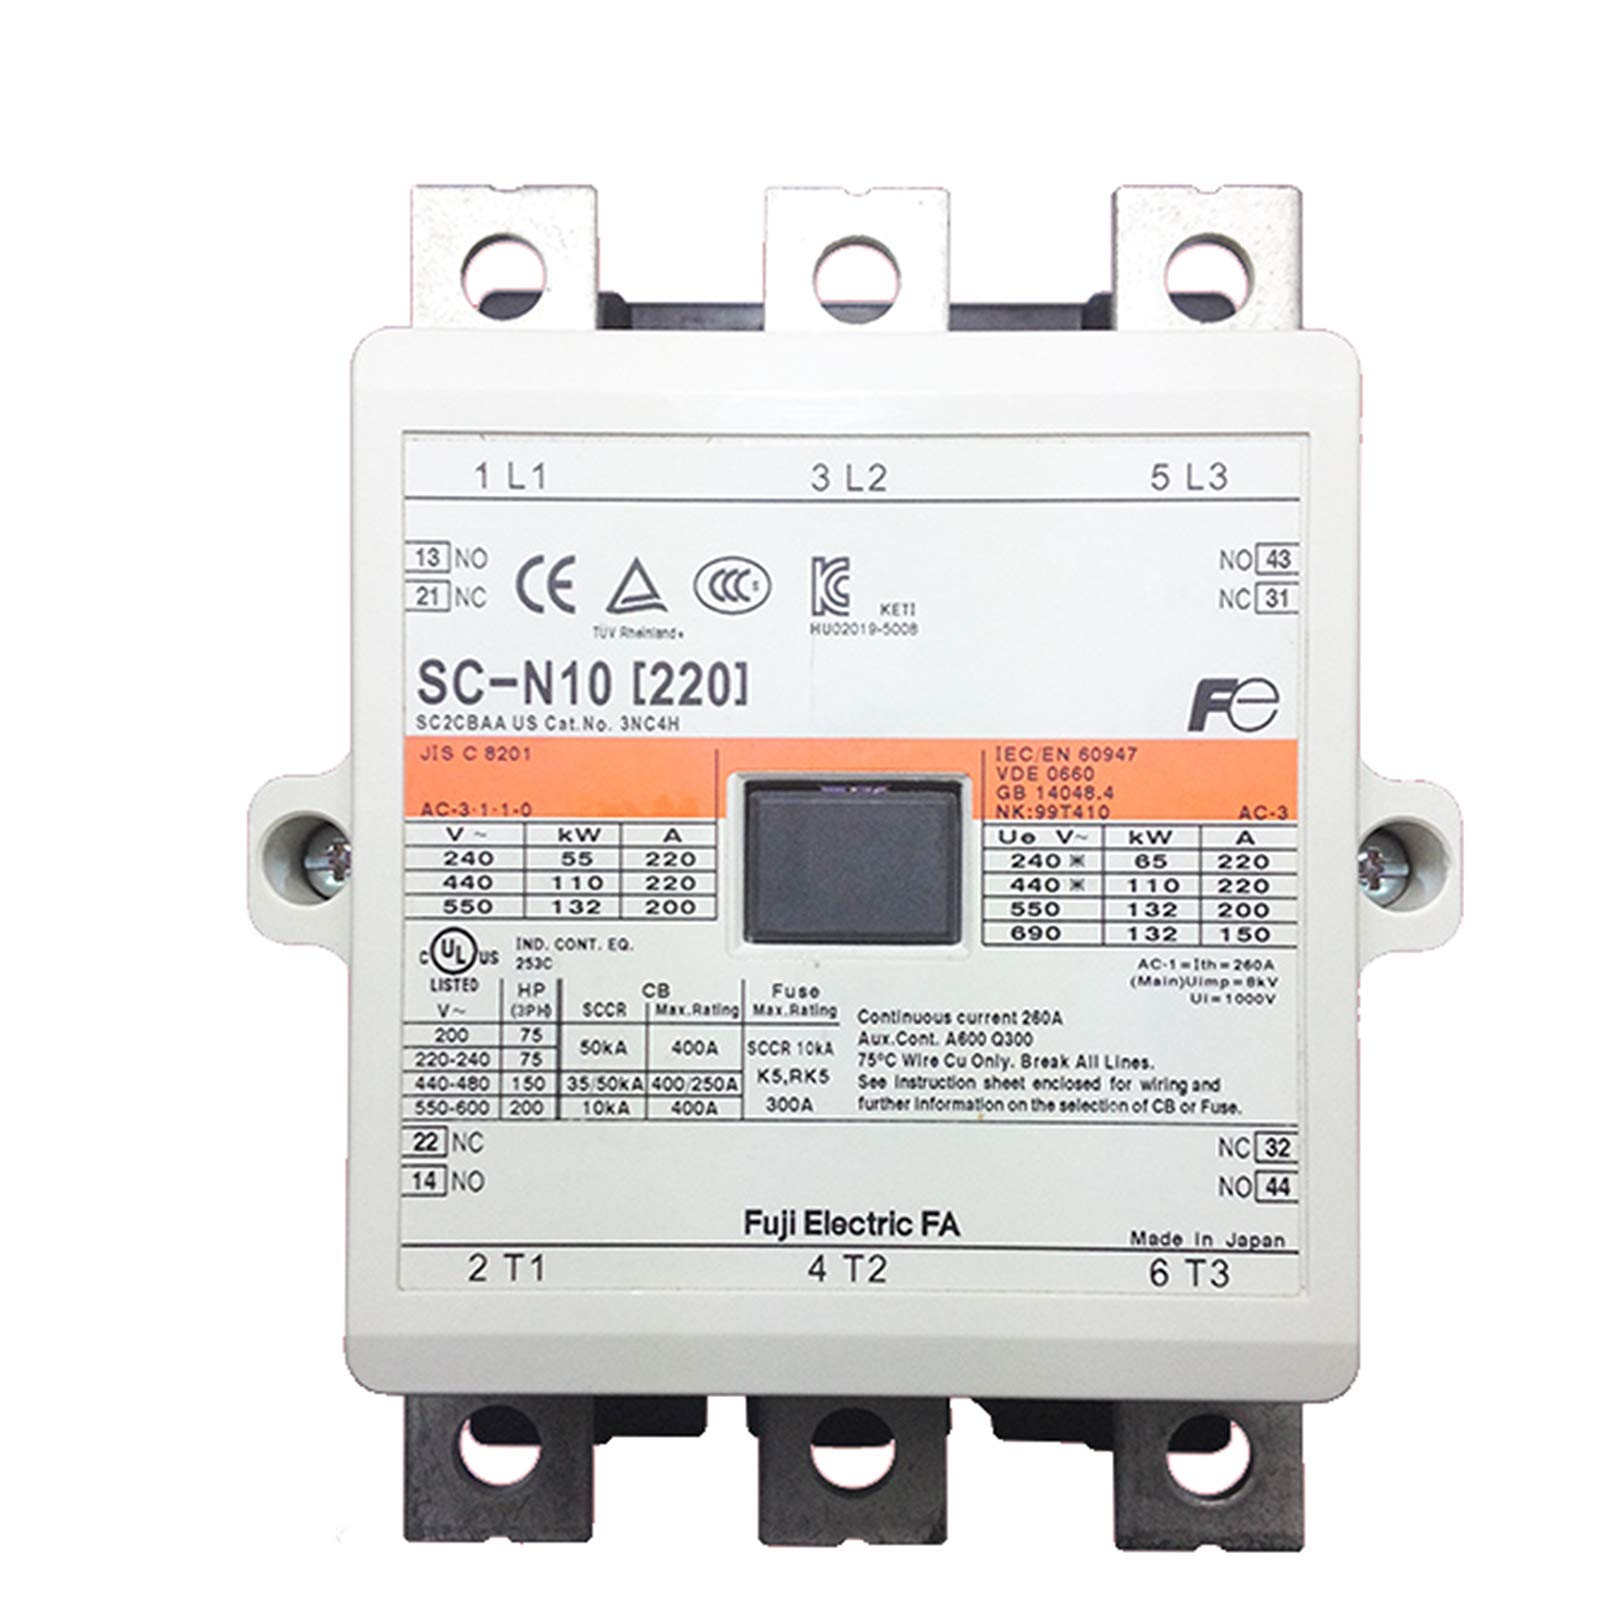
Figure 1: FUJI SC-N10 Contactor 220V AC. This image displays the compact electrical device with clearly labeled terminals and specifications printed on its top surface. The main body is off-white, mounted on a black base with metal connection points for electrical connections.
4. Setup and Installation
Follow these steps for proper installation of the FUJI SC-N10 Contactor:
- Power Disconnection: Ensure all power to the circuit is disconnected and locked out before beginning installation. Verify with a voltage tester.
- Mounting: Mount the contactor securely in a suitable enclosure, ensuring adequate ventilation and clearance for wiring. Use appropriate fasteners for the mounting holes provided on the contactor base.
- Wiring Main Power: Connect the incoming 220V AC power supply to the main power terminals (L1, L2, L3) of the contactor.
- Wiring Load: Connect the load (e.g., motor) to the output terminals (T1, T2, T3) of the contactor.
- Control Circuit Wiring: Connect the control circuit wiring to the coil terminals (A1, A2) of the contactor. Ensure the control voltage matches the coil voltage rating (220V AC for this model).
- Auxiliary Contacts (if applicable): If auxiliary contacts are used, connect them according to your control circuit diagram.
- Verification: Double-check all wiring connections for tightness and correctness according to the wiring diagram of your system.
- Power Restoration: Once all connections are verified, restore power to the circuit.
5. Operating Instructions
The FUJI SC-N10 Contactor operates by energizing its coil, which closes the main power contacts, allowing current to flow to the connected load. De-energizing the coil opens the contacts, interrupting the power flow.
- Energizing the Coil: Apply 220V AC to the coil terminals (A1, A2) to close the main contacts. A distinct click sound indicates the contacts have closed.
- De-energizing the Coil: Remove the 220V AC supply from the coil terminals (A1, A2) to open the main contacts. The click sound will indicate the contacts have opened.
- Indicator: Some contactors may have a visual indicator to show the status of the contacts (open/closed). Refer to the specific markings on your unit.
6. Maintenance
Regular maintenance helps ensure the longevity and reliable operation of your contactor.
- Inspection: Periodically inspect the contactor for signs of wear, damage, or overheating (discoloration). Check for loose connections.
- Cleaning: Keep the contactor free from dust, dirt, and moisture. Use a dry, clean cloth for cleaning. Do not use solvents.
- Terminal Tightness: Ensure all terminal screws are tight. Loose connections can lead to overheating and component failure.
- Contact Wear: While contacts are generally self-cleaning, excessive arcing or pitting may indicate an issue with the load or control circuit. If severe wear is observed, the contactor may need replacement.
- Operating Environment: Ensure the operating environment remains within the specified temperature and humidity ranges.
NOTE: Always disconnect power before performing any maintenance.
7. Troubleshooting
This section addresses common issues you might encounter with the contactor.
| Problem | Possible Cause | Solution |
|---|---|---|
| Contactor does not energize (no click) | No control voltage to coil; Incorrect coil voltage; Damaged coil; Loose wiring. | Check control circuit power supply; Verify coil voltage matches supply; Test coil resistance; Inspect and tighten wiring connections. |
| Contactor energizes but load does not receive power | Main contacts are not closing; Open circuit in load wiring; Overload protection tripped. | Inspect main contacts for damage; Check continuity of load wiring; Reset overload relay if applicable. |
| Contactor hums excessively or overheats | Incorrect coil voltage; Loose mounting; Foreign material in magnet assembly; Excessive load. | Verify coil voltage; Ensure secure mounting; Clean magnet faces; Check load current against contactor rating. |
| Contactor fails to de-energize | Control voltage not removed; Contacts welded shut; Mechanical binding. | Check control circuit for continuous voltage; Replace contactor if contacts are welded; Inspect for mechanical obstructions. |
8. Specifications
| Attribute | Value |
|---|---|
| Model Number | SC-N10 220V |
| Manufacturer | Carus Tool |
| Part Number | SC-N10 220V |
| Material | Metal |
| Item Package Quantity | 1 |
| Number Of Pieces | 1 |
| ASIN | B082WVQ6ZF |
| Date First Available | December 19, 2019 |
9. Warranty and Support
For warranty information or technical support regarding your Carus Tool FUJI SC-N10 220V AC Contactor, please contact the seller or manufacturer directly. Keep your purchase receipt for warranty claims.
Seller: Carus Tool
Refer to the product packaging or original purchase documentation for specific contact details and warranty terms.