UpStart Components AP-W10083957V-DL3277
User Manual: W10083957V 4-Blade Dishwasher Chopper Assembly
Model: AP-W10083957V-DL3277 | Brand: UpStart Components
1. Product Overview
This manual provides instructions for the installation, operation, and maintenance of the UpStart Components W10083957V 4-Blade Dishwasher Chopper Assembly. This replacement part is designed to be compatible with various dishwasher models, including the Maytag MDB7759AWW2, and functions to effectively chop food particles during the wash cycle, preventing clogs and ensuring proper drainage.

Figure 1: UpStart Components W10083957V 4-Blade Dishwasher Chopper Assembly, showing the product with the UpStart Components branding.
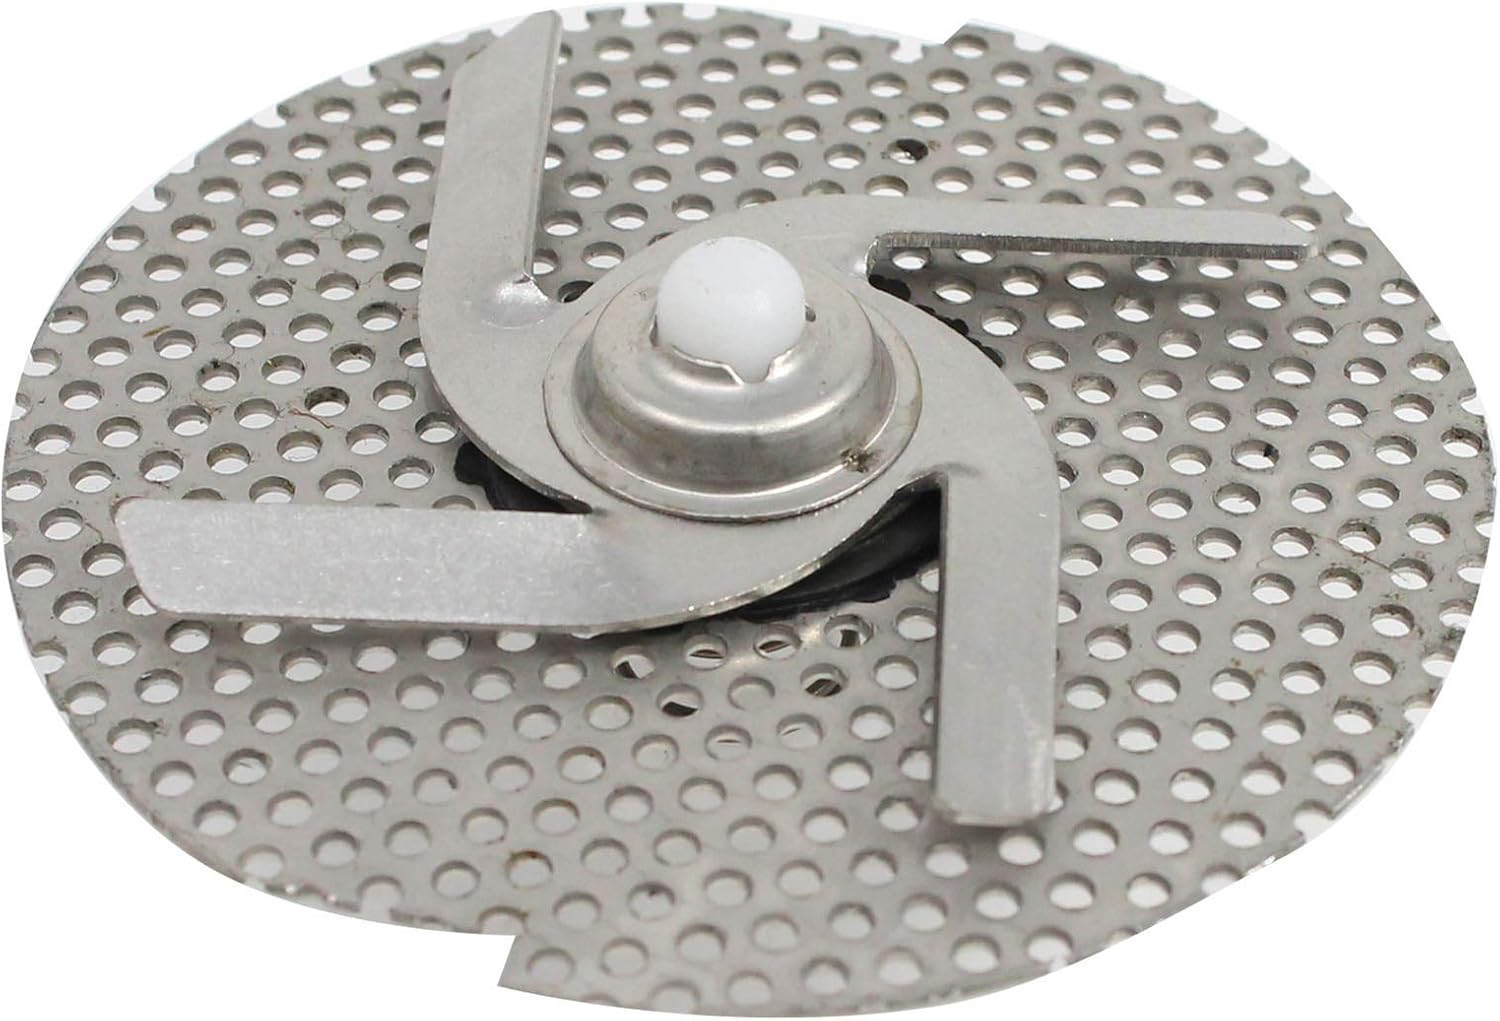
Figure 2: A detailed view of the W10083957V dishwasher chopper assembly, highlighting the four stainless steel blades and the central white spindle mechanism.
2. Safety Information
Always prioritize safety when working with appliances. Failure to follow these safety guidelines may result in injury or damage to property.
- Disconnect Power: Before attempting any installation, maintenance, or repair, always disconnect the dishwasher from its power source. Turn off the circuit breaker or unplug the appliance.
- Wear Protective Gear: Wear appropriate personal protective equipment, such as gloves and eye protection, to prevent injury from sharp edges or debris.
- Consult a Professional: If you are unsure about any step or uncomfortable performing the installation yourself, consult a qualified appliance technician.
- Handle with Care: The chopper blades are sharp. Handle the assembly carefully to avoid cuts.
- Proper Disposal: Dispose of old parts responsibly according to local regulations.
3. Installation
This section outlines the general steps for replacing the dishwasher chopper assembly. Specific steps may vary slightly depending on your dishwasher model. Refer to your dishwasher's service manual for detailed instructions if needed.
3.1 Tools Required
- Screwdriver (Phillips and/or Flathead)
- Pliers (optional)
- Gloves
3.2 Installation Steps
- Disconnect Power: Ensure the dishwasher is completely disconnected from the electrical supply.
- Access the Chopper Assembly:
- Open the dishwasher door and remove the lower dish rack.
- Locate the wash arm assembly at the bottom of the dishwasher. You may need to remove the lower spray arm and its retaining nut/cap.
- Carefully remove the filter screen and any other components covering the sump area where the chopper assembly is located.
- Remove the Old Chopper Assembly:
- The chopper assembly is typically held in place by clips, screws, or a twist-lock mechanism. Observe how the old part is secured.
- Carefully detach the old chopper assembly. Note its orientation for correct installation of the new part.
- Clean any debris or food particles from the sump area before installing the new part.
- Install the New Chopper Assembly:
- Align the new W10083957V chopper assembly with the mounting points in the dishwasher sump.
- Ensure it is seated correctly and securely fastened. If there are clips, ensure they snap into place. If there are screws, tighten them appropriately (do not overtighten).

Figure 3: Top view of the W10083957V chopper assembly, illustrating the perforated disc and the four-blade design, crucial for proper alignment during installation.

Figure 4: Bottom view of the W10083957V chopper assembly, revealing the spindle and the mechanism used for securing the part within the dishwasher sump.
- Reassemble Components: Reinstall the filter screen, spray arm, and any other components that were removed, ensuring they are properly seated and secured.
- Restore Power and Test: Close the dishwasher door, restore power to the appliance, and run a short cycle to ensure the new chopper assembly is functioning correctly and there are no leaks or unusual noises.
4. Operation
The W10083957V 4-Blade Dishwasher Chopper Assembly is an integral part of your dishwasher's filtration and drainage system. During the wash cycle, water containing food particles is directed through the chopper assembly. The rotating blades within the assembly break down larger food debris into smaller, more manageable particles that can be safely flushed away with the drain water. This process helps prevent clogs in the drain pump and lines, ensuring efficient and hygienic dishwasher operation.
No direct user interaction is required for the operation of this component once installed. Its function is automatic as part of the dishwasher's normal cycle.
5. Maintenance
Regular maintenance of your dishwasher, including the chopper assembly, can extend the life of your appliance and ensure optimal performance.
- Regular Cleaning: Periodically inspect the dishwasher sump area, including the chopper assembly and filter screen, for accumulated food debris. Remove any large particles by hand (wearing gloves) or with a soft brush.
- Avoid Large Debris: While the chopper assembly is designed to handle food particles, pre-scraping plates to remove large bones, fruit pits, or other hard, non-food items can reduce strain on the chopper and prevent damage.
- Dishwasher Cleaner: Use a dishwasher cleaner product monthly to help dissolve grease and mineral buildup that can affect the performance of internal components, including the chopper.
- Inspect for Wear: During cleaning, visually inspect the chopper blades for signs of excessive wear, bending, or damage. If significant wear is observed, replacement may be necessary.
6. Troubleshooting
If you experience issues with your dishwasher after installing the new chopper assembly, consider the following common problems and solutions:
| Problem | Possible Cause | Solution |
|---|---|---|
| Dishwasher not draining properly / Food particles left after cycle | Chopper assembly clogged or damaged; filter screen clogged. |
|
| Unusual noise during wash cycle (grinding, rattling) | Foreign object caught in chopper; chopper assembly loose or damaged. |
|
| Dishwasher not cleaning dishes effectively | Clogged chopper assembly affecting water circulation; other dishwasher issues. |
|
If troubleshooting steps do not resolve the issue, it is recommended to contact a qualified appliance repair technician.
7. Specifications
Key specifications for the W10083957V 4-Blade Dishwasher Chopper Assembly:
- Part Number: W10083957V
- Compatible Part Numbers: AP5983779, WP8268383, 8268383, W10083957, PS11722146, W10083957VP, WP8268383VP
- Blades: 4-Blade design
- Material: Ultra durable, high quality material (as per product description)
- Compatibility: Designed for various dishwasher models, including Maytag MDB7759AWW2. Please verify compatibility with your specific appliance model before purchase.
- Manufacturer: UpStart Components
- Model Number (Internal): AP-W10083957V-DL3277
8. Warranty & Support
8.1 Warranty Information
This product is an UpStart Components Brand replacement part. Any warranties for this product are offered solely by UpStart Components. This product is not affiliated with any original equipment manufacturer (OEM) brands and is not covered under any warranties offered by the original manufacturers of the appliances it is compatible with. For specific warranty terms and conditions, please refer to the documentation provided with your purchase or contact UpStart Components directly.
8.2 Customer Support
For technical assistance, questions regarding installation, or warranty claims, please contact UpStart Components customer support. Contact information can typically be found on the product packaging or the seller's website where the product was purchased.
Related Documents - AP-W10083957V-DL3277
 |
Wood-Mizer Sawmill LT30/LT40 Parts Manual Comprehensive parts manual for Wood-Mizer Sawmill models LT30 and LT40, covering assemblies, components, and ordering information. Includes detailed diagrams and part numbers for efficient maintenance and repair. |
 |
BOSS Snowplow Central Hydraulics Setup Guide Comprehensive guide for BOSS Snowplow owners on setting up central hydraulics, detailing 3rd party sandwich valve requirements, component compatibility, wiring, and system specifications. |
 |
Whirlpool, KitchenAid, and Maytag 24" Microfiltration Dishwashers Technical Manual This technical manual provides service professionals with detailed information, diagnostics, troubleshooting, and component testing procedures for Whirlpool, KitchenAid, and Maytag 24-inch microfiltration dishwashers. |
 |
CASE CX80C Excavator Dozer Blade - Specifications and Performance Detailed specifications, performance data, and lift capacities for the CASE CX80C Excavator with Dozer Blade, Tier 4 Final Certified. Includes engine, drivetrain, hydraulics, operator environment, dimensions, and equipment details. |
 |
Kubota Trip Edge Blade AP-TE3596 & AP-TE35108 Operator's Manual Comprehensive operator's manual for the Kubota Trip Edge Blade models AP-TE3596 and AP-TE35108, covering safety, assembly, operation, maintenance, troubleshooting, specifications, and warranty information. |
 |
Valberg Dishwasher Spare Parts Exploded View Diagram Detailed exploded view diagrams of Valberg dishwasher spare parts, including part numbers and component identification for models EUR LV N°7. Find replacement parts for your Valberg dishwasher. |
Ask a question about this manual
Ask about setup, troubleshooting, compatibility, parts, safety, or missing instructions. Manuals+ will review the question and use this page’s manual context to help answer it.