1. Introduction
This manual provides comprehensive instructions for the installation, operation, and maintenance of your Xprite Smoked C-Shaped LED Tail Lights. These tail lights are designed to enhance visibility and functionality for compatible vehicles.
Compatibility: These tail lights are compatible with 2007-2018 Jeep Wrangler JK and JKU 2/4-door models (US models only, requiring a male vehicle connector). They are not designed for Euro versions.

Image: Xprite Smoked C-Shaped LED Tail Lights, showing both the product and its appearance when installed on a Jeep Wrangler JK.
2. Safety Information
- Always disconnect the vehicle's battery before performing any electrical work.
- Ensure all connections are secure to prevent electrical shorts or malfunctions.
- If you are unsure about any installation step, consult a qualified automotive technician.
- Verify local regulations regarding vehicle lighting before installation.
3. Package Contents
Please verify that all items are present in the package:
- 2 x Xprite C-Shaped LED Tail Lights
4. Specifications
| Feature | Specification |
|---|---|
| LED Chips | OSRAM |
| Lamp Cup Material | PMMA+PC |
| Lifespan | Over 50,000 hours |
| Waterproof Rate | IP67 |
| Input Voltage | 9-16V |
| Power | 20W (Reversing Design) |
| Certification | DOT Approved |
| Lens Color | Smoke |
| Housing Material | ABS |
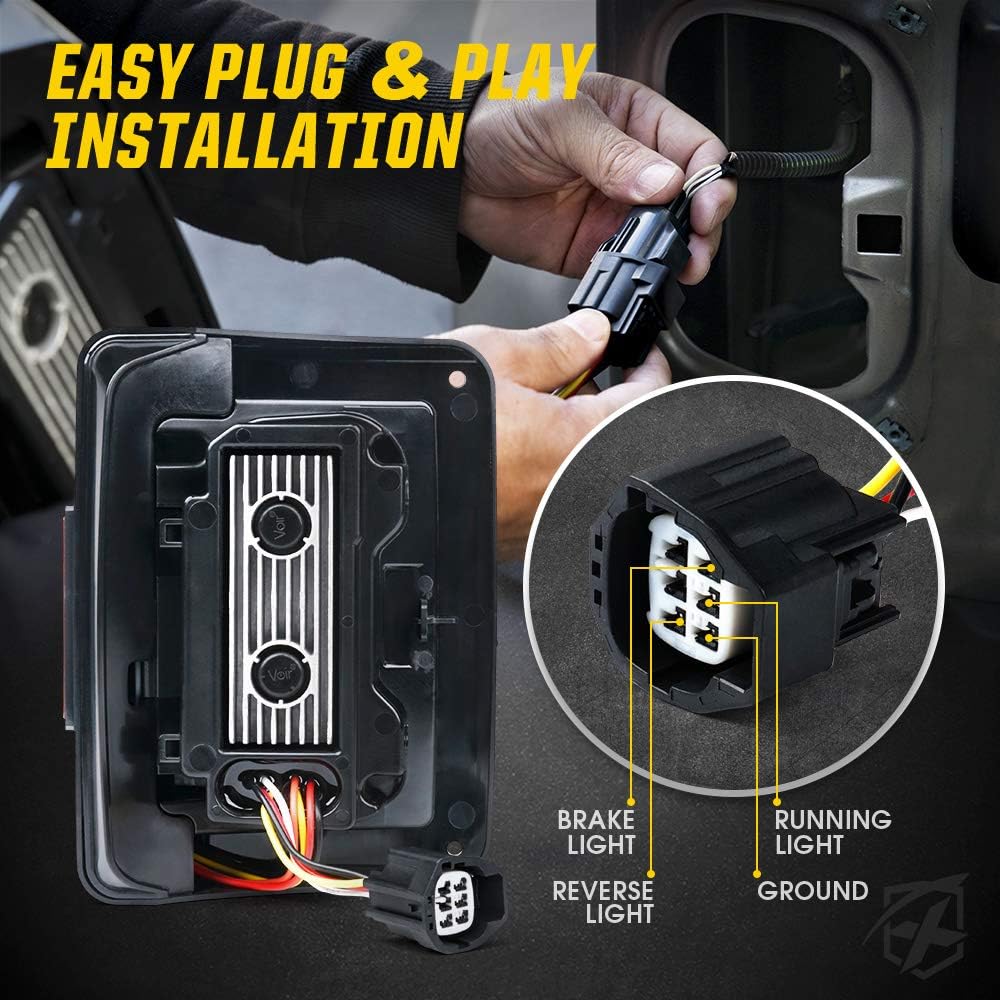
Image: Key product specifications for the Xprite LED Tail Lights.
5. Installation Instructions
The installation process is designed to be plug-and-play, typically taking less than 10 minutes per light. No modifications to existing vehicle parts are required.
- Prepare the Vehicle: Park your Jeep on a level surface and engage the parking brake. Turn off the ignition and remove the key. For safety, disconnect the negative terminal of the vehicle's battery.
- Remove Existing Tail Lights: Locate the screws securing the factory tail light assembly. Carefully remove these screws. Gently pull the tail light assembly away from the vehicle body. Disconnect the electrical connector by pressing the release tab and pulling apart.
- Identify Left and Right Units: Note that the Xprite LED Tail Lights are specific to the left and right sides of the vehicle. The electrical connector on the light side should be positioned towards the bottom of the unit when installed correctly. Incorrect orientation may result in a gap between the light and the vehicle body.
- Connect New Tail Lights: Connect the electrical harness of the new Xprite LED Tail Light to the vehicle's existing connector. Ensure the connection is firm and secure.
- Mount New Tail Lights: Align the new tail light assembly with the mounting holes on the vehicle body. Gently push it into place. Secure the tail light with the original screws. Do not overtighten.
- Repeat for Other Side: Follow steps 2-5 for the other tail light.
- Test Functionality: Reconnect the vehicle's battery. Turn on the ignition and test all light functions: running lights, brake lights, turn signals, and reverse lights.

Image: Connecting the plug-and-play wiring harness during installation.

Image: Rear view of the tail light, highlighting the ribbed design for cooling and the wiring connection point.
6. Operating Instructions
The Xprite Smoked C-Shaped LED Tail Lights integrate three primary lighting functions:
- Running Lights (Red): These illuminate when your vehicle's headlights or parking lights are on, providing continuous rear visibility.
- Brake/Turn Lights (Red): These activate with increased intensity when the brake pedal is pressed or when the turn signal is engaged, clearly indicating braking or directional changes.
- Reverse Lights (White): These bright white lights activate when the vehicle is shifted into reverse, providing illumination for backing up.

Image: Visual representation of the Reverse, Running, and Brake light functions.
Video: Demonstration of the Xprite Smoked C-Shaped LED Tail Lights installed on a Jeep Wrangler JK, showcasing the running, brake, and reverse light functions.
7. Maintenance
These LED tail lights are designed for durability and minimal maintenance. The IP67 waterproof rating ensures protection against dust and water ingress.
- Cleaning: Clean the lens with a soft cloth and mild soap and water. Avoid abrasive cleaners or solvents that could damage the lens material.
- Inspection: Periodically inspect the lights for any physical damage or loose connections.
- Moisture Release: The lights feature dual breathing holes designed to release moisture, preventing condensation buildup inside the lens. Ensure these holes are not obstructed.

Image: The tail light demonstrating its waterproof capabilities.
8. Troubleshooting
- Lights Not Functioning:
- Check all electrical connections to ensure they are securely plugged in.
- Verify that the vehicle's fuses related to the tail lights are intact.
- Ensure the vehicle's battery is properly connected and charged.
- Flickering Issues: The lights are built with an EMC (Electromagnetic Compatibility) chip to prevent flickering. If flickering occurs, ensure the vehicle's electrical system is stable and connections are secure.
- Condensation Inside Lens: While the lights have breathing holes for moisture release, extreme temperature changes can sometimes cause temporary condensation. If persistent, ensure breathing holes are clear and check for any cracks in the housing.
- Improper Fit: If there is a noticeable gap between the light and the vehicle body, ensure the correct left/right unit is installed and oriented with the connector at the bottom.
9. Warranty and Support
Warranty information for Xprite products is typically provided at the point of purchase or on the official Xprite website. Please retain your proof of purchase for warranty claims.
For technical assistance, troubleshooting beyond this manual, or warranty inquiries, please contact Xprite customer support through their official website or the retailer where the product was purchased.