1. Introduction
This manual provides essential information for the safe and efficient operation of your TROTEC TRH 26 E Oil Radiator. Please read these instructions carefully before first use and keep them for future reference. This oil radiator is designed to provide supplementary heating for indoor spaces, offering adjustable heat output and convenient control features.

Image 1.1: The TROTEC TRH 26 E Oil Radiator, a portable heating unit with 11 fins, a digital control panel, and wheels for easy movement.
2. Safety Instructions
Always observe the following safety precautions to prevent injury or damage to the appliance.
- Ensure the radiator is placed on a stable, level surface to prevent tipping.
- Do not cover the radiator, as this can lead to overheating and fire hazards.
- Keep flammable materials (curtains, furniture, paper) at a safe distance from the appliance.
- Do not operate the radiator near water or in damp environments.
- Always unplug the radiator when not in use or before cleaning.
- Do not insert objects into the radiator's openings.
- This appliance is equipped with an Overheat Protection feature that automatically shuts off the unit if it becomes too hot.
- An integrated Tilt Switch will automatically disable the device if it tips over, enhancing safety.
- Ensure the power cable is not a tripping hazard. Utilize the integrated cable reel for tidy storage.
- Supervise children and pets when the radiator is in operation.
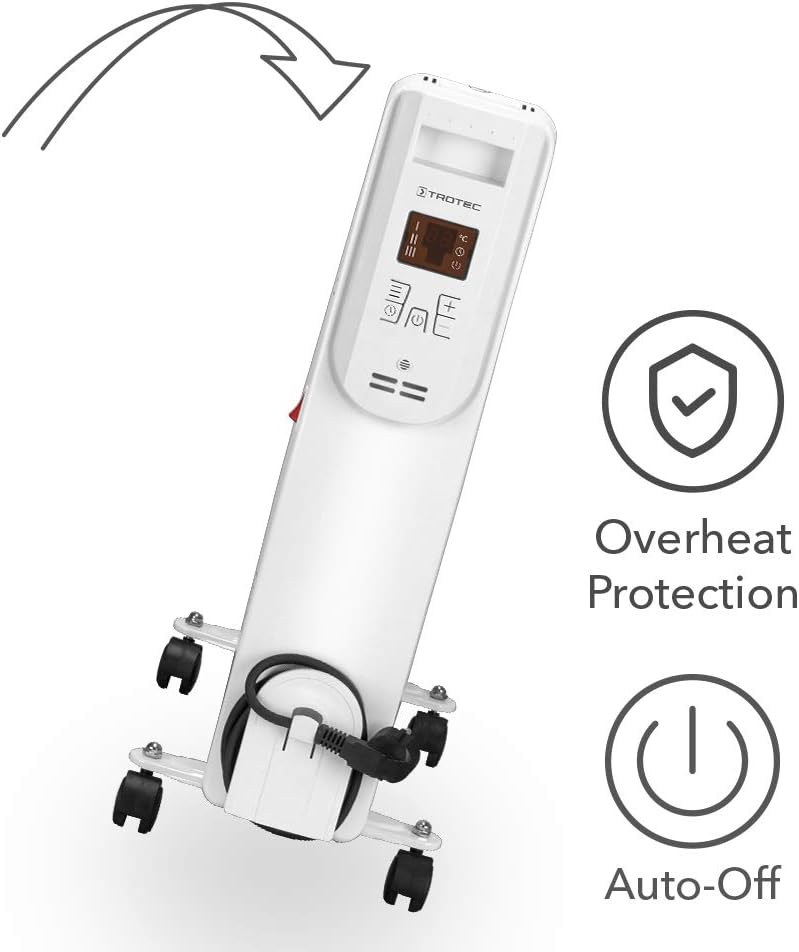
Image 2.1: Illustration of the radiator's tilt protection feature, showing the unit automatically powering off if it falls over.
3. Package Contents
Verify that all items are present upon unpacking:
- TROTEC TRH 26 E Oil Radiator
- Remote Control
- Wheel Set (4 wheels with mounting hardware)
- User Manual
4. Product Overview
Familiarize yourself with the components of your TRH 26 E Oil Radiator.

Image 4.1: Overview of the TROTEC TRH 26 E, highlighting key features such as room coverage (30m²/75m³), 3 power settings, IP20 protection, overheat protection, and silent operation.
Main Components:
- Heating Fins (11 Ribs): The primary heat-emitting surfaces.
- Control Panel: Digital display and buttons for operation.
- Power Switch: Main on/off switch, typically located on the side.
- Wheels: For easy mobility.
- Integrated Cable Reel: For convenient power cord storage.

Image 4.2: Close-up view of the integrated cable reel on the TROTEC TRH 26 E, designed for neat storage of the power cord.
5. Setup and Assembly
5.1 Attaching the Wheels
- Carefully invert the radiator, ensuring it is stable.
- Attach the wheel brackets to the base of the radiator using the provided screws.
- Insert the wheels into the brackets until they click into place.
- Return the radiator to an upright position.
5.2 Placement
- Place the radiator on a firm, level surface.
- Ensure adequate clearance around the unit for proper air circulation (minimum 50 cm from walls and furniture).
- Do not place directly under a power outlet.
- The radiator is suitable for indoor use only.
6. Operating Instructions
6.1 Powering On/Off
- Plug the power cord into a suitable electrical outlet.
- Flip the main power switch (usually red) on the side of the unit to the "ON" position.
- Press the power button on the control panel or remote control to activate the heating function.
- To turn off, press the power button again, then flip the main power switch to "OFF" and unplug the unit.
6.2 Setting Heat Levels
The TRH 26 E offers three heat levels: 1000W, 1500W, and 2500W.
- Use the mode or power level button on the control panel or remote to cycle through the available power settings.
- The selected power level will be indicated on the LCD display.
6.3 Temperature Control
The digital thermostat allows you to set a desired room temperature between 15°C and 35°C.
- Press the "Temperature" button (often marked with +/- or a thermometer icon) on the control panel or remote.
- Use the "+" and "-" buttons to adjust the target temperature.
- The radiator will automatically regulate its heat output to maintain the set temperature, turning off when the target is reached and restarting if the temperature drops.

Image 6.1: Visual representation of the TROTEC TRH 26 E radiating heat into a room, illustrating its function in warming the surrounding air.
6.4 Timer Function
The 12-hour timer can be programmed in 1-hour increments to automatically turn the radiator on or off.
- Press the "Timer" button on the control panel or remote.
- Use the "+" and "-" buttons to set the desired duration (in hours) for the radiator to operate before automatically shutting off, or to set a delay before it turns on.
- The timer setting will be displayed on the LCD.
6.5 Remote Control Usage
The remote control provides convenient access to all functions from a distance.
- Ensure the remote control has working batteries.
- Point the remote control towards the radiator's control panel.
- Buttons on the remote typically mirror those on the main control panel for power, mode, temperature adjustment, and timer.
7. Maintenance
7.1 Cleaning
- Always unplug the radiator and allow it to cool completely before cleaning.
- Wipe the exterior surfaces with a soft, damp cloth. Do not use abrasive cleaners or solvents.
- Ensure no water enters the internal components.
- Dust can be removed from the fins using a soft brush or vacuum cleaner with a brush attachment.
7.2 Storage
- If storing the radiator for an extended period, clean it thoroughly.
- Wrap the power cord around the integrated cable reel.
- Store the unit in a cool, dry place, away from direct sunlight and moisture.
8. Troubleshooting
| Problem | Possible Cause | Solution |
|---|---|---|
| Radiator does not turn on. | No power, main switch off, power button not pressed, overheat protection activated. | Check power connection, ensure main switch is ON, press power button, allow unit to cool if overheated. |
| Radiator is on but not heating. | Temperature setting too low, power level too low, thermostat reached target temperature. | Increase target temperature, select a higher power level, wait for room temperature to drop. |
| Remote control not working. | Dead batteries, obstruction, too far from unit. | Replace batteries, remove obstructions, move closer to the radiator. |
| Unit tips over and shuts off. | Tilt switch activated. | Place the radiator upright on a stable surface. It should resume operation automatically. |
9. Specifications

Image 9.1: Diagram showing the dimensions of the TROTEC TRH 26 E (550mm height, 470mm width, 120mm depth) and its three power settings (1000W, 1500W, 2500W).
| Feature | Detail |
|---|---|
| Model | TRH 26 E |
| Brand | TROTEC |
| Power Output | 1000W / 1500W / 2500W (3 levels) |
| Voltage | 230 V |
| Number of Ribs | 11 |
| Temperature Range | 15°C - 35°C |
| Timer | 12-hour (1-hour increments) |
| Recommended Room Size | Up to 30 m² / 75 m³ |
| Dimensions (Product) | 24 x 69 x 2.5 cm (as per product data) |
| Dimensions (Approximate, with wheels) | Height: 550 mm, Width: 470 mm, Depth: 120 mm (from image) |
| Weight | 250 g |
| Special Features | Overheat Protection, Tilt Switch Auto-Off, Remote Control, Digital Thermostat, Integrated Cable Reel, Smooth-running Wheels |
| IP Protection | IP20 |
Note: Specifications are subject to change without notice. The listed weight of 250g may refer to a component or packaging, not the entire unit.
10. Warranty and Support
For warranty information and technical support, please refer to the warranty card included with your product or visit the official TROTEC website. Keep your proof of purchase for any warranty claims.
For further assistance, contact TROTEC customer service through their official channels.